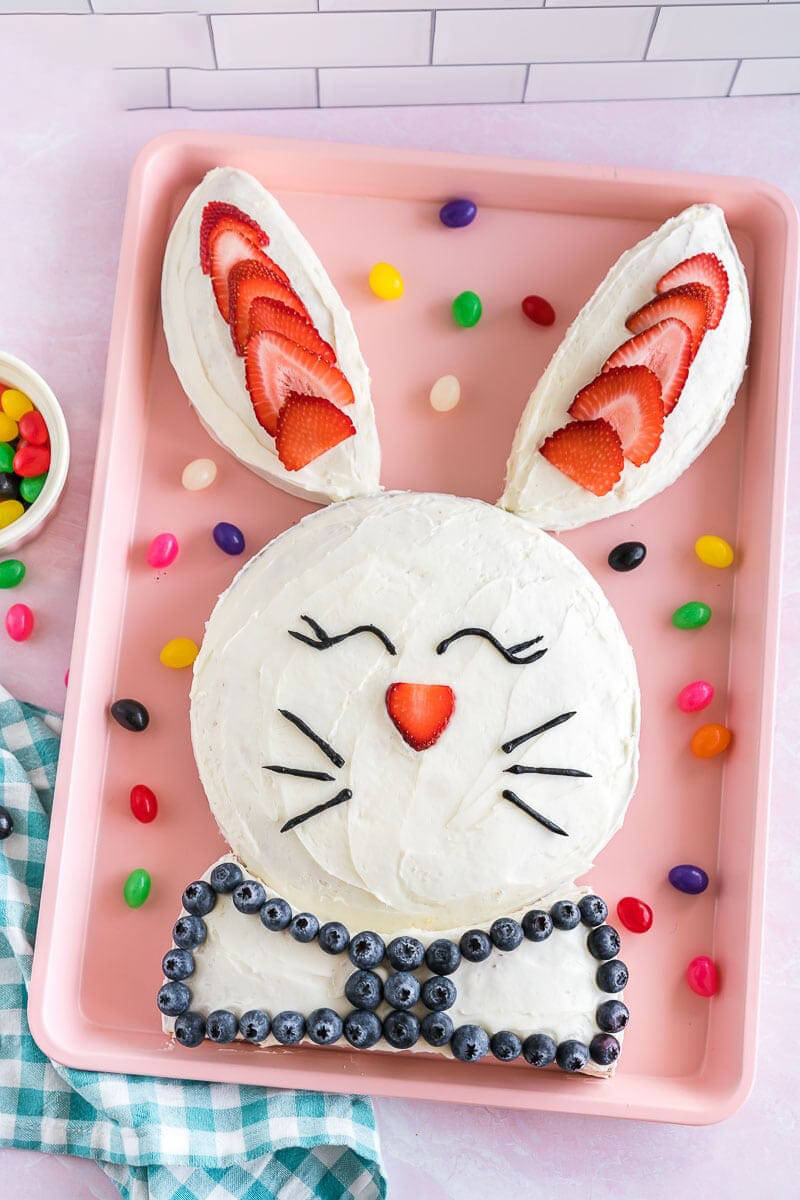
This Easter bunny cake is delicious as it is adorable! Find out how to make this fun cake at home.

I love this easy bunny cake recipe! You do not have to be a professional baker to make this delicious dessert that will also look amazing on your Easter table. Even my kids love to get in on the fun. Start with a store-bought cake mix, add some frosting and sliced fruit and you are done!
It is so simple to gather all the pantry staples and make this cake in just a few hours. Take your decorating skills to the next level with a few berries and some icing. Create this cute bunny cake for your friends and family this Easter season!
Table Of Contents
Ingredients for Bunny Cake
It is so simple to make this bunny cake from scratch or using a box mix! Either way, the flavor and bunny shape will be perfect. Wait until you see the smiles on everyone’s faces when they see your beautiful bunny cake!
- Yellow Cake Mix – Of course, you can make a cake from scratch, but for convenience, I like to use a yellow cake mix.
- Water – The water adds moisture to the cake batter.
- Oil – Oil is another ingredient that adds moisture to the batter.
- Eggs – Eggs make your cake light and fluffy.
- Frosting – Again, homemade frosting works for this cake, but I used two containers of store-bought vanilla frosting.
- Decorations – For this cake I used sliced strawberries, blueberries, and a bag of black decorating icing.
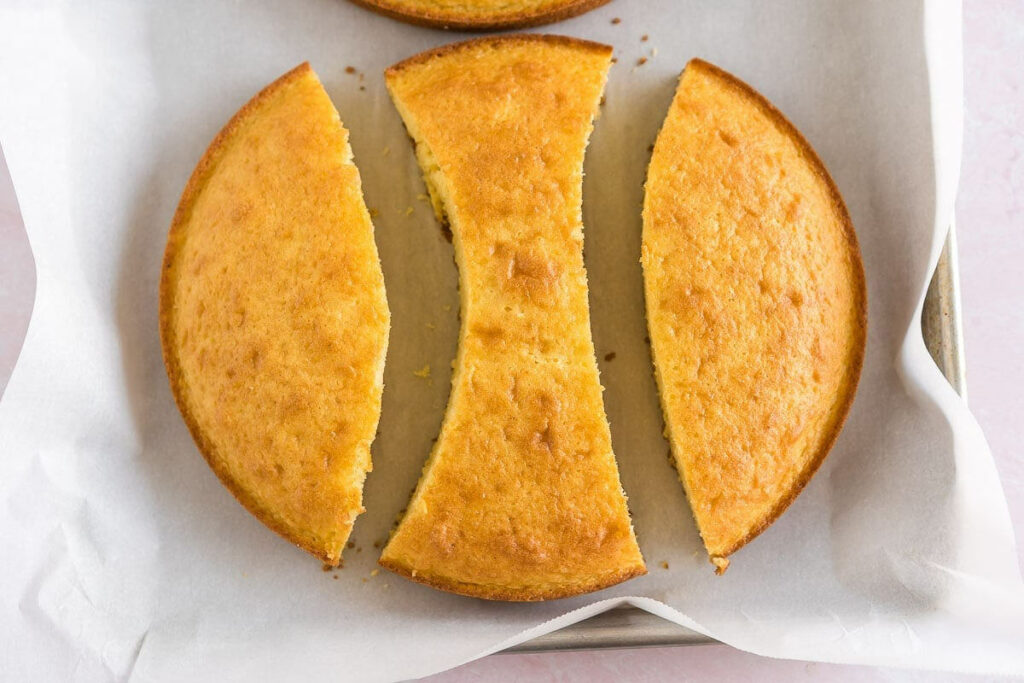
How to Cut a Bunny-Shaped Cake
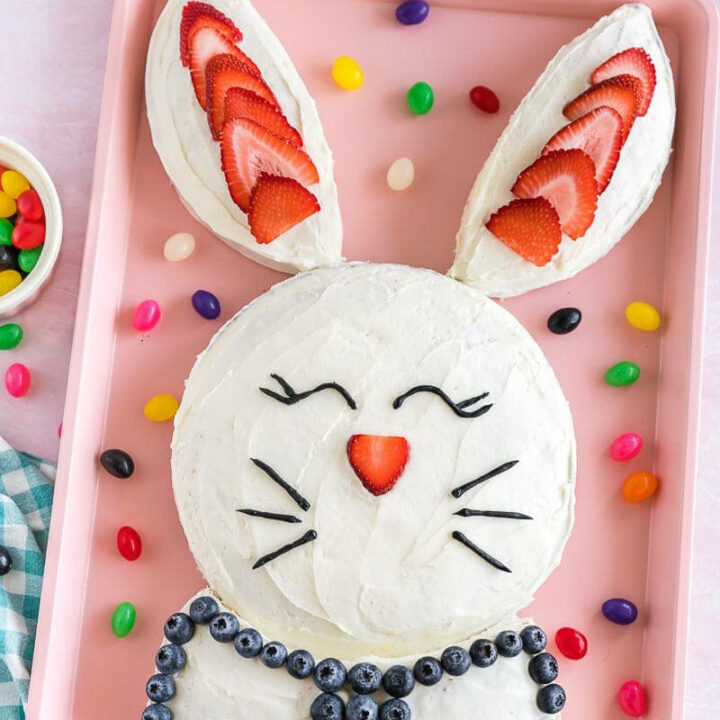
To make a bunny-shaped cake, once the cake is out of the oven and completely cooled. I cut one of the cake rounds into three pieces. It creates two outside pieces shaped like bunny ears and a middle piece shaped like a bow tie. I have also seen the bowtie piece used as a hair bow.
- Combine – Add cake mix, water, oil, and eggs to a large bowl and mix until combined. Pour into two 8-inch round cake pans and bake for 25-30 minutes, or until a toothpick inserted in the middle comes out clean.
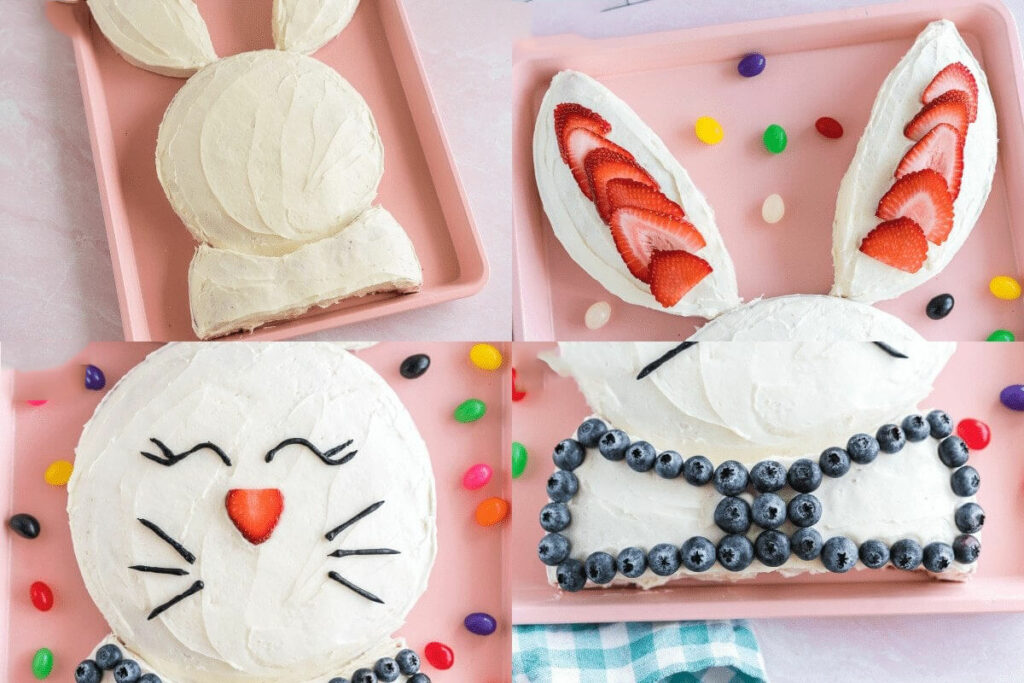
- Cut cake – Once the cakes are cooled and are at room temperature, cut one cake as pictured. The two outside pieces will be the ears and the middle piece will be the bowtie. Arrange the cake pieces on a large pan or platter.
- Frosting – Frost all of the cake including the sides.
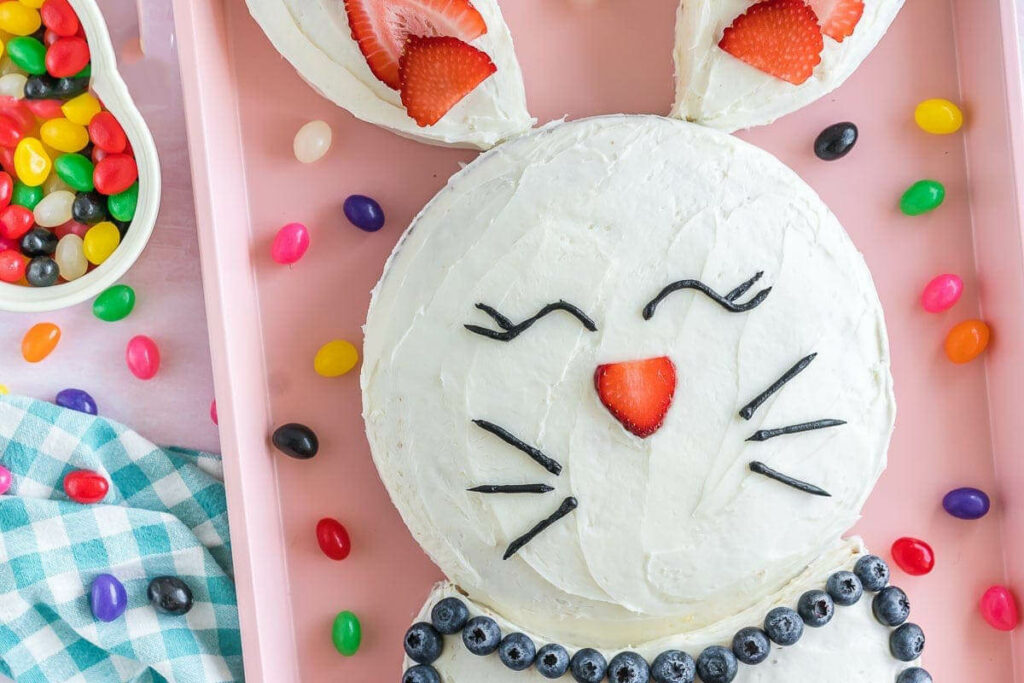
- Strawberry ears – For the ears, slice strawberries and place them in a line in the center of each ear.
- Blueberry bowtie – To decorate the bowtie, use blueberries to outline the middle and sides of the tie.
- Face – For the face, use the black decorating icing to pipe eyes and whiskers. Place a small strawberry slice under the eyes to make a nose.
Decorating the Bunny Cake
It doesn’t take long for your creative side to start hopping in when making this easy bunny cake! This cake is so simple to make and decorate. Get the kids involved to help make it even more special!
- Frosting – Start by frosting the tops and sides of all your cake pieces. Use an offset spatula to make the frosting extra smooth.
- Slice – Then, slice a few strawberries and place them in a line in the center of each ear.
- Piping – After that, for the face, use the black decorating icing to pipe eyes and whiskers.
- Nose – Then, to make a nose, place a small strawberry slice under the eyes.
- Bowtie – Finally, for the bowtie, use the blueberries to outline the outside of the bow and fill in the knot.
Tips for Making the Bunny Cake
These simple tips make this bunny cake even easier! There are so many ways to perfect this cake and make it simple and cute. Try a few of these helpful tips to make one of the best bunny cakes!
- Knife – You can use a sharp chef’s knife, but use a serrated knife for the best results. The lines you cut are similar to the lines on a baseball.
- Vanilla – Add vanilla extract to the cake and frosting for extra flavor.
- Chill – Before frosting the bunny cake place the whole cake in the refrigerator until it is cold or you are waiting to decorate it the day of. This is great when you are making it ahead and want the cake to be firm when frosting and decorating.
- Serving – Use a pretty serving tray, cardboard, or a charcuterie board to place the bunny cake on before frosting and decorating.
- Hold in place – Use the frosting as “glue” to hold the bunny cake in place. Use a small amount of frosting on the back of the cake to stick to the serving tray you are using. This will help the bunny cake stay in place and not slide around if moved or cut.
- Covering – If you need to cover the cute bunny cake with plastic wrap, use toothpicks all around the bunny and a few around the nose area to hold the plastic wrap off the frosting and decorations. Carefully remove the plastic wrap when ready to show it off!
Decoration Variations for the Bunny Cake
Make this bunny cake every year and make it different every time! Surprise your family and friends with a new bunny cake and new decorations every time they see it. It makes it more fun and creative when making this delicious bunny cake recipe!
- Candy – Instead of berries try using candy! Black jelly beans or colored jelly beans are all so cute and can make a fun bowtie or bow for the bunny cake. Easter M&Ms are fun and can make a sweet treat too!
- Easter candy – Browse the Easter aisle and see what candy you can find that will shape and make this bunny cake come to life!
- Coconut – Make a grassy background using green coconut or a fun easter pastel color for the background or a shirt!
- Sprinkles – You can never go wrong with sprinkles! Find easter ones, pastel colors, or all your springtime favorites. Sprinkles are great for the ears, nose, and bow tie, or just one of those pieces of cake. The decorating is endless with sprinkles!
- Frosting – Decorate the whole cake with different piping and frosting colors. Make it as colorful and fun as you like!
Frequently Asked Questions
Which flavor of cake mix should I use?
For this cake, I used a yellow cake mix. However, you can use any cake mix you want. Just make sure to adjust the eggs, water, and oil if the box mix differs from our recipe. If they are different, go with the boxed mix directions. To be extra Easter-y you could use a carrot cake mix and cream cheese frosting.
What can I use for bunny whiskers on a cake?
If you don’t want to pipe the whiskers on, then you can use licorice. Twizzlers Pull and Peel licorice works particularly well.
What else can I use to decorate a bunny cake?
To make your Easter Bunny Cake more fluffy looking, you can sprinkle shredded coconut all over the frosting. You can also use jelly beans and other candies to make the eyes and nose. Use pink jelly beans for the middle of the ears. If you want to decorate around the bunny, you can mix a cup of coconut with a few drops of green food coloring to make “grass”.
How many guests can I feed with this Bunny Cake?
You can get about 16 slices out of this cake. If you need to serve more guests, you can double the recipe and make another cake layer. Use more frosting to sandwich in between the layers.
Storing the Bunny Cake
Storing a cake in general is pretty simple! Cover the cake with plastic wrap, foil, or in an airtight container. Place in a cool area of the house or in the fridge to chill. When ready to eat, slice a piece of cake and enjoy! This easy easter bunny cake recipe will stay in storage for three to four days.
Bunny Cake
This cake is so cute, that it is an insult to eat it. But no worries, the bunny cake is delicious as well as adorable! Find out how to make this fun cake at home.
Instructions
Ingredients
- 1 package yellow cake mix
- 1 cup water
- ½ cup vegetable oil
- 3 eggs
- frosting this cake needs about 4 cups of frosting
- strawberries sliced, for decorating
- blueberries for decorating
- black decorating icing for the eyes and whiskers
Directions
- Add cake mix, water, oil, and eggs to a large bowl and mix until combined. Pour into two 8-inch round cake pans and bake for 25-30 minutes, or until a toothpick inserted in the middle comes out clean.
- Once the cakes are cooled, cut one cake as pictured. The two outside pieces will be the ears and the middle piece will be the bowtie.
- Arrange the cake pieces on a large pan or platter.
- Frost all of the cake including the sides.
- For the ears, slice strawberries and place them in a line in the center of each ear.
- To decorate the bowtie, use blueberries to outline the middle and sides of the tie.
- For the face, use the black decorating icing to pipe eyes and whiskers. Place a small strawberry slice under the eyes to make a nose.