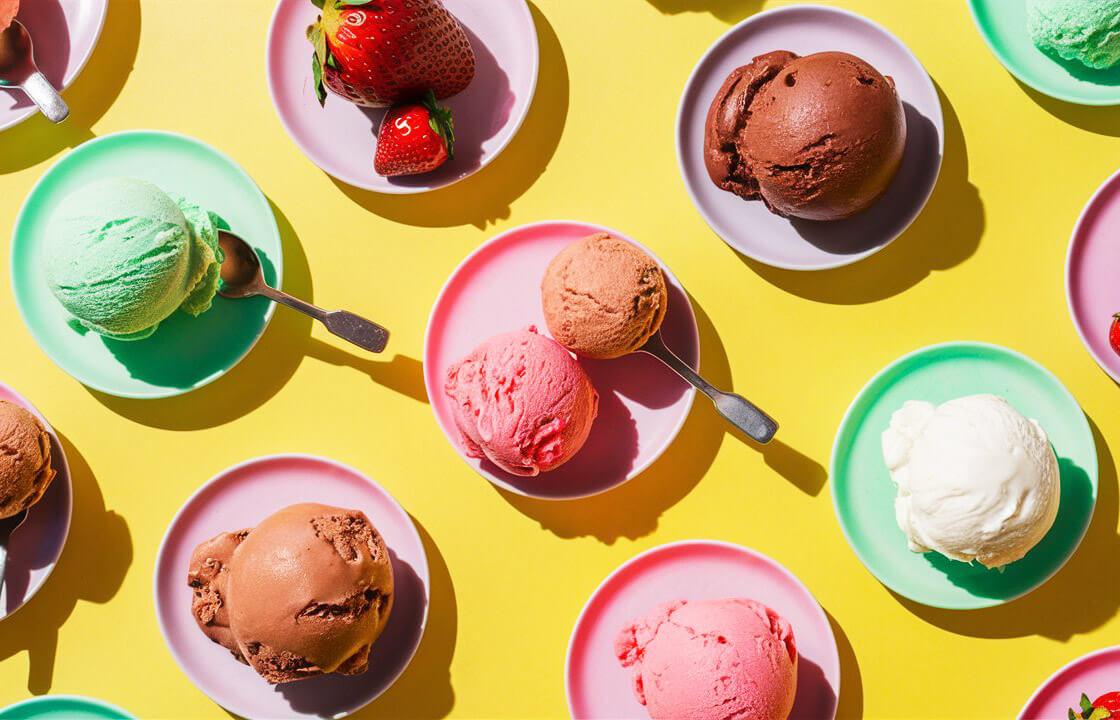
If you’re a vegan, that shouldn’t mean you have to miss out on ice cream! We’ve gathered our top 19 ideas for making vegan ice cream!
Table Of Contents
How to Make Vegan Ice Cream
Using an ice cream maker is the best way to achieve creamy, perfectly chilled ice cream. But for those not ready to invest in an ice cream maker, banana “nice cream” and our no-churn methods are also options!
The other key to creamy vegan ice cream is to use rich dairy-free alternatives such as coconut and/or cashew milk. Our favorite is a combination of the two!
The Classics
Creamy Vegan Vanilla Ice Cream

Vegan vanilla ice cream that’s creamy, perfectly sweet, and easy to make! Just 6 ingredients and simple methods required for this dreamy dessert!
- Total: 3 hours
- Servings: 9
Ingredients
- 2 14-ounce cans full fat coconut milk (ensure it’s a quality brand)
- 1/4 cup raw cashew butter
- 1/4 cup maple syrup or agave nectar (or sub all organic cane sugar)
- 1/4 cup organic cane sugar (or sub all maple syrup)
- 1 Tbsp pure vanilla extract (or sub fresh vanilla from a vanilla pod, though the alcohol in extract ensures the ice cream doesn’t freeze too firmly)
- 1/2 tsp xanthan gum (for creamier texture // if you don’t have, omit)
- 1 Tbsp olive oil or avocado oil (optional // for a bit of added creaminess)
Instructions
- The day before use, place your ice cream churning bowl in the freezer to properly chill.
- To a high-speed blender, add coconut milk, cashew butter, maple syrup, organic cane sugar, vanilla, xanthan gum, and olive or avocado oil (optional). Blend for 1 minute or until completely creamy and smooth, scraping down sides as needed.
- Transfer mixture to the refrigerator to chill for ~30 minutes (or up to overnight) or until it’s at least room temperature or cooler (you don’t want to add it to the ice cream maker warm).
- Add the slightly chilled mixture to ice cream maker and churn according to manufacturer’s instructions — ours took exactly 30 minutes. It should look like thick soft serve.
- Once churned, transfer the ice cream to a large freezer-safe container and smooth with a spoon. Top with parchment paper and freeze for at least 2 hours or until firm.
- Set out for 10-15 minutes before serving to soften slightly. Store in the freezer well covered for up to 1 month.
Vegan Chocolate Ice Cream

Creamy, 6-ingredient vegan chocolate ice cream infused with cocoa powder, vegan dark chocolate, and coconut cream. Simple methods, extremely rich and satisfying results.
- Total: 10 hours
- Servings: 9
Ingredients
- 3/4 cup water
- 1 1/4 cups lite coconut milk
- 2/3 cup organic cane sugar
- 2/3 cup unsweetened cocoa powder
- 1/4 tsp sea salt
- 6 ounces vegan dark chocolate (finely chopped // ~1 cup chopped per 6 ounces)
- 1/2 tsp pure vanilla extract
Instructions
- The day before, add your ice cream churning bowl to the freezer to properly chill.
- The same day, prepare your base. Add the water, coconut milk, cane sugar, cocoa powder, and salt to a large saucepan and whisk to combine. Bring to a low boil over medium-high heat, whisking frequently. Once it reaches a low boil, continue cooking and whisking for 1 minute.
- Remove from the heat and add the chocolate and vanilla. Whisk until melted.
- Then transfer to a mixing bowl and chill in the fridge for 2 hours or until room temperature or cooler. Optional: To remove any graininess, add to a blender and blend for 30 seconds on high.
- Add your chilled base to the ice cream maker and churn according to the manufacturer’s instructions – about 30 minutes or until it looks like soft serve.
- Enjoy as soft serve, or transfer to a parchment-lined dish or loaf pan, cover securely, and freeze for 4-6 hours, or until firm.
- Let thaw 10-15 minutes before serving to soften. Use a hop scoop to ease scooping. Enjoy within 7-10 days. This is excellent with ripe strawberries and coconut whipped cream!
Creamy Vegan Strawberry Ice Cream

Creamy vegan strawberry ice cream that’s perfectly sweet and infused with vibrant strawberry flavor! Just 7 simple ingredients.
- Total: 7 hours
- Servings: 6
Ingredients
STRAWBERRY COMPOTE
- 2 cups sliced strawberries (as ripe as possible for best flavor)
- 1 Tbsp maple syrup
- 1-2 Tbsp water (or orange juice)
- 1 ½ tsp cornstarch
ICE CREAM
- 2 (14-ounce) cans full fat coconut milk (ensure it’s a quality brand)
- 1/4 cup raw cashew butter
- 1/4 cup maple syrup or agave nectar (or sub all organic cane sugar)
- 1/4 cup organic cane sugar (or sub all maple syrup)
- 1 Tbsp pure vanilla extract (or sub fresh vanilla from a vanilla pod, though the alcohol in extract ensures the ice cream doesn’t freeze too firmly)
- 1/2 tsp xanthan gum (for creamier texture // if you don’t have, omit)
- 1 Tbsp olive oil or avocado oil (optional // for a bit of added creaminess)
- 2 Tbsp minced fresh ripe strawberries (optional)
Instructions
- The day before, place your ice cream churning bowl in the freezer to chill. It needs to chill completely (6 hours or overnight).
- The day before, make the compote. (Making the day of is fine, too — it just needs a little time to cool). Add all compote ingredients to a small saucepan (sliced strawberries, maple syrup, water or orange juice — starting with lesser amount — and cornstarch) and stir to combine.
- Heat over medium-low heat and simmer covered, for ~12-15 minutes, stirring occasionally, or until the berries are soft and easy to mash and there is a bit of sauce formed. If the strawberries aren’t producing much liquid, add the remaining 1 Tbsp (15 ml) water or orange juice. Mash lightly with a spoon or potato masher and set aside to cool. If making the day before, cover and refrigerate until ready to use.
- Open your cans of full fat coconut milk and pour mostly just the cream portion into a high-speed blender, reserving the clear liquid for other uses, such as adding to smoothies. This helps achieve extra creamy ice cream.
- To the blender, also add cashew butter, maple syrup, organic cane sugar, and vanilla, and (optionally) xanthan gum and olive or avocado oil. Blend for 1 minute or until completely creamy and smooth, scraping down sides as needed. Then add most of the strawberry compote, reserving ~3 Tbsp of compote (mostly liquid) for swirling later. Blend again until smooth and well combined.
- Transfer ice cream mixture to the refrigerator to chill for ~30 minutes, or until it’s at least room temperature or cooler (you don’t want to add a warm mixture to the ice cream maker).
- Add the slightly chilled mixture to your ice cream maker and churn according to manufacturer’s instructions — ours took ~20-25 minutes. It should look like loose soft serve. Once it reaches soft serve texture, add in your minced raw strawberries (optional) and churn for 1 minute more to disperse.
- Once churned, transfer the ice cream to a large freezer-safe container (we prefer a parchment-lined loaf pan — it’s best not to use glass as it can crack as the ice cream expands) and smooth into an even layer with a spoon. Option to add reserved 3 Tbsp compote liquid and swirl with a spoon or knife. Top with parchment paper (or seal with a lid) and freeze for at least 4-6 hours or until firm — usually overnight.
- Set out for ~10 minutes before serving to soften slightly. Dip your scoop in warm water to help with scooping. Enjoy as is, or top with coconut whipped cream, chocolate sauce, or more fresh sliced strawberries.
More Flavors
Vegan Peanut Butter Chocolate Chip Ice Cream

10-ingredient MEGA creamy vegan ice cream loaded with peanut butter chocolate chip cookie dough! So creamy and decadent you’d never believe it was dairy- and egg-free.
- Total: 2 hours
- Servings: 8
Ingredients
ICE CREAM
- 1 1/4 cups raw cashews (soaked overnight // or at least 6 hours // then drained)
- 1/4 cup brown sugar (or granulated)
- 1/4 cup agave nectar or maple syrup (or honey if not vegan)
- 1 14-ounce can full-fat coconut milk (reserve a little for the cookie dough)
- 2 1/2 Tbsp coconut oil (melted)
- 1 tsp pure vanilla extract
COOKIE DOUGH
- 3 Tbsp vegan butter or coconut oil
- 1/2 cup crunchy or creamy salted natural peanut butter (I like Trader Joe’s)
- 1/2 cup brown sugar
- 1 tsp pure vanilla extract
- 3/4 cup unbleached all-purpose flour (you could sub a GF blend, but it will be slightly grainier in texture)
- 1/4 cup dairy-free mini chocolate chips (such as Enjoy Life)
- 1-2 Tbsp coconut milk or other non-dairy milk
Instructions
- The night before, place your ice cream churning bowl in the freezer to properly chill. Also, make sure you soak your cashews overnight OR the next day for at least 6 hours. Be sure to drain before adding to blender.
- Add all ice cream ingredients to blender and blend until creamy and smooth, scraping down sides as needed. Use the “liquify” or “puree” setting if you have it. You want it to be completely creamy and blended.
- Chill mixture in the freezer for 1.5-2 hours, or in the fridge overnight.
- Add chilled mixture to ice cream maker and churn according to manufacturer’s instructions – about 45 minutes. It should look like soft serve. If for some reason it doesn’t thicken enough, put the mixture (still in the ice cream churning bowl) and pop it back in the freezer to thicken before churning once more.
- In the meantime, add vegan butter, peanut butter, brown sugar and vanilla to a mixing bowl and use a mixer or wooden spoon to combine. Add flour a little at a time and stir until thick and slightly crumbly. Add in a little coconut or other non-dairy milk to add moisture. Lastly, add chocolate chips and stir once more. Transfer to fridge or freezer to chill.
- Once the ice cream is thick like soft serve, add in 3/4 of the cookie dough, crumbling it with your hands as you add it in.
- Then transfer to a freezer-safe container and sprinkle in the last bits of cookie dough for extra texture. Cover well and freeze for at least 4-6 hours or until firm.
- Set out for 15-20 minutes before serving to soften. Will keep for up to 1 week, though best when fresh.
Raspberry Ripple Coconut Ice Cream

Amazing Raspberry Ripple Coconut Ice Cream that’s creamy, sweet, tart, and SO delicious! Just 8 ingredients and minimal effort to create this summery, swoon-worthy treat!
- Total: 3 hours
- Servings: 9
Ingredients
ICE CREAM
- 1 1/2 cups raw cashews (soaked for 4-6 hours in cool water or 1 hour in very hot water then drained)
- 1 13.5-ounce can full-fat or light coconut milk (sub almond milk for a less intense coconut flavor)
- 3 Tbsp melted coconut oil (or sub olive oil)
- 1/2 cup maple syrup or agave nectar (sub up to half with cane sugar // plus more to taste)
- 1 tsp pure vanilla extract
- 1 pinch sea salt
- 1 Tbsp arrowroot powder or cornstarch
RASPBERRY SWIRL
- 1 cup fresh raspberries (thaw if frozen)
- 1 Tbsp cane sugar or maple syrup (optional // to taste)
Instructions
- The night before, be sure to soak your cashews and place your ice cream maker bowl in the freezer to chill.
- To a high speed blender add soaked, drained cashews, coconut milk, oil, maple syrup, vanilla, sea salt and arrowroot starch. Blend until creamy and smooth, scraping down sides as needed.
- Taste and adjust sweetness as needed, adding more cane sugar or maple syrup if desired – I found 1/4 cup maple syrup and 1/4 cup cane sugar to be perfect (amounts as original recipe is written // adjust if altering batch size).
- Transfer to a mixing bowl and cover. For best results, chill overnight or for at least 5-6 hours. If in a rush, 1 1/2 to 2 hours in the freezer is sufficient.
- Once your base is chilled, prepare raspberries by adding to a bowl and mashing with sweetener. Set aside.
- Assemble your chilled ice cream maker and pour in the chilled ice cream batter. Churn until creamy and thick and resembles soft serve – about 40-45 minutes.
- In the last 30 seconds of churning, add in 1/2 of the raspberries and let churn until slightly swirled. Turn off machine.
- Transfer ice cream to a freezer-safe container and smooth flat with a spoon, swirling in the remaining amount of raspberries. Tap on the counter to help settle and remove any air bubbles.
- Cover securely and freeze for 4-5 hours or until firm. Before scooping, set out for 10-15 minutes to soften. Keeps in the freezer for up to 1 week, though best within the first few days.
Vegan Snickers Ice Cream

Vegan coconut milk ice cream with vegan caramel sauce, roasted peanuts, and bits of bittersweet chocolate.
- Total: 45 mins
- Servings: 8
Ingredients
- 2 13.5-ounce cans full-fat coconut milk (2 cans yield ~3 1/2 cups)
- 1/2 – 3/4 cup raw sugar (depending on preferred sweetness)
- 1 tsp quality vanilla extract
- 1 pinch xanthan gum (optional)
- 1/2 cup vegan caramel sauce (subbing full-fat coconut milk for the cream)
- 2 ounces quality dark chocolate (non-dairy)
- 1/3 cup roasted salted peanuts
Instructions
- Add coconut milk to a saucepan over medium heat. Add sugar, stir and bring to a simmer. Continue whisking for 1-2 minutes.
- Remove mixture from heat and stir in the vanilla extract and xanthan gum. Whisk to combine.
- Transfer to a glass bowl and refrigerate until cooled. I left mine in the refrigerator for 6-8 hours and covered it with plastic wrap once it was no longer steaming hot.
- Once the mixture is thoroughly chilled, transfer into the pre-chilled bowl of your ice cream machine and mix according to manufacturer’s instructions.
- Once the ice cream is nearly done add half of the caramel, chocolate flecks and peanuts. To make my chocolate curls I melted my chocolate first, let it cool and then ran a scraper over it to make the pieces more edible. This, however, isn’t necessary.
- When the ice cream machine stops, transfer to a freezer-safe container and sprinkle in the rest of the chocolate flecks, peanuts and caramel in layers, swirling with a knife to slightly incorporate.
- At this point you can either consume it soft, or pop it in the freezer to harden. It should keep fresh for about a week. Thaw for 10-15 minutes before serving.
Vegan Chai Ice Cream

Cashew-based vegan chai ice cream that’s luxuriously creamy and spicy-sweet. Surprisingly easy and quick to make with simple ingredients!
- Total: 45 mins
- Servings: 6
Ingredients
- 1 1/2 cups raw cashews (soaked for 4-6 hours or overnight, then drained)
- 1 cup light coconut milk (or sub another dairy-free milk, such as almond or rice)
- 3 packets chai tea (or ~4 tsp loose leaf as original recipe is written // or sub black tea for a more subtle chai flavor)
- 1/4 cup coconut oil, melted (or olive oil)
- 1/4 cup agave nectar or maple syrup (or sub honey if not vegan)
- 1/4 cup cane sugar
- 1 tsp pure vanilla extract
- 1/2 tsp each cinnamon and ginger powder
- 1/4 tsp each black pepper, ground cloves, and cardamom (optional)
Instructions
- Set your churning bowl in the freezer the night before to chill. Soak your cashews the night before as well, or for at least 4-6 hour before blending.
- When ready to prepare ice cream, steep your chai tea in 3/4 cup boiling water (amounts as original recipe is written // adjust if altering batch size) for at least 10 minutes. It should be very strong. Remove tea bags, squeezing out excess tea, and let cool in the fridge.
- In the meantime, drain cashews and measure out other ingredients.
- Add tea and all remaining ingredients to a blender and blend until creamy and smooth – about 3-4 minutes, using liquify if you have the option. Taste and adjust sweetness/flavors as needed.
- Add mixture to your chilled ice cream maker bowl and churn according to manufacturer’s instructions until thoroughly chilled, about 45 minutes. It should resemble thick soft serve.
- Transfer to a freezer-safe container, cover and freeze until hard – at least 6 hours, preferably overnight. Will keep in the freezer for up to a week.
Cinnamon Toast Ice Cream (Dairy-Free)

Creamy, sweet, vegan cinnamon toast ice cream. The perfect dessert in the summer! Gluten-free optional.
- Total: 50 mins
- Servings: 6
Ingredients
- 2 13.5-ounce cans full-fat coconut milk (2 cans yield ~3 1/2 cups)
- 1/2 cup raw sugar
- 1 tsp quality vanilla extract
- 1 pinch xanthan gum (optional)
- 1/2 tsp cinnamon
- 2 Tbsp cinnamon sugar
- 1 piece of (vegan) toast (grated or scraped with a knife)
Instructions
- Add coconut milk to a saucepan over medium heat. Add sugar, stir, and bring to a boil. Continue whisking for 1-2 minutes.
- Remove mixture from heat and stir in the vanilla extract, cinnamon and xanthan gum (optional). Whisk to combine.
- Transfer to a glass bowl and refrigerate until cooled. I left mine in the refrigerator for 6-8 hours and covered it with plastic wrap once it was no longer steaming hot.
- Once the mixture is thoroughly chilled, transfer it into the bowl of your ice cream machine and mix according to the manufacturer’s instructions.
- Once the ice cream is nearly done – mine took about 35-40 minutes – sprinkle in half of the cinnamon sugar and toast flecks.
- When the ice cream machine stops, transfer to a freezer-safe container and sprinkle in the rest of the cinnamon sugar and toast flecks, swirling with a knife to slightly incorporate.
- At this point you can either consume it soft, which was insanely creamy and delicious, or pop it in the freezer to harden. It should keep fresh for about a week. Thaw for 10-15 minutes before serving.
Vegan Pumpkin Pie Ice Cream

Creamy 10-ingredient vegan pumpkin pie ice cream with tons of creamy pumpkin purée. Simple to make, perfectly sweetened, and subtly spiced.
- Total: 1 hr 15 mins
- Servings: 7
Ingredients
ICE CREAM
- 1 1/2 cups raw cashews (soaked for 4-6 hours or in boiling hot water for 1-2 hours)
- 1 cup dairy-free milk (such as unsweetened almond, light coconut, or rice)
- 3 Tbsp olive oil
- 3/4 cup pumpkin purée
- 1/4 cup maple syrup (sub agave or honey if not vegan)
- 1/3 cup brown sugar
- 1 1/2 tsp pure vanilla extract
- 1/4 tsp sea salt
- 1 1/2 tsp pumpkin pie spice
- 3/4 tsp ground cinnamon
ROASTED PECANS (optional)
- 1/2 cup raw pecan halves
- 1 Tbsp vegan butter (such as Earth Balance // or sub olive or avocado oil)
- 1 Tbsp brown sugar
- 1 pinch each sea salt, cinnamon and cayenne pepper
Instructions
- Set your churning bowl in the freezer the night before to chill. Soak your cashews the night before as well or for at least 4-6 hours before blending. Alternatively soak in boiling water for 1-2 hours.
- Once soaked, add well-drained cashews and remaining ingredients to a blender and blend until creamy and smooth – about 3-4 minutes, using the “liquify” or “purée” setting if you have the option to get it really creamy. Taste and adjust sweetness/flavors as needed.
- Add mixture to your chilled ice cream maker bowl and churn according to manufacturer’s instructions until thoroughly chilled – about 45 minutes. It should resemble thick soft serve.
- Transfer to a freezer-safe container, cover and freeze until hard – at least 6 hours, preferably overnight. Will keep in the freezer for up to a week.
- Take out of the freezer and thaw for 30-40 minutes – or microwave (gasp!) for 15-20 seconds – before serving to soften. Serve with brown sugar roasted pecans (see next step) and coconut whipped cream for extra oomph.
FOR THE PECANS:
- Preheat oven to 350 degrees F (176 C) and place pecans on a foil-lined baking sheet. Toast for about 8 minutes.
- In the meantime, melt butter in a small skillet or in the microwave and stir in brown sugar, sea salt, cinnamon and cayenne.
- Remove toasted pecans from oven and toss with butter and spice mixture. Spread back onto the baking sheet and toast for another 4-7 minutes or until fragrant and golden brown, being careful not to burn.
Coffee Coconut Ice Cream

Creamy coffee ice cream made with coconut milk, pure vanilla extract, raw sugar, and bold coffee.
- Total: 50 mins
- Servings: 6
Ingredients
- 2 13.5-ounce cans of quality full-fat coconut milk (2 cans yield ~3 1/2 cups)
- 1/2 – 3/4 cup raw sugar (depending on preferred sweetness // I used lesser end of range)
- 3/4 cup strong brewed coffee
- 1 1/2 tsp pure vanilla extract
Instructions
- Combine coconut milk, coffee, and raw sugar in a small saucepan over medium heat and whisk until well combined – about 5 minutes.
- Remove from heat and whisk in vanilla. Transfer to a bowl to let cool completely in the fridge – at least 6 hours, overnight being preferable.
- Transfer to ice cream maker and prepare according to manufacturer instructions. Once done either eat immediately or transfer to a freezer-safe container and let harden for several hours. Should keep for 1 week in the freezer. Let stand for 15 minutes at room temperature before serving.
Creamy Vegan Mint Brownie Ice Cream

10-ingredient vegan GF mint ice cream with brownie chunks!
- Total: 1 hr 15 mins
- Servings: 8
Ingredients
For the Ice Cream
- 1/2 cup fresh mint (divided)
- 1 1/2 cups raw cashews (soaked for 8 hours, then drained)
- 1 14-ounce can full-fat coconut milk (or other non-dairy milk, though full-fat coconut will yield creamiest result)
- 1/2 – 3/4 tsp peppermint extract (depending on how minty you like it)
- 1/4 cup cane sugar
- 1/4 cup agave nectar or maple syrup (or honey if not vegan)
- 3 Tbsp coconut oil (melted)
- 1 tps vanilla extract (optional)
For the Raw Brownie
- 1 cup packed dates (pitted // if your dates are dried out, soak them in warm water for 10 minutes to plump them back up then drain)
- 1 1/4 cups raw walnuts (I used a mix of almonds and walnuts)
- 1/3 cup cacao OR cocoa powder (though cocoa powder makes it not technically raw)
Instructions
- Set your churning bowl in the freezer the night before to chill. Soak your cashews the night before as well, or for at least 4-6 hours before blending.
- OPTIONAL STEP: When ready to prepare ice cream, steep HALF of your fresh mint leaves in the coconut milk. Bring the coconut milk to a simmer in a small saucepan and add the mint leaves, then turn to low. Use a wooden spoon or muddler to puncture the mint so it infuses the coconut milk. Keep on low for 15 minutes, then kill heat and let cool. Once cooled, strain out the mint leaves using a fine mesh strainer and pour the coconut milk right into a blender. (If not doing this step, just add all of the fresh mint and coconut milk right into the blender. The flavor won’t be AS strong, but it will still be delicious.)
- Add remaining ingredients, including DRAINED cashews and remaining fresh mint (vanilla extract is optional) and blend until creamy and smooth – about 3-4 minutes, using the “liquify option” if you have it. Taste and adjust sweetness/minty-ness as needed.
- Add mixture to your chilled ice cream maker bowl and churn according to manufacturer’s instructions until thoroughly chilled, about 45 minutes. It should resemble thick soft serve.
- While churning, prepare your raw brownie by processing dates in the food processor until small bits remain – it will likely form into a ball. Remove and set aside.
- Add nuts and process until small bits remain, then add back in dates and cocoa or cacao powder and process until well combined.
- Transfer to a piece of plastic wrap or parchment paper and use hands to form into a “brick” shape. Set in freezer to chill.
- Once ice cream is done churning, break off chunks of your brownie and stir into the ice cream. I used about 3/4 of my brownie.
- Transfer ice cream to a freezer-safe container, cover with plastic wrap and freeze until hard – at least 6 hours, preferably overnight. Will keep in the freezer for up to one week, though best when fresh.
- Before serving, let thaw on the counter for 10-15 minutes to soften.
Cherry Pie Ice Cream

Seriously decadent Vegan Cherry Pie Ice Cream made with just 10 ingredients using simple methods! Real pieces of cherry pie filling and crust swirled throughout.
- Total: 2 hr 50 mins
- Servings: 12
Ingredients
ICE CREAM
- 1 1/2 cups raw cashews (soaked in cool water for 4-6 hours or overnight, or 1 hour in very hot water, then drained)
- 1 13.5-ounce can full-fat coconut milk (sub light with less creamy results)
- 3 Tbsp melted coconut oil or olive oil
- 1/4 cup maple syrup or agave nectar
- 1/4 cup organic cane sugar (or sub maple syrup)
- 1 tsp pure vanilla extract
- 1 pinch sea salt
CHERRY FILLING
- 3 cups sweet red cherries (pitted and halved // fresh or frozen)
- 1-2 Tbsp water or orange juice
- 1-2 Tbsp maple syrup, organic cane sugar, or coconut sugar (to taste)
- 1 Tbsp flour (for thickening // or sub arrowroot or cornstarch)
PIE CRUST
- 1 1/4 cups all-purpose flour
- 1/4 tsp sea salt
- 6 Tbsp vegan butter (or semi-firm refined coconut oil that’s scoopable)
- 2-4 Tbsp ice cold water
Instructions
- The night before, be sure to soak your cashews and place your ice cream maker bowl in the freezer to chill.
- To a high speed blender add soaked, drained cashews, coconut milk, oil, maple syrup, cane sugar, vanilla, and sea salt. Blend until creamy and smooth, scraping down sides as needed.
- Taste and adjust sweetness as needed, adding more cane sugar or maple syrup if desired – I found 1/4 cup maple syrup and 1/4 cup + 1 Tbsp cane sugar to be perfect (amounts as original recipe is written // adjust if altering batch size).
- Transfer to a mixing bowl and cover. Freeze for 1 1/2 hours to chill.
- While the base is chilling, prepare cherry compote by adding cherries, water or orange juice, maple syrup or sugar, and flour to a small saucepan and bringing to a simmer over medium heat.
- Use a wooden spoon to smash cherries and stir to incorporate. You want to break them down quite a bit so the ice cream scoops easier later on. Turn heat to low and let simmer for 3-5 minutes, or until it resembles cherry pie filling. Remove from heat – set aside.
- Preheat oven to 350 degrees F (176 C).
- Prepare crust by adding flour and salt to a blender or food processor (or a mixing bowl). Pulse (or whisk) to combine. Then add cold butter or semi-firm coconut oil and pulse (or use a fork/pastry cutter to mix) until it resembles wet sand, scraping down sides as needed.
- Add cold water 1 Tbsp at a time, intermittently mixing, until a loose dough is formed. Transfer to a floured surface and form into a 1-inch thick disc with your hands, handling as little as possible.
- Dust the top of the dough and rolling pin and roll into a large, thin circle the shape of your pie pan, adding more flour as needed.
- Gently roll the dough onto the rolling pin from one end to another and transfer to a pie pan (mine is 9 inches, but any similar size will do).
- Drape and form into the pan and crimp the edges, not worrying about appearance as it will be crumbled anyway. Add cherry pie filling and bake on the center rack of your 350 degree oven for 44-47 minutes, or until the filling is bubbly and the crust is golden brown. Set aside to cool.
- Assemble your chilled ice cream maker and pour in the chilled ice cream batter. Also add the equivalent of 1 slice of pie with crust (amount as original recipe is written // adjust if altering batch size), crumbling a little. Do this at the beginning of churning to impart more flavor into the base. Then churn until creamy and thick and resembles soft serve – about 20 minutes.
- In the last 30 seconds of churning, add in the desired amount of remaining pie, crumbling as you add it to ease scooping later. (NOTE: Know that the more pie you add, the more difficult it can be to scoop since the texture becomes more chunky. As an option, you could reserve some to serve with the ice cream instead of adding it to the base.)
- Reserve about 1/4 cup (amount as original recipe is written // adjust if altering batch size) of the crust for serving, if desired. Churn until just incorporated, then turn off machine.
- Enjoy immediately as soft serve, or transfer ice cream to a freezer-safe container and smooth flat with a spoon.
- Cover securely and freeze for 4-5 hours or until firm. Before scooping, set out for 20-30 minutes to soften and use a hot scoop to ease the scooping process. I found this ice cream easier to scoop into balls rather than in rows, since the crust and cherries form little chunks in the ice cream. The extra work is worth the effort!
- Serve with additional pie crust crumbles and a fresh cherry on top (optional). Keeps in the freezer for up to 1 week, though best within the first few days.
Vegan Brownie Chocolate Ice Cream

Chocolate brownie ice cream that tastes just like the real thing! Only my version is vegan and gluten-free, and it requires just 7 ingredients.
- Total: 2 hr 30 mins
- Servings: 8
Ingredients
- 1 (14-ounce) can full-fat quality coconut milk (1 can yields ~1 3/4 cups // organic when possible)
- 1 cup unsweetened vanilla almond milk
- 1/2 tsp xanthan gum (for a creamy texture)
- 2/3 cup unsweetened cocoa powder
- 1 tsp pure vanilla extract
- 1/3 heaping cup raw sugar ground in a coffee grinder (or sub maple syrup / honey if not vegan)
- 3-4 whole vegan gluten-free black bean brownies
Instructions
- Place coconut and almond milk, xanthan gum, cocoa powder, vanilla, and sugar in a high-speed blender and blend until well combined. Transfer to a mixing bowl, cover and refrigerate until chilled through – at least 2 hours.
- Once chilled, pour into pre-chilled ice cream maker and use according to directions. (Alternatively, pour into a freezer-safe container, cover and freeze, taking out to stir every couple hours to aerate.)
- Once the ice cream is at soft-serve consistency, add in brownie chunks. You can either do this at the end of the ice cream maker’s churning process, or once you pour it into a container. Smooth the top with a spoon, cover, and freeze until firm. Or eat immediately though it will be quite soft.
Banana “Nice Cream”
Banana “nice cream” is a fun twist on ice cream, made with a base of (you guessed it) frozen ripe bananas!
It can be made without an ice cream maker or any added sugar. It’s also super quick and requires just a high-speed blender or food processor to prepare!
It does melt more quickly than traditional ice cream and each flavor will have a slight banana taste. So if you aren’t a banana fan, we’d suggest sticking to one of our more traditional vegan ice cream flavors.
Easy Banana Ice Cream (10 flavors!)

The ultimate guide to making EASY, perfect 1-INGREDIENT banana ice cream every time! We’re sharing our top tips and tricks, plus 10 delicious flavors!
- Total: 5 mins
- Servings: 2
Ingredients
- 2 ½ cups sliced frozen ripe banana (~2 medium-large bananas as recipe is written — adjust amount if adjusting serving size // the riper, the sweeter)
- 1-2 tsp maple syrup or other sweetener of choice (optional)
FLAVOR VARIATIONS
- Vanilla (base recipe + 1 tsp vanilla extract)
- Strawberry (base recipe + 1 cup frozen strawberries, organic when possible)
- Berry (base recipe + 1 cup frozen mixed berries)
- Green Dream (base recipe + 1 tsp spirulina + 1-2 tsp matcha)
- Chocolate (base recipe + 2 Tbsp cacao or cocoa powder)
- Chocolate Nut Butter (base recipe + 2 Tbsp cacao powder + 2 Tbsp nut butter)
- Peanut Butter (base recipe + 2-3 Tbsp peanut butter or other nut butter of choice)
- Chocolate Tahini
- Sea Salt Caramel (4-6 soaked pitted dates + healthy pinch sea salt)
- Cookie Dough
FOR SERVING optional
- Sliced fresh fruit (such as kiwi, banana, or berries)
- Nut butter
- Shredded coconut
- Seed cycling mixes
Instructions
FREEZE BANANAS:
- Be sure to start with ripe and spotty bananas. Peel and slice into 1/2-inch slices for easier blending (large chunks tax the motor). Then add to a parchment-lined baking sheet and freeze until firm (3-4 hours or overnight).
FOOD PROCESSOR:
- Add sliced frozen bananas to a food processor fitted with an “S” blade. Then blend for 4-5 minutes or until completely smooth, fluffy, and blended. You’ll need to stop occasionally to stir and scrape the sides. You’ll be left with a soft serve texture. See “FREEZING” below for freezing tips.
HIGH-SPEED BLENDER:
- Add sliced frozen bananas to a high-speed blender, our most recommended model being the Vitamix 5200 for ultimate control and its powerful motor. (The Kitchenaid KSB8270FP Pro Line Series works well, too.) Turn the Vitamix dial to its lowest setting and ensure the switch is flipped to “Variable” NOT “High” to start with. It’s too much to jump the motor from 0-100 that fast.
- Once it’s started blending, quickly switch from “Variable” to “High” speed and use the tamper to press down and stir/agitate the bananas, which should turn into soft-serve texture banana ice cream quite quickly. If the motor seems to be struggling, stop and pause momentarily. Be sure to switch back to low speed / “Variable,” then switch to “High” speed every time to protect the motor.
FLAVORS:
- Adding flavor to your nice cream is easy! For every flavor besides strawberry, berry, or Salted Caramel, simply add the recommended amounts of each ingredient to your ice cream at this time and blend until creamy and smooth, scraping down the sides as needed. If making strawberry or berry, we recommend adding them at the beginning with the unblended bananas for best texture.
FREEZING:
- At this point you have soft-serve texture banana ice cream. To get more of a scoopable ice cream texture, simply spread into a Tupperware or parchment-lined loaf pan and freeze for 2-3 hours. Then scoop with an ice cream scoop! If too firm, let thaw 15-30 minutes to soften.
STORAGE:
- Best when fresh. See freezing instructions above. Frozen banana ice cream should keep for up to 1 month if well covered, though we find it’s best when used within the first week.
Coffee Chocolate Nice Cream

The flavors of coffee and chocolate blend together in this bowl of creamy banana ice cream. Decaf options included + tips for getting perfectly scoopable banana ice cream. Just 3 ingredients and simple methods required!
- Total: 10 mins
- Servings: 2
Ingredients
NICE CREAM
- 2 large ripe frozen bananas
- 2 Tbsp cacao powder (or cocoa powder)
- 1-2 tsp dandy blend or espresso powder (or sub a small amount of strong brewed coffee or espresso that’s been chilled — just add slowly as it can make the nice cream watery)
- 1-2 Tbsp dairy-free milk only as needed (optional)
FOR SERVING optional
- Sliced banana
Instructions
- To a high-speed blender or food processor, add frozen ripe banana, cacao powder, and dandy blend (or espresso powder or strong-brewed coffee), and blend on high until creamy and smooth. If using a Vitamix, it’s important to first turn on your blender using the “variable” setting on medium speed, then quickly flip to high speed and use the tamper to blend. If the motor is starting to overheat, turn off and let it rest for a minute or two, then proceed. If using a food processor, you should be able to blend on high and scrape down sides as needed.
- If it has trouble blending, add a bit of dairy-free milk to encourage blending. Just be careful not to add too much or it can become runny.
- Taste and adjust flavor as needed, adding more cocoa or cacao powder for chocolate flavor, or coffee powder / espresso of choice for more intense coffee flavor.
- Optional: Top with cacao nibs for a little crunch or sliced banana for more texture. Enjoy immediately. Freeze leftovers in ice cube or popsicle molds for best results (will last in the freezer up to 1 month, though best when enjoyed fresh).
Tahini Chocolate Banana Soft Serve

Super creamy and naturally sweetened banana soft serve infused with tahini paste and raw cacao powder! A healthier and delicious way to indulge in a plant-based dessert or snack.
- Total: 10 mins
- Servings: 2
Ingredients
SOFT SERVE
- 2 cups ripe sliced frozen bananas
- 2 Tbsp tahini (sesame seed paste // or sub other nut/seed butter // plus more for serving)
- 3 Tbsp cacao (or unsweetened cocoa) powder
- 1-2 Tbsp maple syrup (or sub dates or other sweetener (i.e. stevia) to taste)
- 1-2 ripe pitted dates (optional)
- 1 tsp vanilla extract (optional)
- 1 pinch sea salt (optional)
Instructions
- Add ripe, sliced, frozen bananas to a food processor or a high-speed blender and mix / blend until a creamy “soft serve” is formed, scraping down sides as needed – about 3-5 minutes.
- Add tahini (or other nut/seed butter), cacao powder, and maple syrup and blend to combine. Then taste and adjust flavors as needed, adding more tahini for nuttiness, cacao for intense chocolate flavor, or maple syrup (or pitted dates) for sweetness. At this time, you can also add vanilla extract or a pinch of sea salt for more flavor. Mix as needed to combine.
- Serve immediately or transfer to serving bowls and put in the freezer to thicken up. Serve as is or top with additional tahini or magic shell!
- Best when fresh. Leftovers will keep in the freezer up to 1 week. Let come back to soft serve consistency at room temperature before enjoying.
No-Churn Ice Creams
Vegan Vanilla Soft Serve (No-Churn!)

Creamy vegan vanilla soft serve made with simple methods and NO ice cream maker. SO classic and just 6 ingredients required!
- Total: 6 hrs 10 mins
- Servings: 6
Ingredients
ICE CUBES
- 1 (13.5-oz.) can full-fat coconut milk (use a smooth, creamy brand // we used Field Day)
- 2 Tbsp cashew butter (we like Artisana)
- 1/4 cup organic cane sugar
- 1 ½ tsp vanilla extract
- 1/8 tsp sea salt
SOFT SERVE
- 14-16 ice cubes vanilla coconut mixture (from above)
- 2-6 Tbsp unsweetened almond milk (or other dairy-free milk)
Instructions
- ICE CUBES: At least 6 hours before you wish to enjoy the soft serve, prepare the sweetened coconut milk ice cubes.
- For the ice cubes, place the coconut milk, cashew butter, cane sugar, vanilla, and salt into a high-speed blender and blend until smooth — about 1 minute. Transfer the mixture to an ice cube tray — it should make ~14-16 standard-size ice cubes (as recipe is written). Freeze for at least 6 hours.
- SOFT SERVE: To a food processor (our preferred method) or high-speed blender, add all of the coconut milk ice cubes and the almond milk (starting with the lesser amount — 2 Tbsp as the recipe is written). Pulse or blend until all of the ice cubes have completely broken down and you’ve achieved a thick, smooth consistency. You may need to stop and stir a few times to get it moving, or add more almond milk 1 Tbsp (15 ml) at a time until it mixes more easily. If using a blender, use the blender’s tamper, pressing down to help it mix.
- Enjoy immediately! If storing for later, place in an airtight container and freeze. Once refrozen, the texture will be firm, scoopable, and creamy but will be much more dense/icy than the fresh soft serve. Let sit for 10 minutes before scooping.
No Churn Vegan Chocolate Ice Cream

5-ingredient no-churn vegan chocolate ice cream that has all the creaminess, flavor, and richness of the real thing! Naturally sweetened, vegan, and gluten-free.
- Total: 30 mins
- Servings: 12
Ingredients
- 2 14-ounce cans coconut cream OR full- fat coconut milk (chilled overnight in the fridge // I like Trader Joe’s coconut cream or Thai Kitchen coconut milk)
- 2/3 cup unsweetened cocoa or cacao powder powder
- 14-16 ounces pitted dates (if not sticky and moist, soak in warm water for 10 minutes then drain)
- 1 tsp pure vanilla extract
- 1/2 cup unsweetened almond milk
OPTIONAL ADD-INs
- 1 ounce espresso (cooled)
- 1/2 tsp cinnamon
Instructions
- Place a large mixing bowl in the freezer to chill for 10 minutes.
- In the meantime, add moist, pitted dates to a food processor and process until small bits remain. Then add hot water a little at a time until it forms a thick paste. Set aside.
- Without tipping the cans, scoop out the coconut cream from the cans of coconut cream OR coconut milk, reserving the clear liquid for other uses. Place in chilled mixing bowl.
- NOTE: If you’re using coconut milk, you’ll likely use less sweetener because there’s less volume.
- Using a mixer, whip until creamy and smooth. Then add cocoa powder, vanilla, almond milk, and half of the date paste. Whip until fully incorporated.
- Taste and adjust flavors as needed. I ended up adding most of the date paste and a little more cocoa powder.
- Transfer to a parchment-lined freezer-safe container and cover loosely with plastic wrap, then foil to help freeze.
- You can take this out in a couple of hours for a chilled mousse-like ice cream. Freeze overnight for a firmer ice cream.
- Set out for at least 20 minutes prior to scooping, and use a scoop warmed under hot water for a proper scoop.
Mint Chocolate Chip Ice Cream (Vegan, No Churn!)

Creamy mint chocolate chip ice cream made without an ice cream maker! A delicious, dairy-free dessert with fresh mint, peppermint extract, and matcha. Just 8 ingredients required!
- Total: 6 hrs 20 mins
- Servings: 6
Ingredients
ICE CUBES
- 1 (13.5-oz.) can full-fat coconut milk (use a smooth, creamy brand // we used Field Day)
- 2 Tbsp cashew butter
- 10-12 fresh mint leaves
- 1/4 tsp peppermint extract
- 1/4 cup maple syrup
- 1 ½ tsp vanilla extract
- 1/4-1/2 tsp matcha powder (optional // for green color)
- 1 pinch sea salt (optional)
SOFT SERVE
- 2-6 Tbsp unsweetened almond milk (or other dairy-free milk)
- 1/3 – 1/2 cup semi-sweet chocolate chips (ensure vegan/dairy-free as needed // we used Enjoy Life)
Instructions
- ICE CUBES: At least 6 hours before you wish to enjoy the soft serve, prepare the coconut milk ice cubes.
- For the ice cubes, place the coconut milk, cashew butter, mint leaves, peppermint extract, maple syrup, vanilla, matcha (if using), and salt (if using) into a high-speed blender and blend until smooth with no remaining pieces of mint leaves — about 1 minute. Transfer the mixture to an ice cube tray — it should make ~14-16 standard-size ice cubes. Freeze for at least 6 hours.
- SOFT SERVE: To a food processor (our preferred method) or high-speed blender, add all of the coconut milk ice cubes, along with 2 Tbsp (30 ml) of almond milk. Pulse or blend until all of the ice cubes have completely broken down and you have a thick, smooth consistency. You may need to stop and stir a few times to get it moving, or add more almond milk 1 Tbsp (15 ml) at a time until it mixes more easily. If using a blender, use the blender’s tamper, pressing down to help it mix.
- Once you have reached a semi-smooth consistency, add in the chocolate chips (starting with the lesser amount and adding more to taste) and pulse/mix until they have evenly dispersed but are still in small, distinct pieces. Enjoy immediately!
- If storing for later, place in an airtight container and freeze. Once refrozen, the texture will be firm, scoopable, and creamy but will be much more dense/icy than the fresh soft serve.