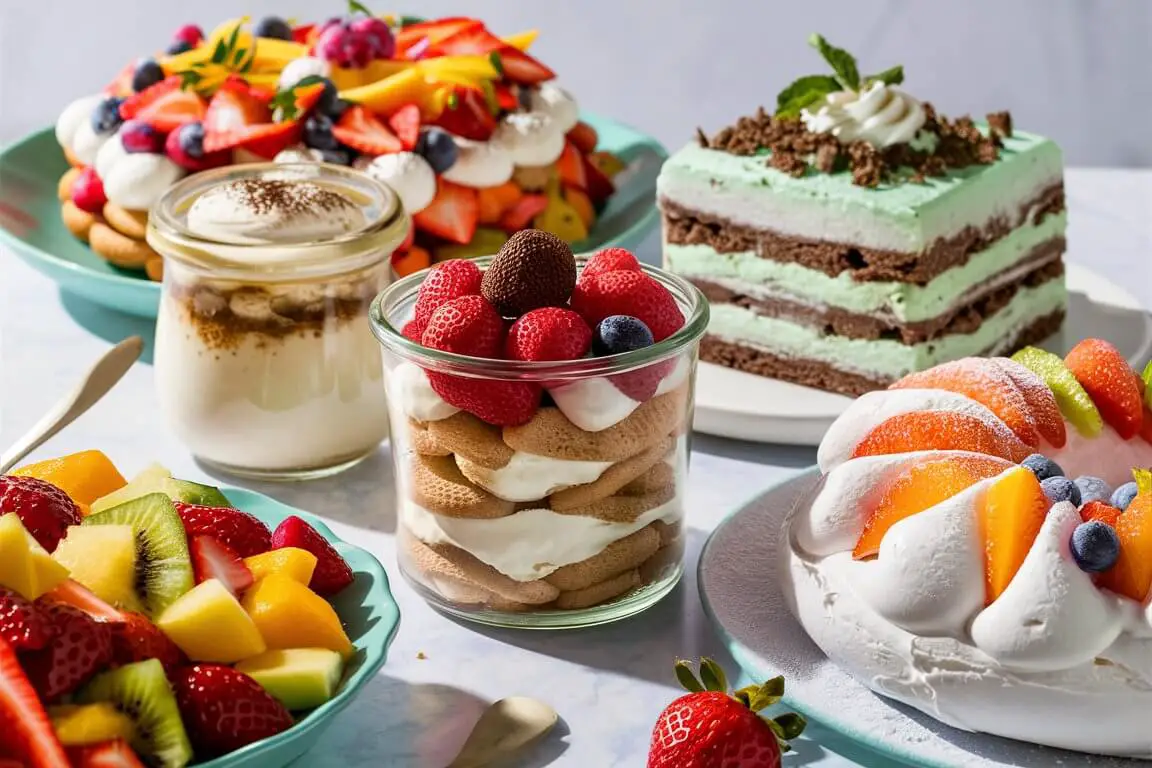
No Bake Summer Desserts – If you’re loving the heat and want something sweet that requires no baking, here are the top notch no-bake summer dessert recipes that are sure to cool you down.
Table Of Contents
- Pina Colada Popsicles
- Orange Creamsicle Pie
- Fireball Fluff Salad
- Grasshopper Pie
- Cheesecake Fruit Salad
- Cherry Fluff Salad
- No Bake Mango Lime Pie Dessert
- No-Bake Raspberry Cheesecake Squares
- Strawberry Jello Pie
- No Bake Strawberry Cream Cheesecake
- Watermelon Sorbet
- 3-Ingredient No Cook Easy Banana Pudding
- Strawberry Icebox Cake
- Strawberry Vanilla Popsicles
- No-Bake Blueberry Lemon Cheesecake
- Mango Popsicles
- Fruit Salad
- Red, White and Blue Cheesecake Salad
- Brownie Fruit Pizza
- No Bake Strawberry Lime Cheesecakes
- No Bake Mango Cheesecake Trifles
- Cherry Mango Popsicles
- No Bake Key Lime Cheesecake Bars
- Banana Cream Pie
- Blueberry Frozen Yogurt
- Watermelon Granita
- No Bake Orange Creamsicle Cheesecake
- Lemon Cheesecake
- Grill Peaches
- Frozen Greek Yogurt Granola Bars
- Pineapple Cream Cheese Pie
- Strawberry Cream Cheese Icebox Cake
Pina Colada Popsicles
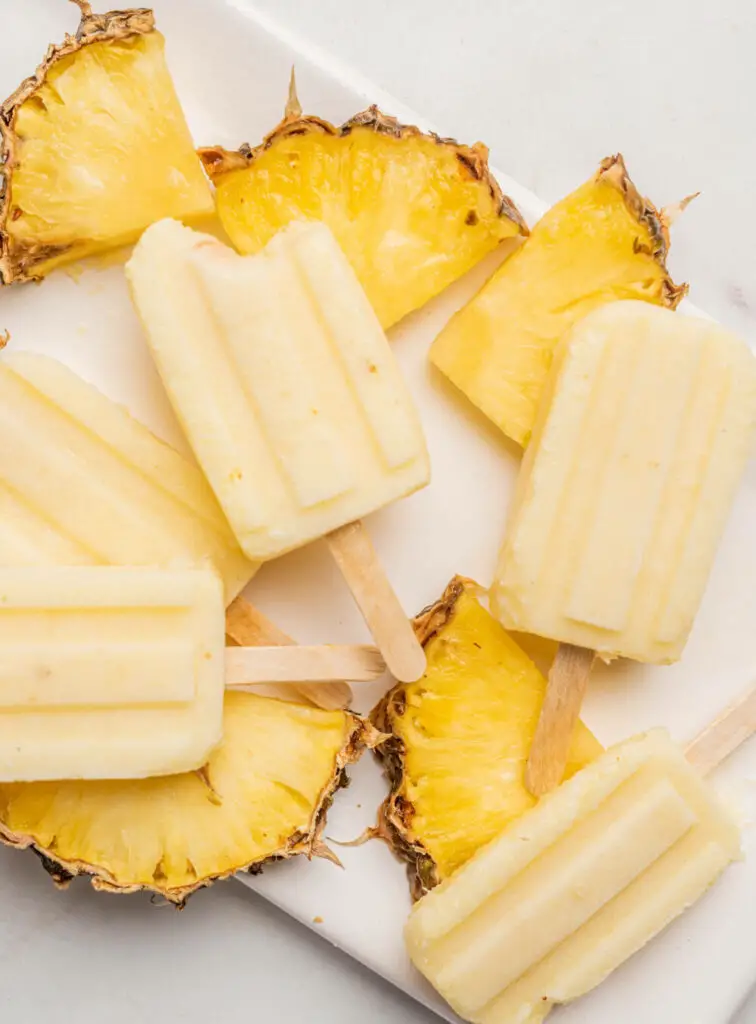
Pina Colada Popsicles – are the perfect boozy and refreshing summer treat. Sweet, satisfying and easy to make, these pina colada popsicles will help take you to a tropical destination. These are the best coconut pineapple popsicles you’ll be making over and over again.
INGREDIENTS
- 1 cup pineapple juice
- 1 cup coconut milk
- 1/4 cup granulated sugar
- 1/2 cup fresh pineapple, chopped into pieces
- 1/4 cup white rum (optional)
INSTRUCTIONS
- In a small saucepan, combine the pineapple juice and sugar over medium heat. Stir until the sugar has completely dissolved, then remove from heat and let cool.
- In a blender, blend the chopped fresh pineapple until smooth. Add the cooled pineapple juice mixture, coconut milk, and rum (if using) to the blender and pulse until well combined.
- Pour the mixture into popsicle molds, leaving a little bit of room at the top for expansion as the popsicles freeze.
- Insert popsicle sticks into the molds and freeze for at least 6 hours or overnight.
- To remove the popsicles from the molds, run the molds under warm water for a few seconds to loosen them.
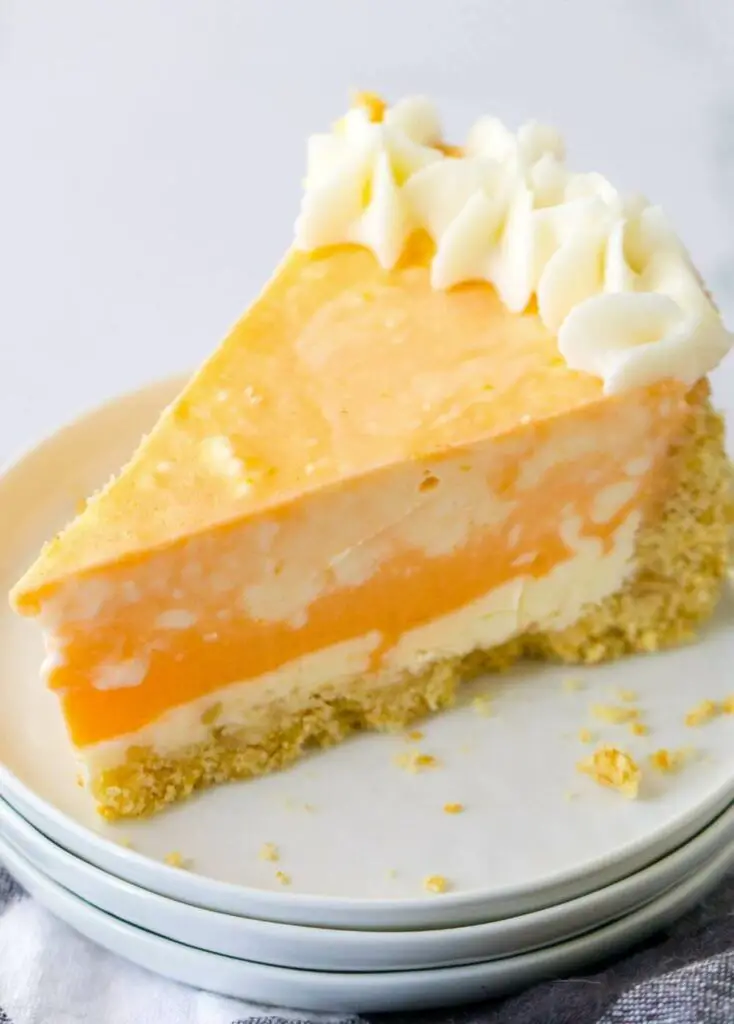
Orange Creamsicle Pie
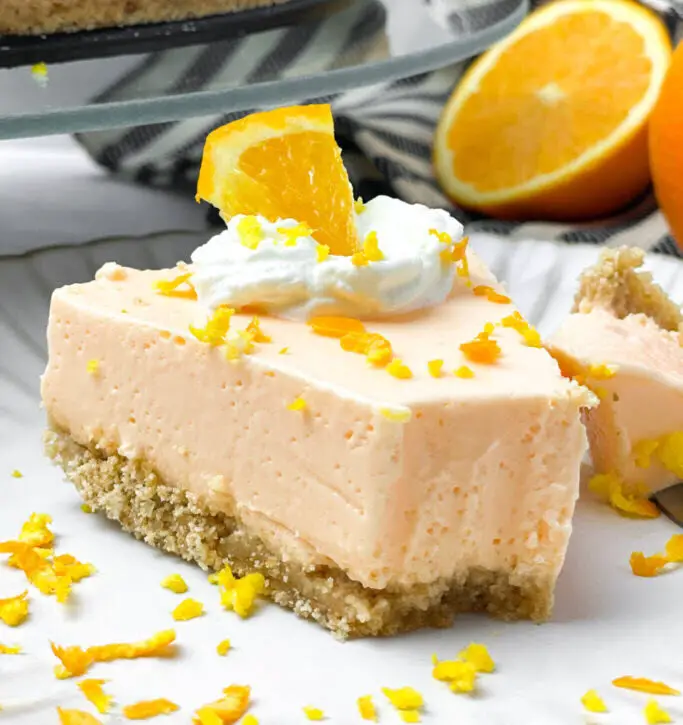
Orange Creamsicle Pie – is a silky, smooth and dreamy no-bake orange creamsicle cheesecake that is going to become your new summer favorite. It is very light, flavorful and extremely easy to make. This orange creamsicle pie makes a great warm-weather dessert.
- Prep: 20 mins
- Servings: 12 slices
INGREDIENTS
- 1 1/2 cup graham cracker crumbs
- 1/4 cups melted unsalted butter
- 1/3 cup granulated sugar
For The Orange Filling
- 1 box orange jell-o gelatin (2oz)
- 12 oz cream cheese, softened to room temperature
- 1 orange, peeled
- 1 tsp vanilla extract
- 1/4 cup orange juice
- 2 tbsp orange zest
- 12 oz cool whip
- 1 can sweetened condensed milk, around 14oz
For The Toppings
- heavy whipping cream
- orange slices, orange zest
INSTRUCTIONS
- For The Crust – Add the graham crackers to a food processor and process until you have fine crumbs. Scoop the crumbs into a mixing bowl, add the melted butter and sugar. Mix until well combined. Press mixture into the bottom and up the sides of a 9-inch pie dish and refrigerate while you make the fillings.
- Add the orange slices, orange zest, vanilla extract, and orange juice to food processor. Puree until smooth. Set aside.
- In a stand mixer combine 8 ounces of cream cheese and the orange jello mix. Beat until smooth.
- Fold in the sweetened condensed milk along with 8 ounces of Cool Whip.
- Beat the orange juice mixture into the filling.
- Pour creamsicle filling into prepared pie crust. Smooth out with a small offset spatula.
- Next, place the pie into the freezer for about 3 hours to set and chill. (Overnight is prefered)
- Serve with additional whipped cream and orange slices and zest for garnish. Serve chilled!
Fireball Fluff Salad
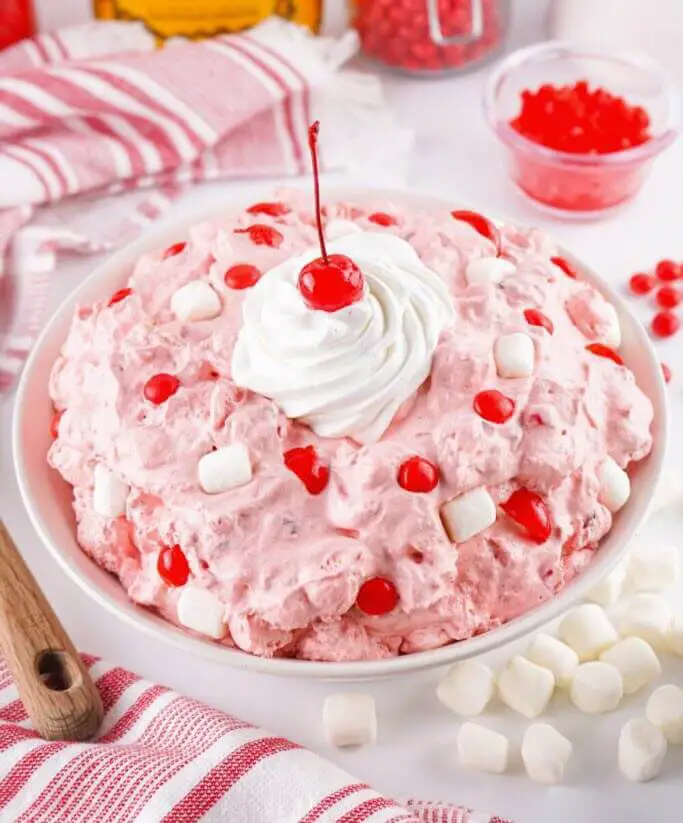
Fireball Fluff Salad – Turn to this no-bake spring and summer dessert when you only have minutes to spare! Once family and friends dive in face first into this fantastic Fireball Fluff salad, they will be asking you for this easy fluff recipe!
- Prep: 10 mins
- Servings: 12
INGREDIENTS
- 1 box cherry jell-o, 3oz
- 1 tub cool whip, 16oz
- 1 jar maraschino cherries, drained and chopped, 10 oz
- 2 1/2 cups mini marshmallows
- 1 cup sour cream
- 1 cup chopped pecans
- 1/2 cup Fireball Whiskey
- 1 tbsp ground cinnamon
- red hots, for garnish
- extra maraschino cherries, for garnish
- extra cool whip, for garnish
INSTRUCTIONS
- In a large mixing bowl, combine the cool whip and cherry jello. Mix until there are no white streaks.
- Add the rest of the ingredients, except for the garnishes, and stir until well combined.
- Cover and store in the fridge, overnight, for best results.
- Stir after removing from the fridge. Garnish if desired. Serve and enjoy!
Grasshopper Pie

This insanely delicious chocolate mint pie is completely no-bake with a minty cream cheese filling and Oreo crust. Mint chocolate lovers will enjoy this easy pie for a summer treat!
- Prep: 15 mins
- Servings: 8
INGREDIENTS
For The Crust
- 2 1/2 cup Oreo cookies, crushed
- 1/4 cup unsalted butter, melted
For The Pie
- 2 1/2 cups heavy cream
- 2 egg whites
- 1/4 cup granulated sugar
- 2 cups marshmallows + 1/4 cup water
- 1/4 cup Green crème de menthe liqueur
- 1/4 cup White crème de cacao liqueur
- green food gel
- chocolate sauce
- chocolate shavings
INSTRUCTIONS
- In a mixing bowl, combine the chocolate cookie crumbs and melted butter. Stir until the crumbs are evenly coated. Press the mixture into the bottom and up the sides of a 9-inch pie dish to form the crust. Place it in the refrigerator to chill for about 30 minutes.
- In a saucepan, combine the marshmallows and water. Heat the mixture over low heat, stirring constantly, until the marshmallows are completely melted and smooth.
- In a clean mixing bowl, whip the egg whites using an electric mixer on medium-high speed until soft peaks form.
- Add the granulated sugar to the whipped egg whites and continue to beat on medium-high speed. Beat until stiff peaks form and the sugar is fully incorporated.
- In a large bowl, combine the melted marshmallow mixture, green crème de menthe liqueur, whipped cream, white crème de cacao liqueur, whipped heavy cream and whipped egg whites until fully incorporated.Be careful not to overmix and deflate the whipped cream, just fold all the ingredients carefully.
- Remove the pie crust from the refrigerator. Pour the grasshopper filling into the crust, spreading it evenly.
- Return the pie to the refrigerator and let it chill for at least 4 hours, or until set.
- If desired, garnish with chocolate shavings on top and serve with chocolate sauce if desire!
- Slice and serve chilled.
Cheesecake Fruit Salad
This creamy and delicious cheesecake fruit salad is a simple mix of your favorite fresh fruit, Cool Whip, vanilla yogurt, cheesecake pudding mix, and sugar.
- 15 mins prep + 1 hr setting time
- 10 servings
INGREDIENTS
- 32 ounce vanilla yogurt
- 8 ounce Cool Whip, (1 tub)
- 3.4 ounce instant cheesecake pudding mix, (1 pkg)
- 2 tablespoon granulated sugar, (optional)
- 2 1/2 cup fresh fruit, any combination that you’d like
INSTRUCTIONS
- In a large bowl, whisk together Cool Whip, vanilla yogurt, cheesecake pudding mix, and sugar until thoroughly blended.
- Add about 3/4 of your chosen fruit to the bowl, then use a spatula to gently fold it into the cheesecake mixture.
- Scoop cheesecake fruit salad into a serving bowl of your choice. Smooth out the top of the salad, then decorate the top with the remaining 1/4 of fruit.
- Cover bowl and refrigerate for at least 1 hour.
- Serve as desired.
Cherry Fluff Salad
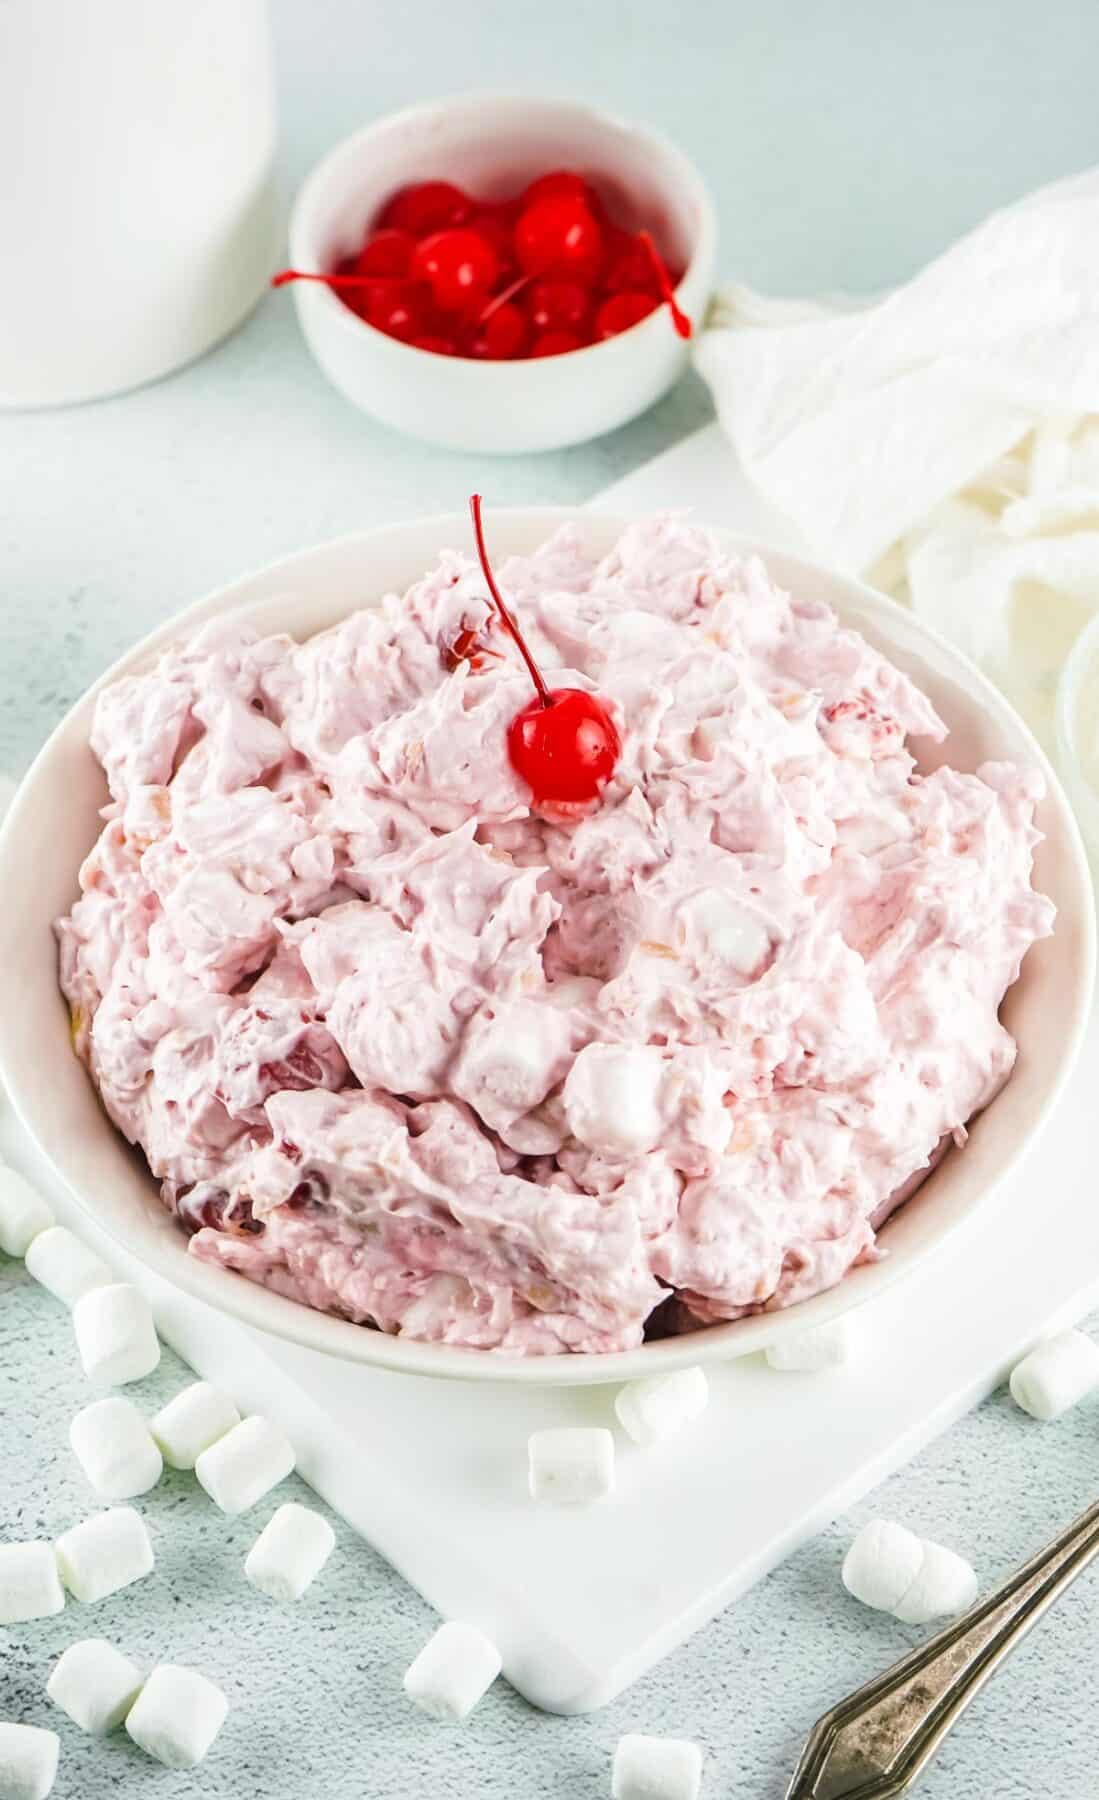
You can never go wrong with this Cherry Fluff Salad Recipe! It only takes a handful of simple ingredients to make and it’s super quick to toss together. This deliciously sweet and fruity side dish is a classic recipe that’s perfect for parties and family gatherings!
- Prep: 5 mins
- Servings: 6
INGREDIENTS
- 1 21 oz. can cherry pie filling
- 1 20 oz. can crushed pineapple, pineapple juice drained well
- 1 8 oz. tub whipped cream, such as Cool Whip
- 1 1/2 cups mini marshmallows
- 1 cup sweetened shredded coconut
- 7 oz. sweetened condensed milk, half of a regular 14 oz. can
INSTRUCTIONS
- Combine all ingredients in a large mixing bowl, combine first 5 ingredients. Then, gently fold in sweetened condensed milk.
- Mix well and serve immediately, or cover with plastic wrap and store in the fridge until it’s ready to be served.
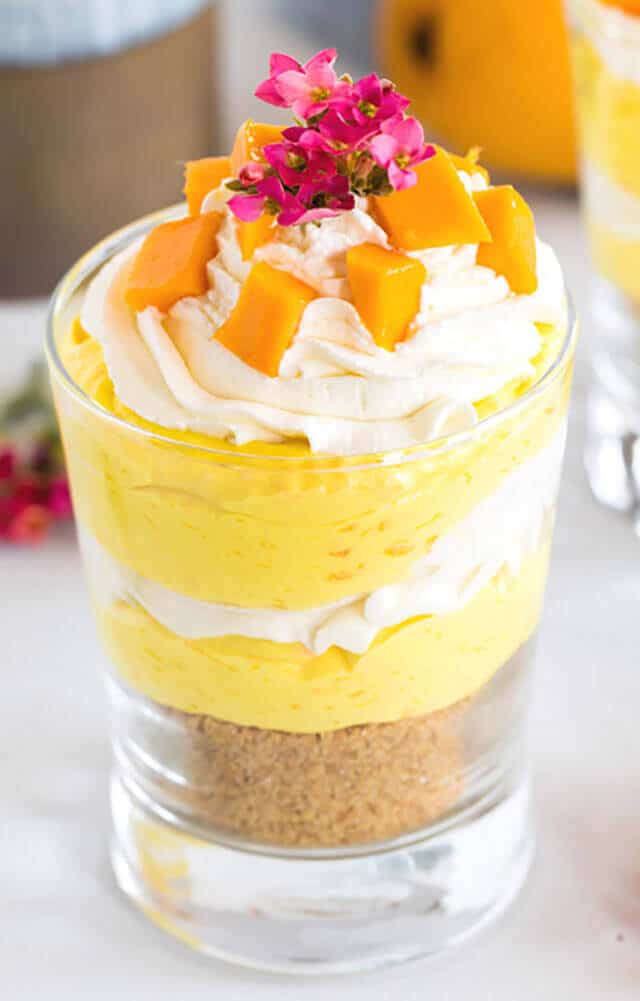
No Bake Mango Lime Pie Dessert
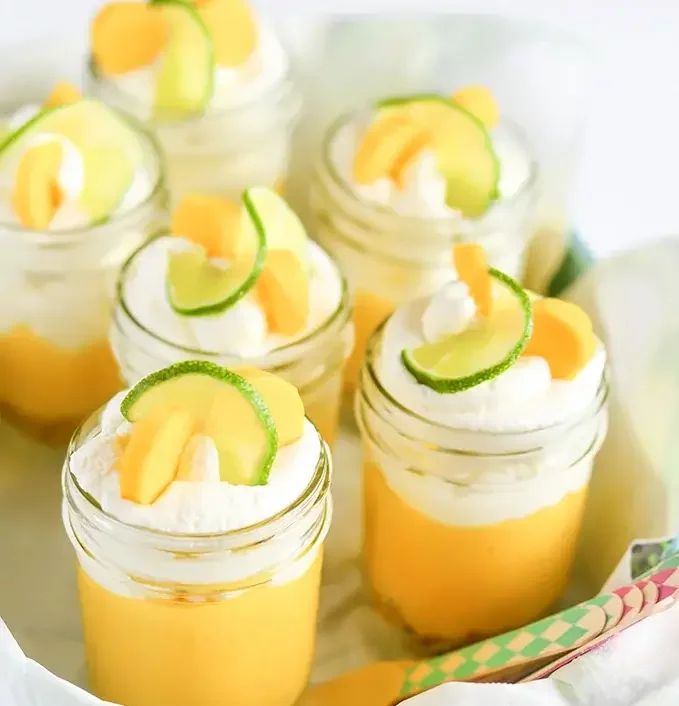
These easy crazy good, no bake mango lime pies served in mason jars are ready in just 15 minutes!
- Prep: 15 mins
- Servings: 8
Ingredients
- 10 graham crackers
- 1/4 cup almonds
- 4-5 large ripe mangoes, peeled, pitted and diced
- 1/2 can (7oz) condensed milk
- 5 tablespoons fresh lime juice
- 1/2 teaspoon lime zest
- heavy cream, whipped to serve
Instructions
- To make the pie crust, crush graham crackers and almonds in a food processor. Set aside.
- Combine diced mangoes, condensed milk, lime juice and some fresh lime zest in a bowl and using a hand blender, blend until really smooth. Place the pie filling into the fridge for about 10 -15 minutes to cool down.
- Get your mason jars ready.
- Add crushed graham cracker and almond pie crust mixture to the bottom of your jars.
- Remove the pie filling mixture out of the fridge and divide between jars.
- Top it with some whipped cream, sprinkle on some more graham crackers, add a slice of lime and some fresh diced mango and serve!
No-Bake Raspberry Cheesecake Squares
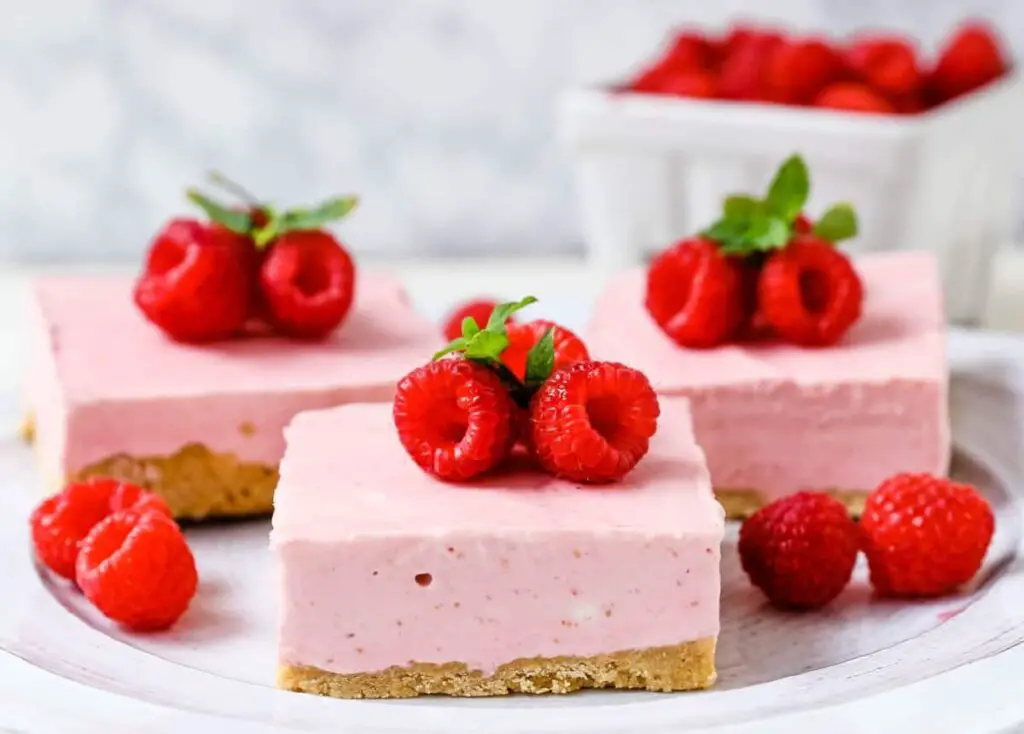
Creamy no-bake raspberry cheesecake filling on top of a shortbread or graham cracker crust topped with fresh raspberries. A creamy no-bake frozen dessert.
- Prep: 20 mins
- Servings: 12
Ingredients
Crust:
- 2 cups Shortbread Cookie or Graham Cracker Crumbs
- 1/2 cup Melted Salted Butter
- 2 Tablespoons Sugar
Raspberry Cheesecake Filling:
- (2) 8-ounce pkgs. Cream Cheese (softened)
- 1 cup Sugar
- 1 1/2 cups Fresh Raspberries (reserve 1/4 cup for garnish)
- 1 cup Fresh Whipped Cream
- 1 teaspoon Vanilla
Garnish:
- Fresh Raspberries
- Fresh Whipped Cream
Instructions
For the Strawberry Cheesecake Filling:
- While cookie crust chills, add cream cheese, sugar, strawberries and vanilla to Vitamix.
- Blend mixture starting at Variable 1 and going up to Variable 9 and blend until smooth. If needed, use the tamper to push all the ingredients down towards the blades. This will insure everything is blended evenly and smoothly.
- Add half of whipped cream to cheesecake filling and gently fold in using a spatula. Repeat with remaining whipped cream.
- Remove baking pan with crust from refrigerator and pour filling into baking pan and smooth with a spatula.
- Freeze cheesecake for at least 4 hours then use a hot knife cut into 3 rows horizontally and vertically creating 9 bars. Keep frozen and put in refrigerator for about 30 minutes before serving.
Crust:
- Line an 8 x 8 square baking pan with parchment or wax paper leaving some to overhang outside the sides of the pan.
- In a food processor, blend the shortbread or graham crackers until fine crumbs form. Add melted butter and sugar and mix until combined. If you don’t own a food processor, add the crumbs, melted butter, and sugar in a bowl and mix together.
- Press crust mixture into the bottom of the pan. Place in the freezer for at least 15 minutes.
Raspberry Cheesecake Filling:
- While the crust is chilling, make the cheesecake filling. Add softened cream cheese, sugar, and fresh raspberries to a blender or mixer. Mix until completely creamy.
- Whip 1 cup of heavy cream until soft peaks form. Fold into cream cheese mixture.
- Remove the crust from the freezer and pour filling all over the crust. Cover and place in the freezer for at least 4 hours or overnight.
- When ready to serve, cut into slices and top with fresh raspberries and homemade whipped cream. Serve cold.
Strawberry Jello Pie
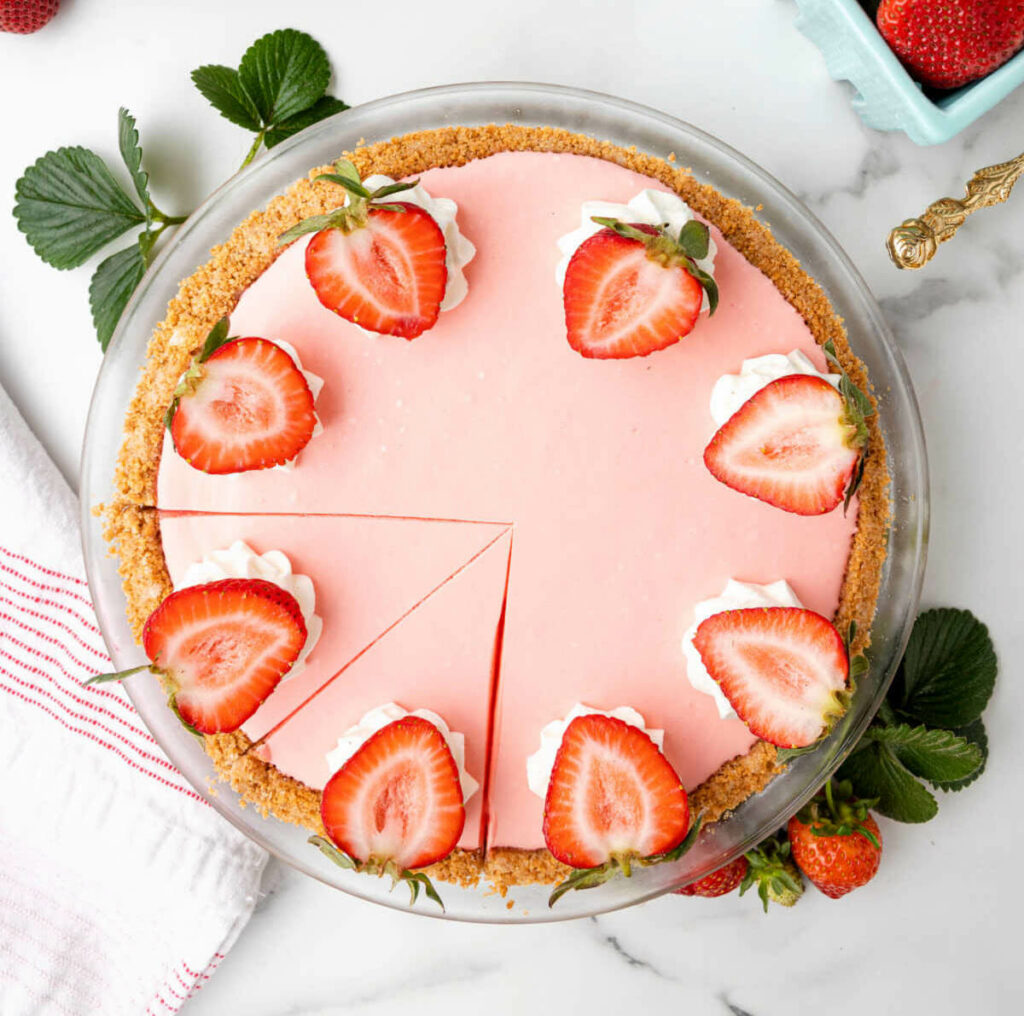
Cool and creamy strawberry Jello pie! This super easy no bake pie is made with just 4 ingredients and takes just minutes to put together.
- Prep: 15 mins
- Servings: 8
INGREDIENTS
- 3 ounce package strawberry Jello powder
- 2/3 cup boiling water
- 1 cup ice water
- 8 ounces Cool Whip, thawed, plus extra for garnish
- 9 inch graham cracker pie crust
- Strawberries for garnish
INSTRUCTIONS
- Stir together the Jello mix and boiling water in a large mixing bowl until all the Jello has dissolved.
- Stir in the cold water.
- Fold in the Cool Whip.
- Place the filling into the fridge for 30 minutes.
- Spread the chilled filling into the crust.
- Place it in the fridge overnight.
- Decorate the pie with additional Cool Whip and strawberries.
Notes
- Strawberry Jello powder: You’ll need the dry powder.
- Cool Whip: Or another frozen whipped topping, like TruWhip.
No Bake Strawberry Cream Cheesecake
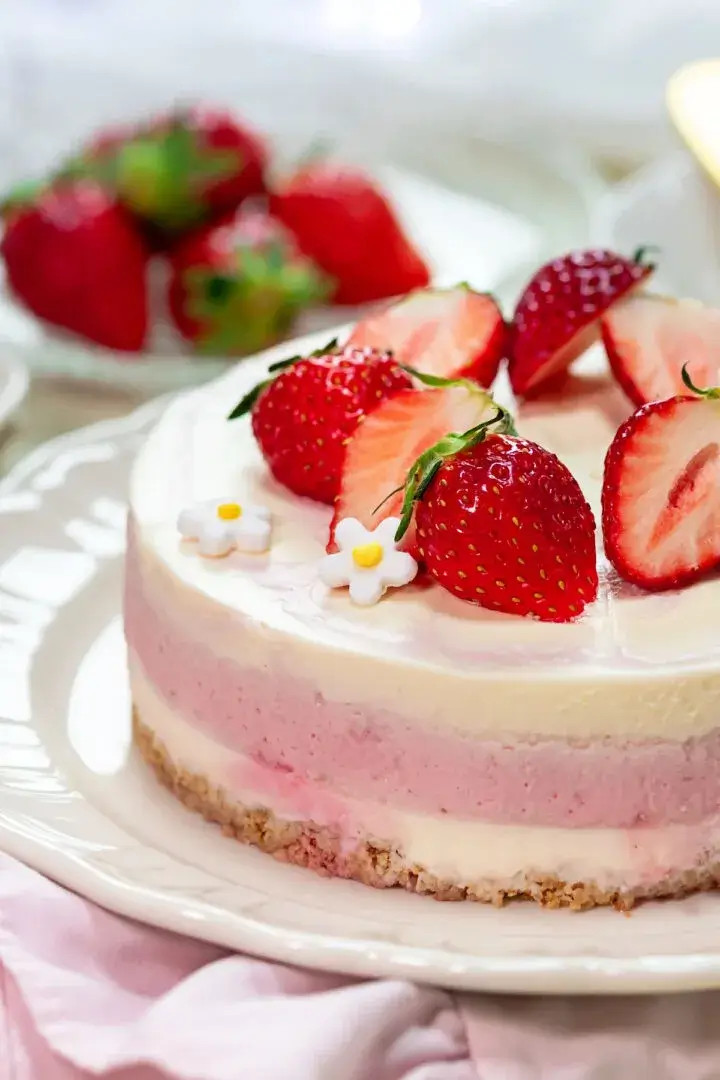
No bake strawberry cream cheesecake is a delicious dessert that can be enjoyed all year round, especially during the summer when turning on the oven can be a daunting task. That’s why I love no bake desserts, especially this creamy strawberry cheesecake.
- Prep: 45 mins
- Servings: 8
Ingredients
For the crust
- 1 1⁄2 cups cups graham cracker crumbs
- 6 tbsp unsalted butter, melted
- 3 tbsp granulated sugar
For the strawberry mixture
- 1 lb fresh strawberries, sliced (450g)
- 2 tbsp granulated sugar
- 1 tbsp water
- 1 tsp cornstarch (optional)
For the filling
- 16 ounces cream cheese, softened (450g)
- 2 tbsp sour cream
- 1 tsp lemon juice
- 1 cup powdered sugar (confectioners’ sugar)
- 1 tsp vanilla extract
- 1 cup heavy cream
Directions
Prepare Graham Crust
- Prepare the springform pan by lining it with plastic wrap. This will make it easier to remove the cheesecake later on.
- To create the crust, combine graham cracker crumbs and melted butter, mix it until it resembled wet sand. Next, press the graham cracker mixture into the bottom of a springform pan and on the sides. Refridgerate for about 10 minutes to let it set before adding the cheesecake filling.
Prepare the Strawberry Mixture
- First, rinse and hull fresh strawberries and puree them in a blender until smooth.
- Transfer the fresh strawberry puree to a medium saucepan, add sugar and water. Cook the mixture over medium heat until the sauce thickens, which takes around 10-15 minutes. To thicken the sauce even further and give it a jam-like consistency, you can add 1 teaspoon corn starch. Mix it well with the strawberry mixture and continue cooking over medium heat until the mixture begins to thicken and bubble.
- Remove the saucepan from the heat and set it aside to cool to room temperature.
Make the Creamy Cheesecake Filling
- Beat the cream cheese with powdered sugar till smooth. Add sour cream, vanilla essence and lemon juice. Once the cream cheese mixture is smooth, fold in some whipped cream that has been whipped to stiff peaks. This gives the cheesecake its light and airy texture. I also add some heavy cream to the mixture to make it even creamier.
- Once all the ingredients are combined, I have a creamy filling that is ready to be poured into the crust.
Assemble the Strawberry Cream Cheesecake
- Divide the cheesecake filling into 4 separate small mixing bowls and pour strawberry mixture (once it’s completely cooled down) to every bowl to create different shades of pink. If you wish to get more bright pink color, consider adding 1-2 drops of food coloring.
- Remove the springform pan from the fridge and spoon the lightest color of cheesecake into the crust and smooth evenly. Place into the freezer for 20 minutes.
- Take the next darker shade of pink cheesecake batter and spread on top of the first layer. Place back into the freezer for another 20 minutes.
- Continue with adding the last two shades of pink to the cheesecake. Making sure that the darker shade is on top.
- Cover the pan with plastic wrap and refrigerate overnight. This will give the cheesecake enough time to set and become firm.
- Once the cheesecake has set, remove it from the refrigerator and carefully remove the plastic wrap from the top of the cheesecake.
- If desired, you can garnish the top of the cheesecake with fresh strawberries or whipped cream before serving, or you can scoop the cool whip into the piping bag and pipe dollops of cool whip around the edges, sprinkle graham cracker crumble around the cheesecake and place a strawberry slice on top
Notes
- Don’t forget that the cream cheese has to be at room temperature. This allows it to mix smoothly and easily with the other ingredients. I usually take it out of the fridge a few hours before I start making the cheesecake.
- To make the strawberry sauce really smooth, strain it to remove any seeds or lumps before adding it to the saucepan. This step is optional, but it gives the cheesecake a more refined texture.
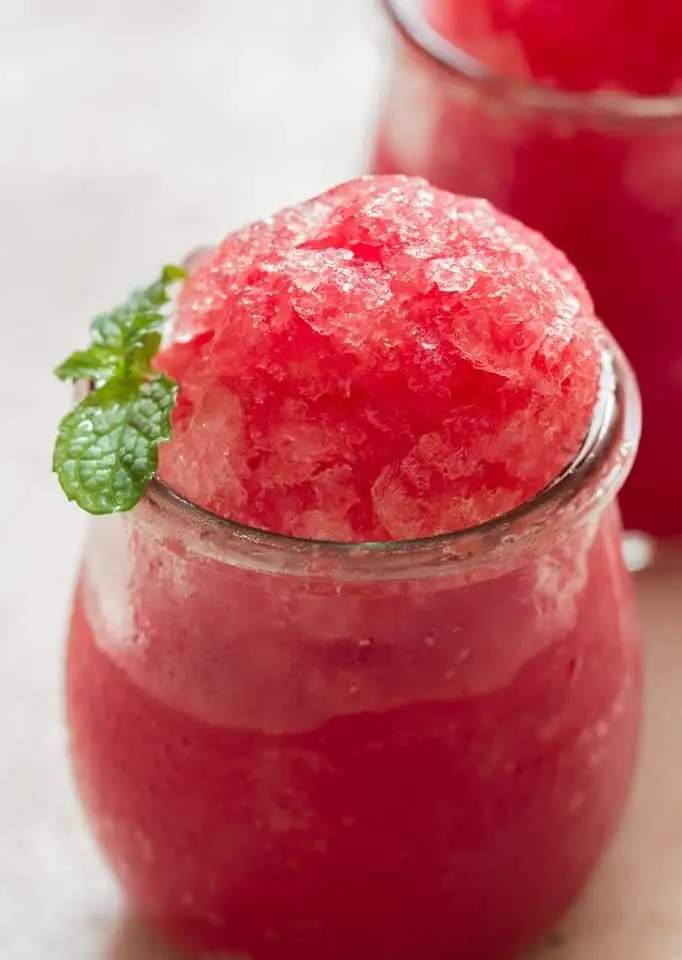
Watermelon Sorbet
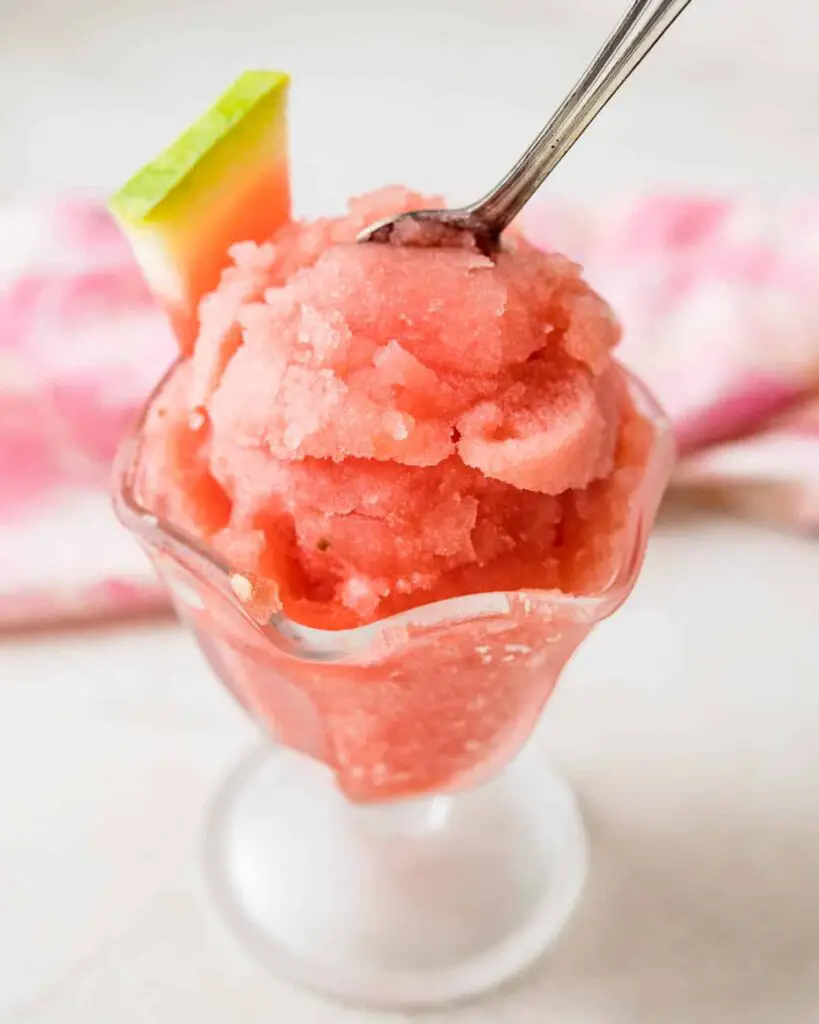
This light, refreshing watermelon sorbet is a delicious, dairy free dessert that’s perfect for summer! Cool off with this riff on the classic pink lemonade, made with fresh watermelon and lemon juice.
- Prep: 30 mins
- Servings: 8
INGREDIENTS:
- 4 cups fresh seedless watermelon cut into chunks
- ½ cup lemon juice fresh squeezed from 2-3 lemons
- ½ cup sugar
- ¼ cup corn syrup
- 2 tablespoons vodka optional
DIRECTIONS:
MAKE THE WATERMELON SORBET MIXTURE:
- In a small saucepan, combine the sugar, corn syrup and lemon juice. Bring to a boil over high heat, stirring constantly until the sugar is completely dissolved. Set aside to cool.
- Transfer the watermelon chunks to a food processor or blender and pulse until completely pureed.
- Add the lemon syrup and vodka (if using) to the watermelon puree and pulse to blend. Cover and refrigerate for at least 2 -3 hours until very cold.
MAKE THE SORBET:
- Transfer the watermelon sorbet mixture to your ice cream maker and churn according to the manufacturers instructions, about 20-25 minutes or until the sorbet freezes to the consistency of soft whipped cream.
- Transfer the watermelon sorbet to a freezer safe storage container and freeze until firm, at least 4 hours.
- To serve, let the watermelon sorbet rest on the counter for about 5 minutes to make it easier to scoop.
IF YOU DON’T HAVE AN ICE CREAM MAKER:
- Make the watermelon sorbet as directed, then transfer to a wide, shallow freezer-safe container, like a 13×9″ cake pan. Transfer the pan to the freezer.
- Remove the pan every 20-30 minutes, and use a fork to scrap and mash the watermelon sorbet. Please continue to do this until the mixture is frozen, then pack it into an airtight storage container to keep in the freezer.
NOTES:
Vodka doesn’t change the flavor of the watermelon sorbet or make it boozy. It simply prevents the sorbet from hardening to a solid mass so you can scoop it right from the container.
If you want to skip it, you can, but you may need to let the sorbet sit on the counter for 5-10 minutes to soften enough to scoop.
3-Ingredient No Cook Easy Banana Pudding
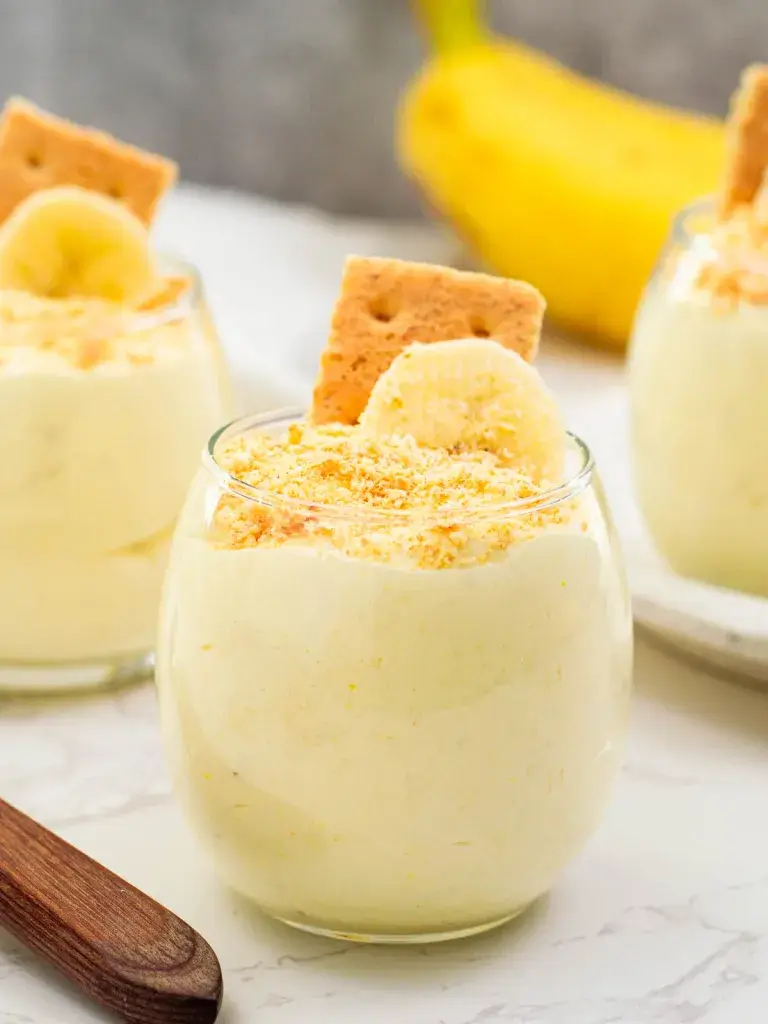
Hands down the best banana pudding recipe around! With minimal ingredients and a five minute prep time, this creamy 3-ingredient banana pudding recipe is the perfect way to impress at a party or to satisfy a sweet tooth at home.
- Prep: 5 mins
- Servings: 6
Ingredients
- 2 ripe bananas
- 3.4 oz pkg vanilla instant pudding mix
- 8 oz tub Cool whip, thawed in the refrigerator
Instructions
- In a mixing bowl, mash your bananas
- Add the instant pudding mix and Cool Whip and stir until well combined.
- Serve your pudding with fresh banana slices, Nilla wafers, or graham crackers.
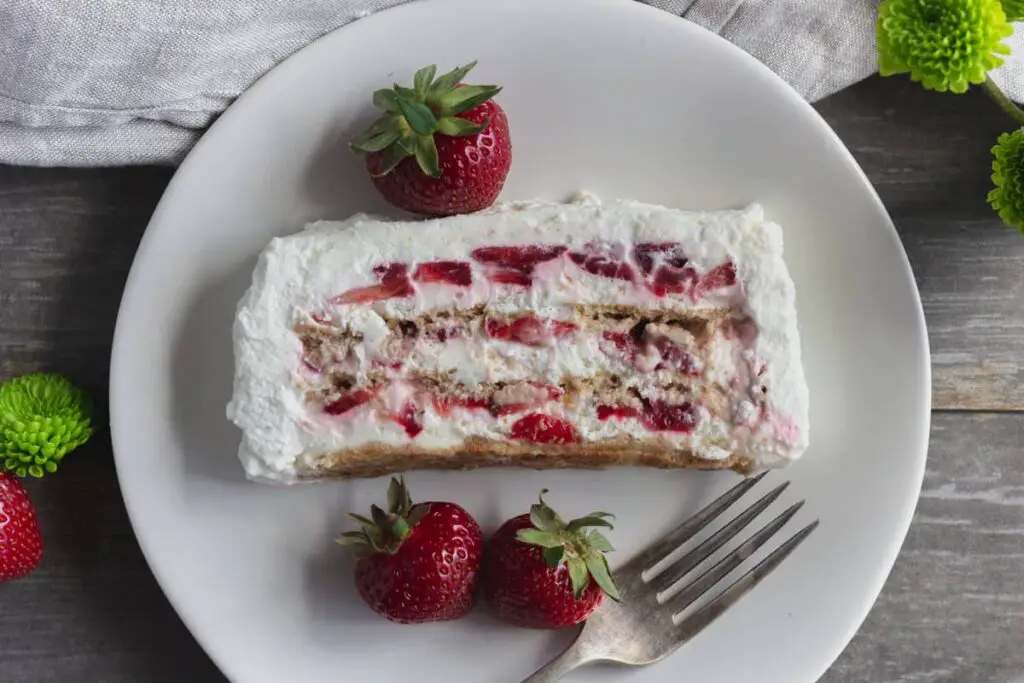
Strawberry Icebox Cake
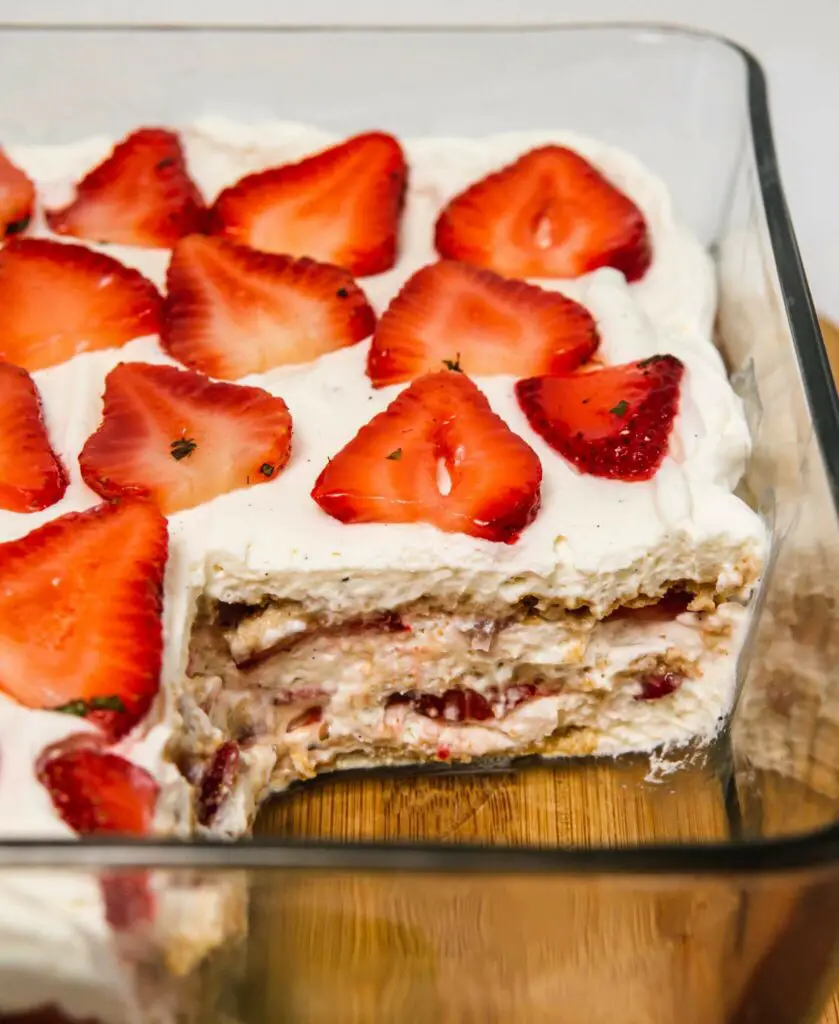
Fluffy. Creamy. Fruity. My Strawberry Icebox Cake is a simple and delicious, no-bake dessert. The combination of juicy strawberries, fresh mint, cream, and graham crackers, creates the perfect refreshing treat for a hot summer’s day!
- Prep: 30 mins
- Servings: 8
INGREDIENTS
- 1-2 pint Fresh Strawberries, sliced
- 1/2 Lime, juiced
- 1-2 tsp Fresh Mint, finely chopped (optional)
- 4 oz (113g) Cream Cheese, Softened
- 6 tbsp Honey, divided (1 tb strawberries, then 5-7 tbsp for cream)
- 2 cups Heavy Cream
- 1 tsp Vanilla bean paste, or vanilla extract
- 1-2 sleeves Graham Crackers
INSTRUCTIONS
- In a small bowl, mix together strawberries, honey, lime juice, and chopped mint. Set aside. (Note: this allows the flavours to develop while preparing cream mixture)
- In a large bowl and with an electric mixer (or whisk), beat cream cheese, vanilla, and honey together until smooth and creamy. Add heavy cream with whip until mixture forms a stiff whipped cream consistency. Add additional sugar/honey as desired. Set aside.
Assembly
- Add a thin layer of the cream mixture to the bottom of a 9”x9” baking dish (or similar sized dish).
- Next, top cream layer with graham crackers until surface is fully covered.
- Divide remaining cream mixture into approximately 3 portions. Top graham crackers with 1/3 of cream mixture. Then place about 1/3 of thinly sliced strawberry mixture. Repeat process 2 more times. The last layer will be decorating the top with strawberries. (Note: Additional honey can be drizzled over the top of the strawberry layers, as desired)
- Cover baking dish with plastic wrap or appropriately sized lid.
- Refrigerate overnight, scoop/cut, and enjoy!
NOTES
- Chilling this dessert overnight allows the graham crackers to absorb the cream and strawberry juices to make a deliciously soft and flavourful icebox cake!
- This dessert will be soft and easily eaten with a spoon, like a pudding!
- If you’re short on time, this dessert can be chilled for 4 hours.
- If not using a 9″x9″ baking dish, remember that the smaller the container you use, the taller the resulting Icebox cake!
- In the refrigerator, this Strawberry Mint Icebox Cake lasts for up to 2 days.
Strawberry Vanilla Popsicles
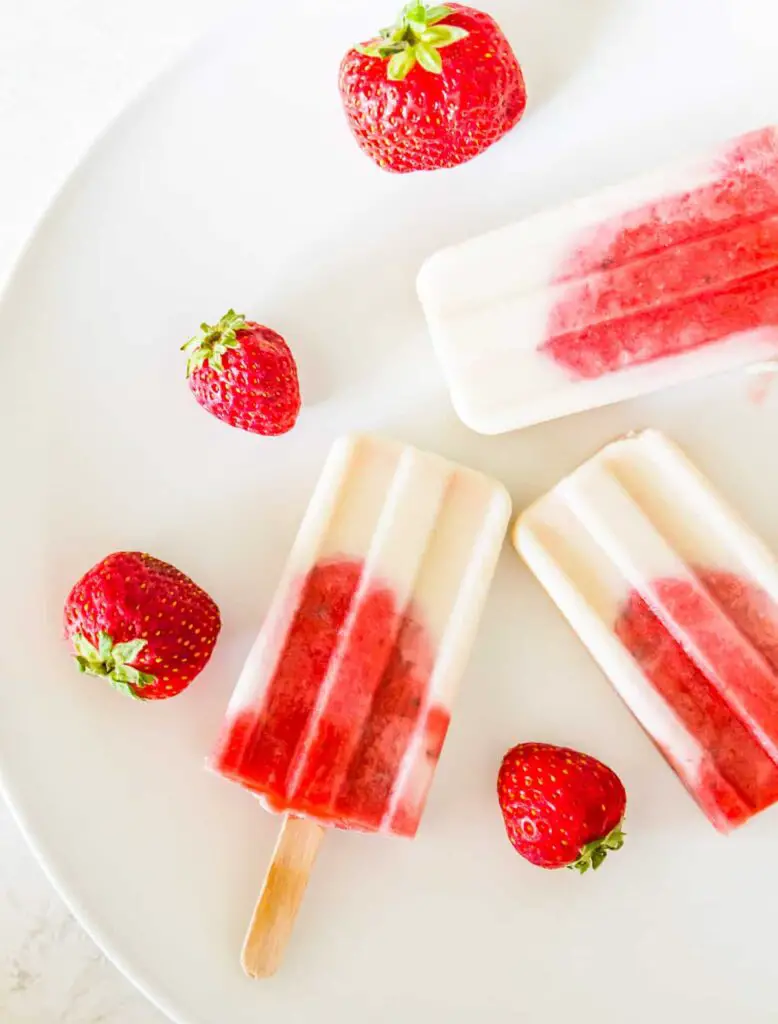
These strawberry vanilla popsicles are the best! Easy to make they are full of flavour and are such a pretty pink colour. This healthy dessert is also dairy free, paleo and vegan.
- Prep: 20 mins
- Servings: 10 popsicles
Ingredients
Vanilla Layer
- 1 cup full fat coconut milk
- 1 tablespoon organic vanilla extract
- 3 tablespoon maple syrup or honey
Strawberry Layer
- 2.5 – 3 cups fresh strawberries
- 1/2 cup full fat coconut milk
- 1 tablespoon organic vanilla extract
- 2 tablespoon maple syrup or honey
Instructions
Vanilla Layer
- Place all the ingredients into your food processor or high speed blender and blend until smooth.
- Pour into your popsicle molds (about 1/3 to 1/2 full). Place in the freezer and freeze for 20-25 minutes
Strawberry Layer
- While the vanilla layer is freezing add the ingredients for the strawberry layer to your food processor or blender and blend well until smooth.
- Remove the popsicle molds from the freezer (after 10-15 minutes) and pour the strawberry layer on top of the vanilla layer.
- Place the lid on the mold and put the popsicle sticks into each popsicle (use the slots on the top of the lid of your popsicle mold).
- Place the molds back in the freezer and freezer for 3 hours, or until fully frozen.
- Serve and enjoy!
Notes
- Run the popsicle molds under hot water for a few seconds when you remove them from the freezer to make the popsicles easier to remove from the mold.
No-Bake Blueberry Lemon Cheesecake
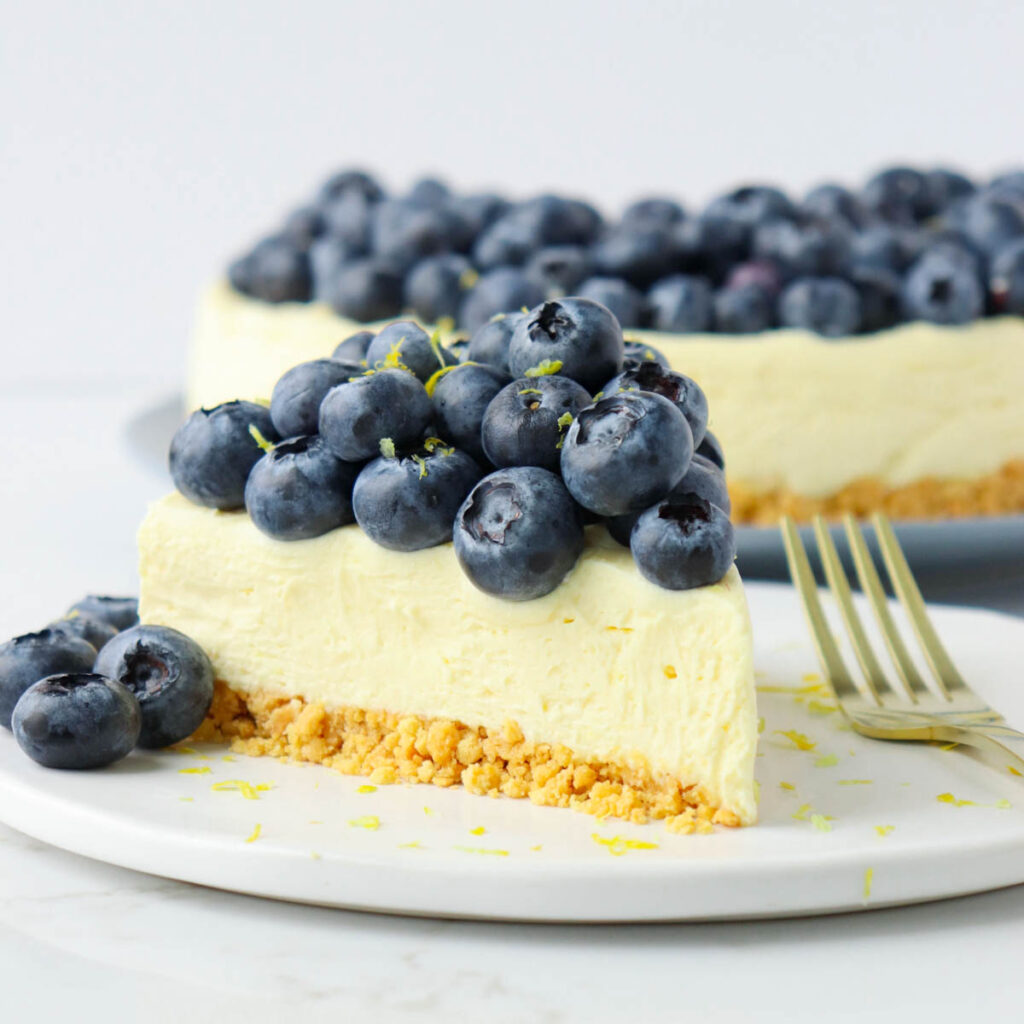
Creamy lemon cheesecake filling atop a buttery vanilla cookie crust topped with loads of juicy, in-season blueberries, this cheesecake recipe is dessert perfection!
- Prep: 30 mins
- Servings: 12 slices
INGREDIENTS
For the Crust:
- 2 cups crushed vanilla sandwich cookies (with icing) *(approximately 20 cookies)
- ¼ cup salted butter * (melted)
For the Cheesecake Batter:
- 16 ounces cream cheese softened to room temperature
- 1 cup powdered sugar (confectioners sugar)
- 1 tablespoon lemon zest
- 2 tablespoons fresh lemon juice
- 2 teaspoons vanilla extract
- 2 cups heavy whipping cream (I use 33%)
- ¼ cup instant lemon pudding mix (powder)
- 1 pound fresh blueberries (washed and patted dry)
INSTRUCTIONS
- Lightly grease the bottom and sides of a 9-inch springform pan with non-stick spray. Mix together the vanilla cookie crumbs and melted butter and press into the bottom of the pan to form a crust. Refrigerate while making the filling.
- Place the softened cream cheese, powdered sugar, lemon zest, lemon juice, and vanilla in a large mixing bowl and beat with an electric handheld mixer on high speed until smooth. Add the whipping cream and instant pudding mix and continue mixing, starting on low speed and increasing to high until the mixture is fluffy and whipped.
- Spread the filling over the prepared crust, smoothing out the top with a spatula. Refrigerate for at least 4 hours or overnight before serving.
- For serving, you may top the entire cheesecake with the blueberries and then slice it or top the individual pieces with blueberries, whichever you prefer. Serve with whipped cream, if desired. Enjoy!
NOTES
- Crush up approximately 20 sandwich cookies (with the icing) using a food processor or place them in a freezer ziplock bag and crush them with a hammer.
- Add ⅛ teaspoon of salt to the crust if using unsalted butter instead.
Mango Popsicles
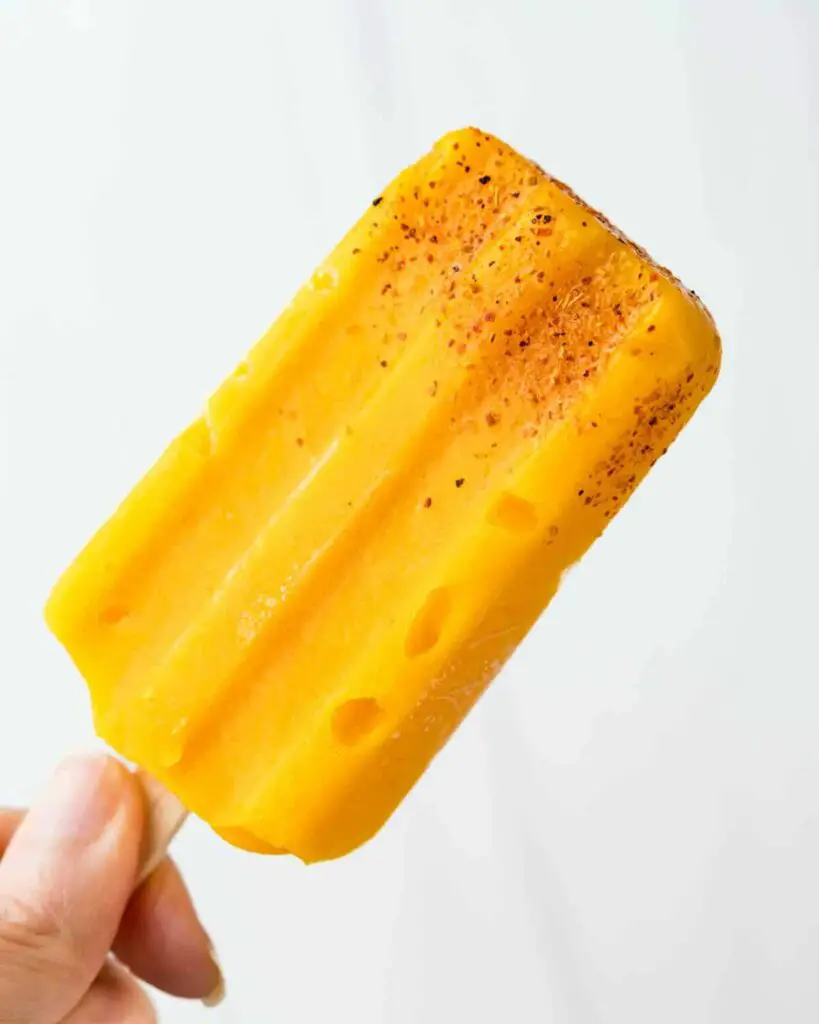
These refreshing fruity tropical treats take 5 minutes to prep. They are made with fresh mangoes, lime juice, optional coconut liqueur, and Tajin garnish. They’re a light, healthy snack for summer.
- Prep: 5 mins
- Servings: 8 popsicles
INGREDIENTS:
- 2½-3 cups mango chunks from 4-5 mangoes
- ¼ cup coconut liqueur or other liqueur or flavored rum
- ¼ cup lime juice
- Tajin (optional)
DIRECTIONS:
FOR MANGO POPSICLES:
- Cut the mangoes vertically along either side of the pit and use a spoon to scoop out the flesh. Cut away the excess fruit from around the pit.
- Combine all ingredients, except Tajin, in a blender and puree until smooth. Pour the puree into popsicle molds, add the “stick” and freeze until solid.
- Fill a glass with hot tap water and dip the popsicle mold into the hot water — up to but not past the rim. Hold for 10 seconds in the water, then slip the popsicle from the mold.
TO GARNISH:
- Let the popsicles sit out for a few minutes at room temperature, then sprinkle with Tajin (so the seasoning sticks).
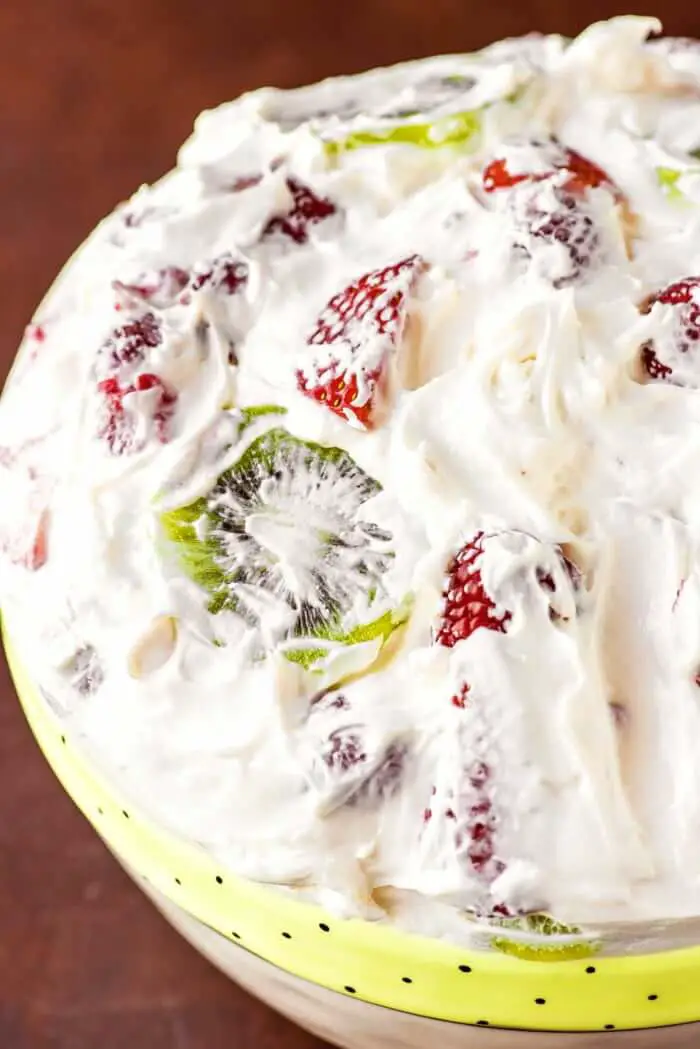
Fruit Salad
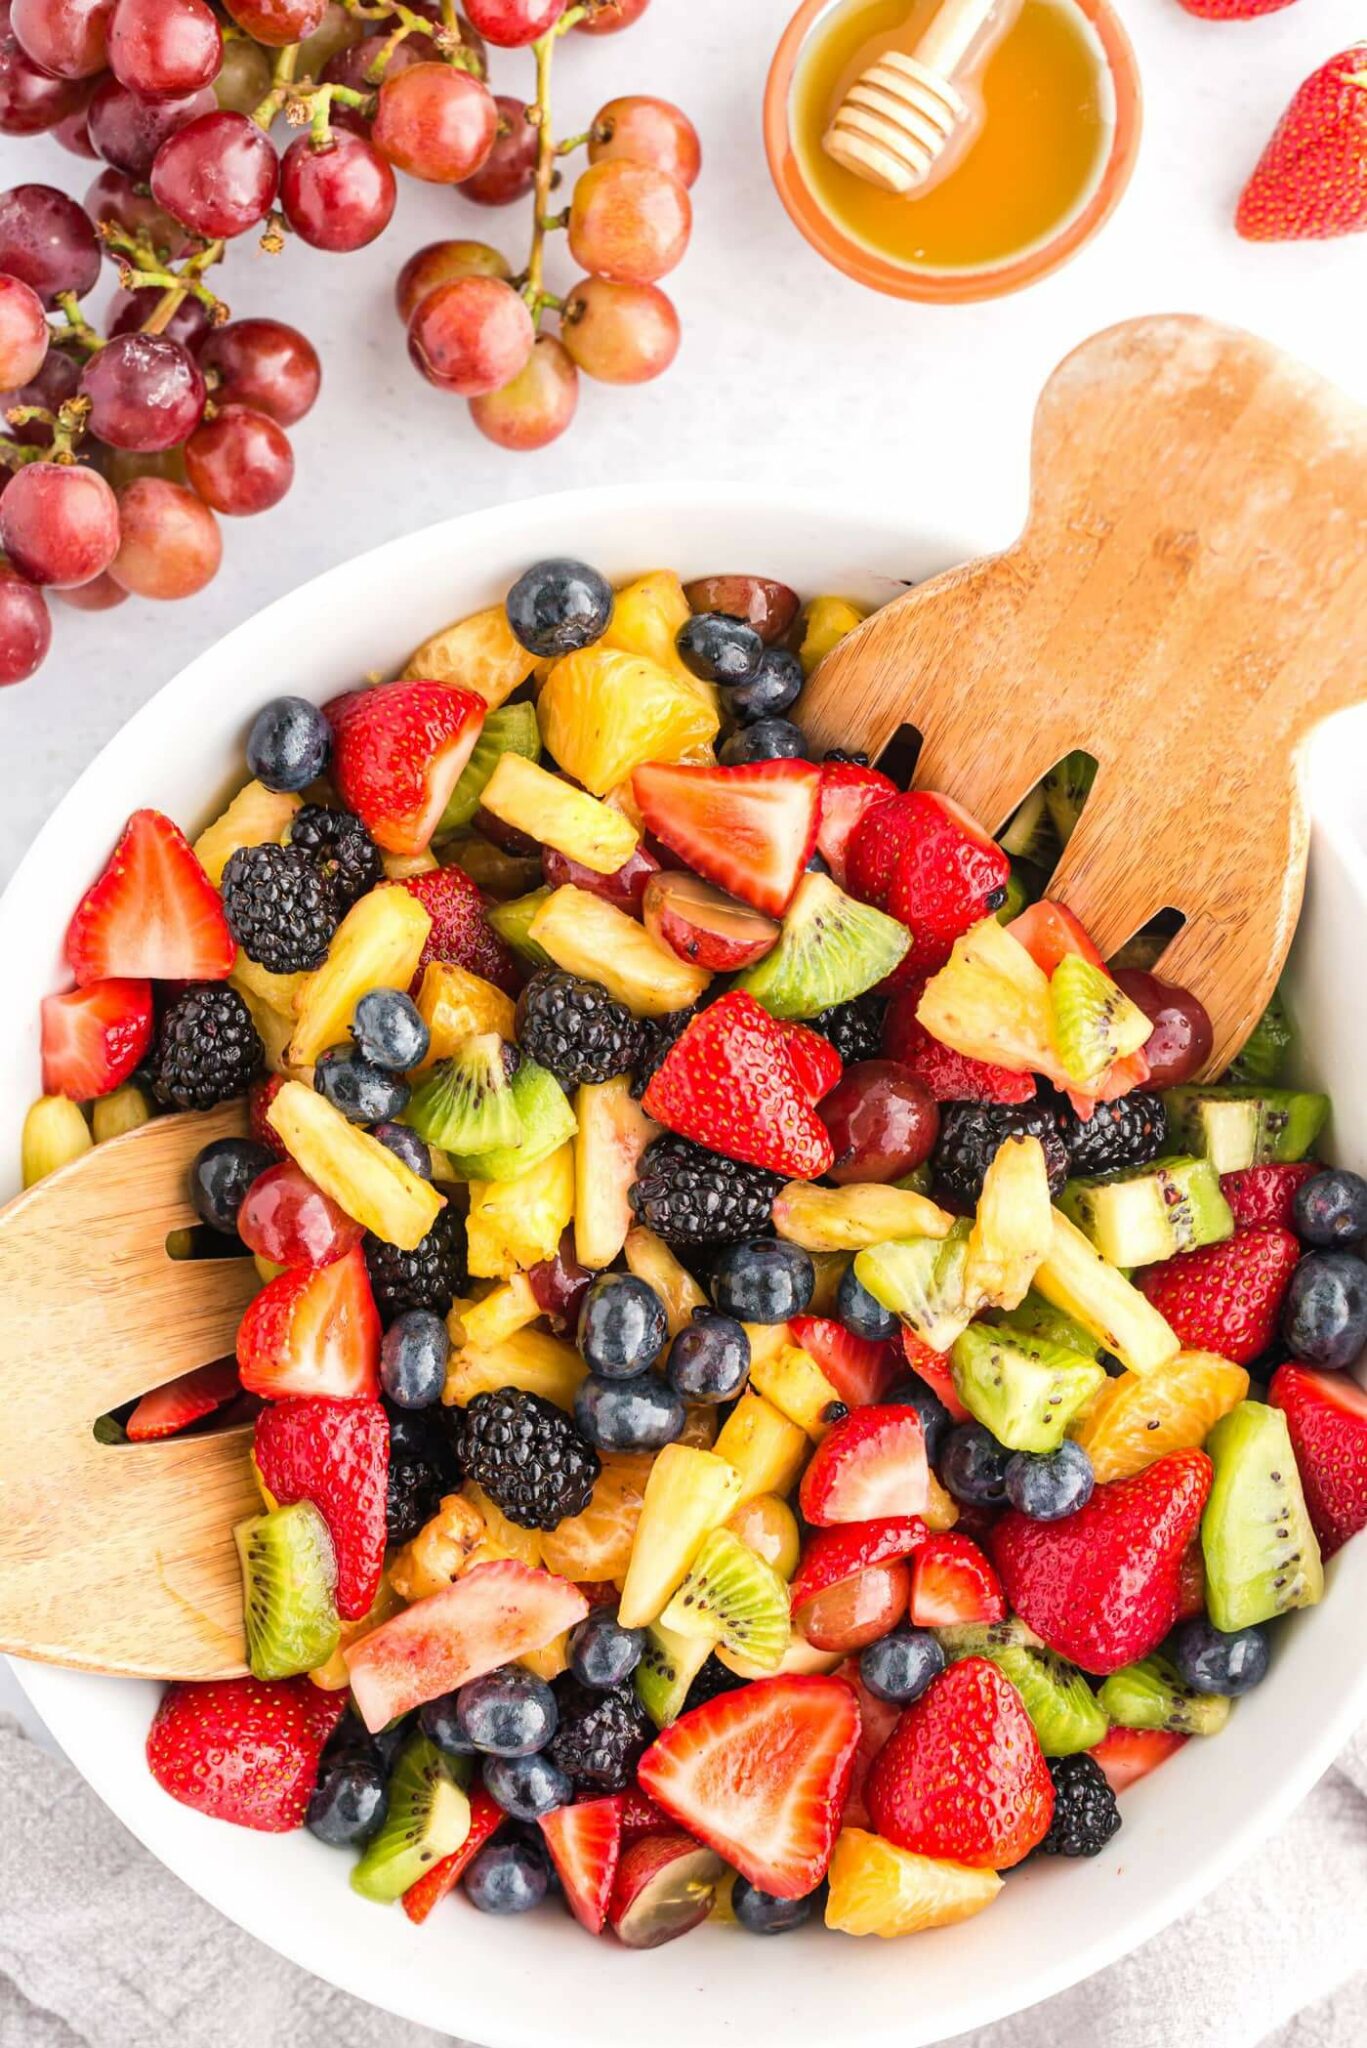
Colorful, gorgeous, delicious fruit salad! This is one of those recipes that makes the rounds in your family. Packed with fresh berries and tropical fruit and tossed with a sweet dressing, it’s always a hot item!
- Prep: 20 mins
- Servings: 10
Ingredients
- 2 tablespoons orange juice
- 2 tablespoons pineapple juice
- ¼ cup honey
- 2 cups fresh pineapple wedges
- 1 pound strawberries, hulled and quartered (about 2 1/2 cups)
- 3 kiwi fruit, peeled, quartered and sliced (about 6 oz, or 1 1/2 cups)
- 1 ½ cups fresh orange wedges, halved (or fresh mandarin oranges)
- 1 cup red seedless grapes, cut in half (about 5 oz)
- 1 cup blueberries, about 5 oz
- 1 cup blackberries, about 5 oz
Before You Begin
Because of the honey, the strawberries will begin to break down due to the natural sugar. So serving right away is ideal for a pretty fruit salad. On the other hand, the longer it sits, the better it tastes! So if you don’t mind the strawberries getting a little soft, leave it in the fridge for a few hours to let the flavor mingle.
When cutting the fruit, quarter the strawberries, halve the grapes, cut kiwi into quarters then slices, and leave blackberries and blueberries whole. If you are using regular sized oranges, peel and segment, then cut the segments in half.
Instructions
- Whisk together orange juice, pineapple juice, and honey.
- Add fruit to a large bowl and add the dressing, tossing gently to combine.
- Cover and refrigerate for 1 hour before serving. Chill until ready to serve.
Red, White and Blue Cheesecake Salad
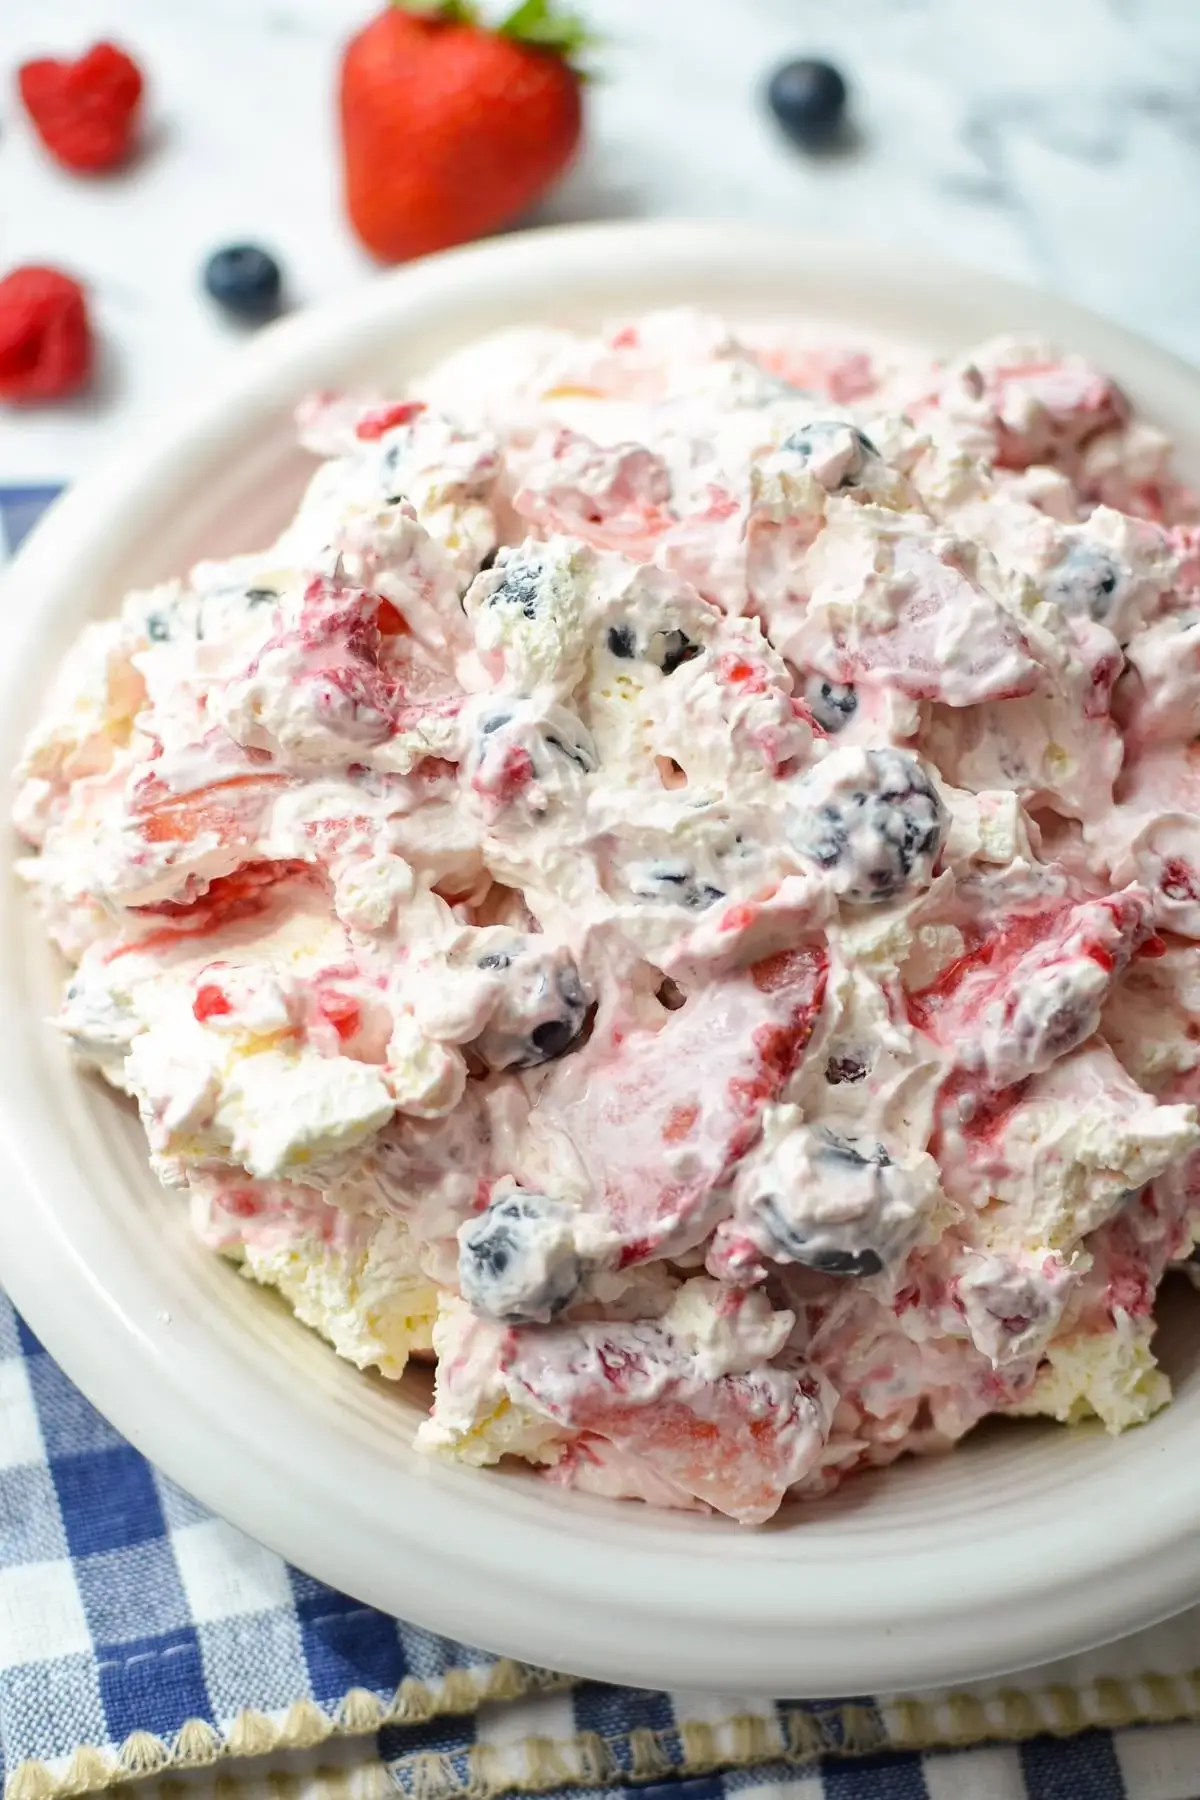
This easy recipe for Red, White and Blue Cheesecake Salad is made with cream cheese, Cool Whip, and fresh berries. A favorite for potlucks, BBQ’s, Memorial Day and 4th of July celebrations, this easy berry cheesecake salad is a no bake dessert that is ready to chill or serve in just 15 minutes!
- Prep: 15 mins
- Servings: 6
Ingredients
- 1 8oz block cream cheese, softened
- ½ cup powdered sugar, up to ¾ cup
- ½ tsp. vanilla extract
- 8 ounce container Cool Whip, thawed
- 3 cups sliced strawberries
- 1 ½ cups blueberries
- 1 ½ cups raspberries
Instructions
- Add the softened cream cheese to a large bowl. Add in the powdered sugar and vanilla extract.
- Using a hand mixer, beat the softened cream cheese together with the powdered sugar and vanilla extract.
- Add the thawed whipped topping to the bowl and mix it with the cream cheese mixture. Scrape down the sides of the bowl and mix again until everything is well combined.
- Add in the berries, and gently fold them into the cheesecake mixture until they are fully coated and the berries and evenly distributed.
- Cover tightly with plastic wrap and chill in the refrigerator for 30 minutes to 1 hour before serving.
Notes
Stronger cheesecake flavor: Use an additional 4oz of cream cheese (half of a block) and an additional ¼ cup powdered sugar. You may also increase the vanilla extract to ¾ teaspoon if you want a stronger vanilla flavor.
Berries: Use anywhere from 5-6 cups of the berries of your choice. The exact amounts are just suggestions. Make sure you have at least one berry with a “blue” color like blackberries or blueberries, and one that is red like strawberries or raspberries.
Brownie Fruit Pizza
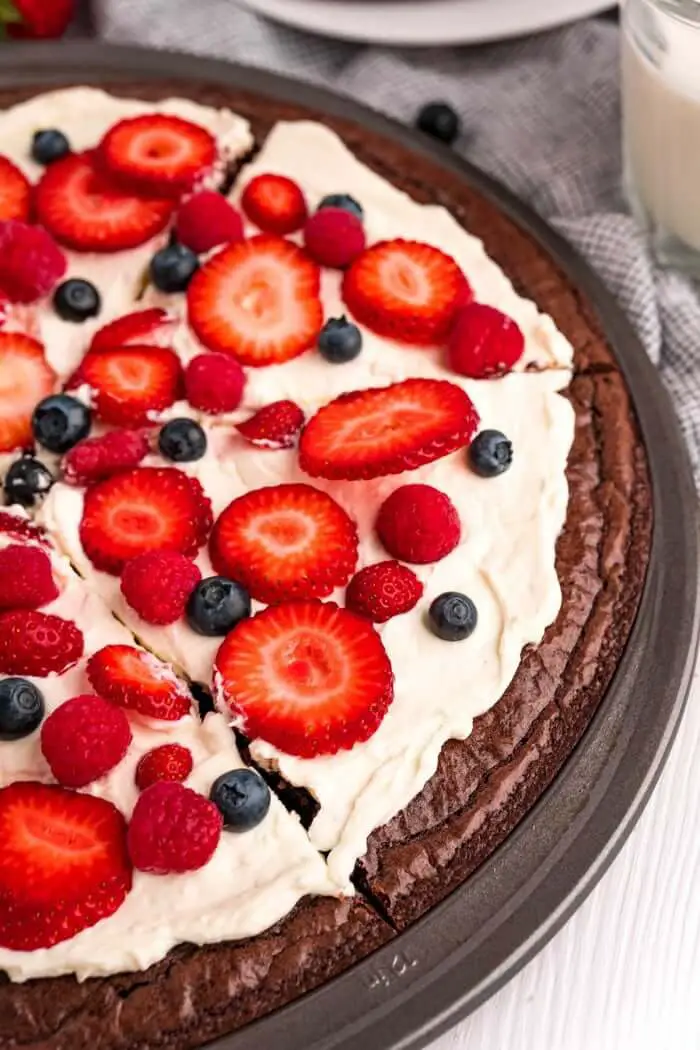
With a chocolate brownie base and a layer of homemade cream cheese frosting, this brownie fruit pizza is a beautiful dessert with vibrant fruit toppings.
- Prep: 35 mins
- Servings: 8 slices
INGREDIENTS
- 1 box fudge brownies, plus ingredients listed on the box
- 8 ounce cream cheese, softened
- 1 cup heavy whipping cream, cold
- 1 teaspoon vanilla extract
- 1/4 cup powdered sugar
- 8 strawberries, sliced, for topping
- 1/2 cup raspberries, for topping
- 1/2 cup blueberries, for topping
INSTRUCTIONS
- Preheat oven to 350°F. Spray a 12 or 14 inch round pan with cooking spray, then set nearby.
- In a large bowl, prepare fudge brownie batter per package instructions, then pour batter into prepared round pan.
- Bake brownie base for 15 minutes or until top has a flaky film and edges are firm.
- Transfer baked brownie base to a wire cooling rack to cool completely, about 2 hours.
- When ready to decorate pizza, prepare the frosting. Using a stand mixer (or hand mixer + large bowl), whip the cream cheese on medium-low speed until fluffy, abour 2-3 minutes.
- Keeping speed on medium-low, pour in heavy whipping cream, vanilla, and powdered sugar. Increase speed to medium and beat for an additional 1-2 minutes or until all ingredients are fully incorporated.
- Using a spatula, spread cream cheese frosting over prepared brownie base in an even layer. Top with sliced strawberries and decorate with raspberries and blueberries.
- Slice and serve immediately.
No Bake Strawberry Lime Cheesecakes
No Bake Strawberry Lime Cheesecakes….Strawberries and lime collide to make a quick and easy no-bake summer dessert great for entertaining!
- Prep: 20 mins
- Servings: 12
Ingredients
FOR THE CRUSTS:
- 2 cups graham cracker crumbs (about 10 crackers)
- 5 tablespoons salted butter
- 2 tablespoons honey
FOR THE CHEESECAKES:
- 16 ounces cream cheese softened
- ⅔ cup sugar
- ½ cup plain whole milk yogurt
- 2 tablespoons lime juice
- zest of 1 lime
FOR TOPPING
- 12 strawberries
- 1 lime (sliced and quartered)
Instructions
FOR THE CRUST:
- Line a muffin pan with paper liners.
- Melt the butter and add it with the honey to the graham cracker crumbs. Stir until all the crumbs are moistened.
- Divide the graham crackers between the 12 cupcake liners. Press the crumbs down firmly into the bottom of each liner.
FOR THE CHEESECAKE:
- Beat together the cream cheese, sugar, yogurt, lime juice and lime zest until light and fluffy.
- Divide the cheesecake batter between the 12 cupcake liners on top of the crusts. (I used a cookie scoop to fill the cups.)
- Refrigerate at least 3 hours or overnight.
BEFORE SERVING:
- When ready to serve, top each cheesecake with a strawberry and ¼ slice of lime.
- Garnish with additional lime zest if desired.
- Serve cold.
No Bake Mango Cheesecake Trifles
Creamy no bake mango cheesecake trifles, freshly whipped cream and topped with fresh mangoes, what’s not to love? The perfect no bake summer dessert.
- Prep: 20 mins
- Servings: 6
Ingredients
CRUST
- 3/4 cup graham cracker cumbs
- 1 tablespoon granulated sugar
- 2 tablespoon unsalted butter, melted
CHEESECAKE
- 8 oz cream cheese, at room temperature
- 1 cup heavy cream
- 1/3 cup mango puree, fresh or canned
- 4 tablespoons granulated white sugar, divided
- 2-3 drops mango essence, optional
- fresh mangoes to garnish
Instructions
- Crush the graham crackers using your food processor or simply put them in a ziplock and whack them up with a rolling pin.
- Transfer crumbs to a bowl. Add sugar and melted butter and mix till well combined.
- Divide the crumb equally in serving glasses, pressing down firmly. I used 2 large glasses here but you can easily divide these crumbs into 6 small trifle glasses.
- Place the glasses in the refrigerator while you make the cheesecake filling.
- Using the paddle attachment of your stand mixer or using your hand mixer, beat together cream cheese and granulated sugar till smooth and creamy.
- Add in the mango puree and mix till well combined with the cream cheese. Also add in mango essence if using. Set aside.
- Using the wire whisk attachment of your stand mixer or using your hand mixer beat the heavy cream till it forms peaks. Be careful not to over-beat.
- Fold half of the whipped cream to the cream cheese mixture carefully till combined.
- Transfer cheesecake mixture to a piping bag fitted with ½ inch round tip.
- Transfer remaining half of the whipped cream into another piping bag fitted with round tip.
- Layer the glasses with the cheesecake mixture first, top it with whipped cream.
- Add one more layer of cheesecake and finish with whipped cream on top.
- Garnish with fresh mangoes.
- Chill the cheesecake trifle for 4-6 hours or overnight before serving.
Cherry Mango Popsicles
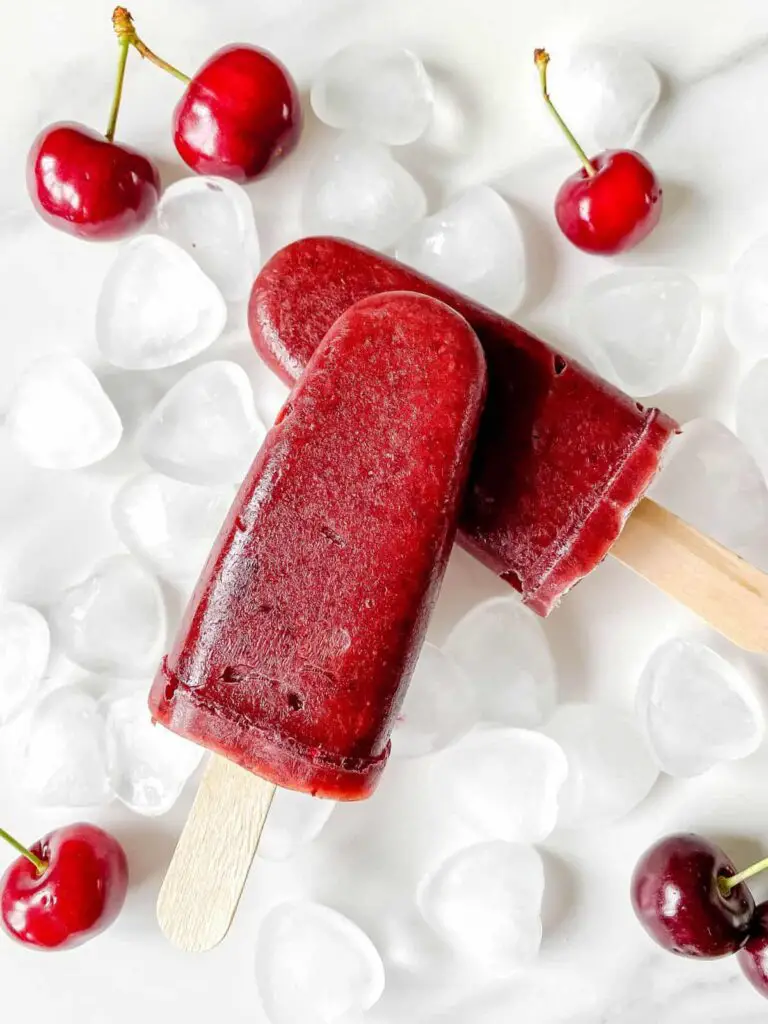
These cherry mango popsicles are a fun sweet treat for summer. Made without yogurt or dairy, they combine fruit and coconut milk and are so delicious! This recipe makes 4 popsicles, but will vary slightly depending upon the molds used.
- Prep: 10 mins
- Servings: 4 popsicles
INGREDIENTS
- 1.5 cups frozen cherries
- 1 cup frozen mango
- ½ cup coconut milk
INSTRUCTIONS
- Blend the fruit and coconut milk in a blender until all combined. You may need to scrape the sides down a few times.
- Pour into a jug, then pour into your popsicle molds. Freeze for about an hour, then add the stick (depending upon the type of mold you are using). Return to the freezer for at least five hours or until fully frozen.
NOTES
- If using frozen fruit it is helpful to let it thaw for 5-10 minutes to help it blend more easily.
- Using a jug to pour the mixture into the popsicle molds is often less messy!
- Adjust the ratio of mango and cherry if you like!
- Depending upon the type of popsicle mold being used, loosen by running warm water over the sides of the popsicles.
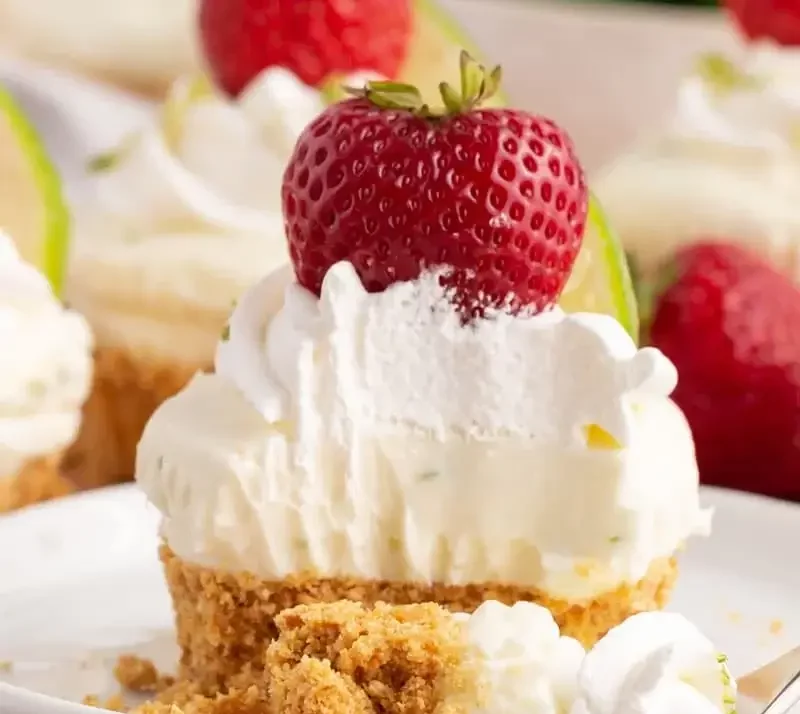
No Bake Key Lime Cheesecake Bars
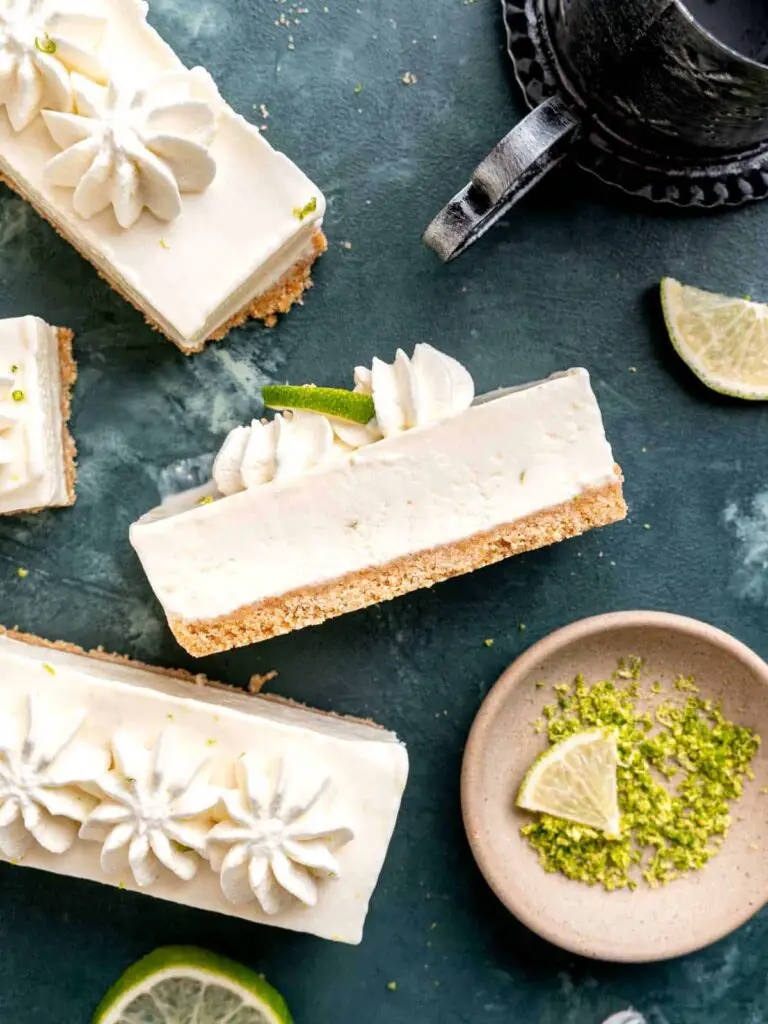
They have the perfect balance of tart, creamy, sweet, and crunchy just like a traditional key lime pie. This dessert comes together in less than 20 minutes, then the fridge does the rest. Trust me, these are the best easy key lime cheesecake bars!
- Prep: 20 mins
- Servings: 10 bars
INGREDIENTs
Graham Cracker Crust
- 1½ cups (150 g) graham crackers, 9-10 whole crackers
- 2 tablespoons (25 g) granulated sugar
- ⅛ teaspoon ground cinnamon, optional
- 5 tablespoons (70 g) unsalted butter, melted
Key Lime Cheesecake
- ⅔ cup (157.73 ml) heavy whipping cream, cold
- 8 ounces (226.8 g) cream cheese, room temperature
- 14 ounces (396.89 ml) sweetened condensed milk
- ½ cup (118.29 ml) key lime juice, or regular lime juice
- 1 teaspoon lime zest
INSTRUCTIONS
Graham Cracker Crust
- In a food processor, chop the graham crackers with the sugar, cinnamon and melted butter until it resembles wet sand.
- Press the graham cracker crust mixture into the bottom of a foil-lined 8×8-inch pan using your hands or the bottom of a glass. Freeze while preparing the cheesecake filling.
Key Lime Cheesecake
- In a medium bowl (hand mixer recommended), whisk the heavy whipping cream until stiff peaks form.
- In a separate bowl, stir the softened cream cheese until it’s smooth. Mix in the sweetened condensed milk, key lime juice and zest.
- Carefully fold the whipped cream into the lime mixture just until combined.
- Pour the mixture over the frozen graham cracker crust, cover and refrigerate overnight.To make the cheesecake set quicker and be firm enough to cut into clean slices, move it into the freezer for a few hours.
- Cut into 10 rectangular bars or 16 squares, top with extra whipped cream, lime slices and zest (optional), and enjoy!
NOTES
Key lime juice: Bottled juice is recommended and can be found at most grocery stores.
Storage: Store in the refrigerator for up to 1 week or in the freezer for 1 month.
Banana Cream Pie
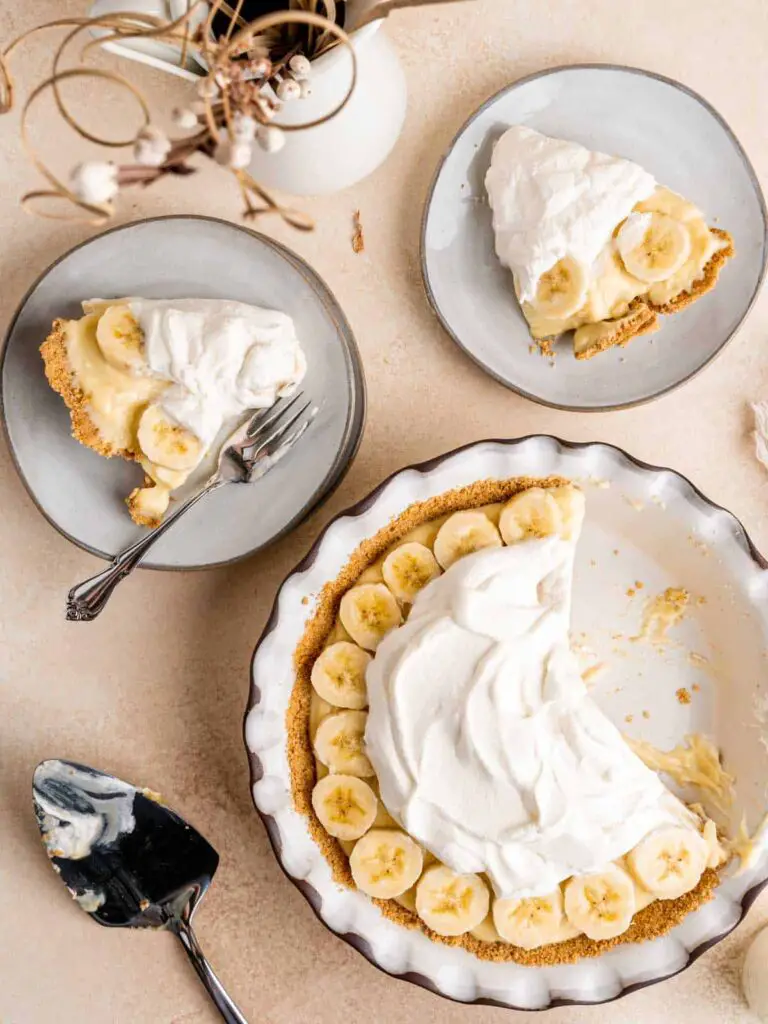
This version of a classic homemade banana cream pie uses a graham cracker crust, fresh bananas, a creamy vanilla pudding, and is topped with light as a cloud whipped cream.
- Prep: 15 mins
INGREDIENTS
- 2½ cups (591.47 ml) whole milk
- ¾ cup (150 g) granulated sugar
- ⅛ teaspoon (⅛ teaspoon) salt
- 4 large (4 large) egg yolks
- 5 tablespoons (40 g) cornstarch
- 2 teaspoons (2 teaspoons) vanilla extract
- ¼ cup (56.75 g) unsalted butter, room temperature
- 4 (4) bananas, sliced
- 1 (1) pie crust
- whipped cream, optional, for topping
INSTRUCTIONS
Prepare the pudding
- Prepare your pie crust. I prefer using a graham cracker crust for this pie, but a regular pie crust is just as delicious!
- Combine the milk with the sugar and salt in a medium-sized pot over medium heat. Whisk until the mixture is hot to touch, and the sugar has completely dissolved.
- Whisk together the egg yolks and cornstarch.
- While stirring, gradually pour ~½ cup of the milk mixture into the yolk mixture. Then, add the yolk mixture to the pan with the remaining milk mixture.
- With the pan over medium heat, stir until the pudding is thick and bubbly. Remove from heat and whisk in the vanilla extract and softened butter until it’s melted and completely combined.
- Cover the top of the pudding with plastic wrap and let it cool.
Assemble the pie
- Starting with banana slices, alternately layer the banana slices and pudding over the crust.
- Let the pie chill for at least an hour prior to serving.
- Serve with whipped cream (optional). Enjoy!
Blueberry Frozen Yogurt

Blueberry frozen yogurt is a stunning vibrant color summer dessert that everybody would love. This slightly tangy, sweet blueberry frozen yogurt is a great summer treat that you can serve for breakfast or dessert.
- Prep: 30 mins
- Servings: 5
INGREDIENTS
- 2 cups frozen blueberries
- ⅓ cup full-fat Greek yogurt
- 3 tablespoon maple syrup (or honey)
- 1 tablespoon lemon juice
- ¼ teaspoon salt
INSTRUCTIONS
- Pick and discard all bad berries. Freeze blueberries.
- Freezer Greek yogurt in ice cube trays.
- Use Vitamix for best consistency. Blend frozen blueberries, frozen Greek yogurt, lemon juice with zest, honey (or maple syrup), and a pinch of salt until it smooth.
- If you want soft swirl consistency, simply serve it up as it is in a bowl or cup. Make it look YUM by swrilling it in serving bowls.
- Pour into freezer safe container and freeze for couple of hours.
- Just before serving, scoop out blueberry frozen yogurt into serving bowls. Garnish with frozen blueberries and fresh mint leaves. Serve immediately.
Watermelon Granita
Beat the summer heat with this cool refreshing watermelon granita. Icy cool granita is the perfect summertime treat to keep yourself cool and refreshed.
- Prep: 10 mins
- Servings: 4
INGREDIENTS
- 1 medium size watermelon (about 4 cups watermelon cubes)
- ¼ cup sugar or honey or stevia
- 1 tablespoon lime juice
- 10 to 15 fresh mint leaves
INSTRUCTIONS
- Remove the green rind, and cut the watermelon into discs.
- Add watermelon cubes into a food processor or blender.
- Pulse it a couple of times to make it into juice.
- Add sugar for added sweetness. This is optional. If watermelon has enough sweetness, skip sugar.
- Add lime juice. Lime juice brings out the sweetness of watermelon and tastes better.
- Add fresh mint leaves. Mint leaves add amazing fresh flavors to the granita. This step is an option, but you’ll love the flavors of mint leaves in granita, trust me.
- Blend everything until everything blends well. Filter out watermelon juice and pour it into a shallow dish.
- Set it in the freezer for a couple of hours. Once set a bit, remove it from the freezer and scrape it well. Place it back in the freezer to set it again. Repeat this a couple of times to make the consistency better.
- Once it fully sets scrape it and break it down well with a strong fork.
- Scoop the shavings and serve them immediately garnished with mint leaves.
NOTES
- Best use seedless watermelon or remove the seeds from watermelon before you go ahead.
- The secret ingredient – mint. Adds a twist to the regular granita and makes it fresh and flavorful.
No Bake Orange Creamsicle Cheesecake
This No Bake Orange Creamsicle Cheesecake is a summer sensation, featuring creamy layers of delicious orange and vanilla flavors, perfect for cookouts and potlucks.
- Prep: 20 mins
INGREDIENTS
For the Crust
- 12 oz vanilla wafers
- 1-½ cup sugar, divided
- 1 stick of butter, melted
For the Filling
- 2 8 oz cream cheese (room temp)
- 2 cups heavy cream
- 1 box 3 oz orange jello
- 1 cup boiling water
- ½ cup powdered sugar
- ½ tsp vanilla extract
- Zest of one orange
INSTRUCTIONS
- Step 1: Prepare the crust. Pulse vanilla wafers in a food processor. Add crumbs to a medium sized bowl plus ½ cup sugar and melted butter. Stir to combine. Spray a 9 inch springform pan with cooking spray. Press wafer mixture onto the bottom of the pan and chill in the freezer for 30 minutes.
- Step 2: Make the creamsicle filling. In a bowl, beat cream cheese and sugar until smooth and creamy. In another bowl, mix jello with boiling water. In a separate bowl, beat heavy cream, vanilla extract, powdered sugar, and orange zest until stiff peaks form. Combine half of the whipped cream with the orange jello and the other half with the cream cheese mixture.
- Step 3: Assemble and chill. Alternate spreading each mixture onto the crust. Start with the cream cheese mixture and end with the orange jello whipped cream mixture. Chill for at least 4 hours or overnight. Slice and serve!
Lemon Cheesecake
This creamy and smooth Lemon Cheesecake is an easy, no bake recipe that’s made with freshly squeezed lemon juice and zest! The cheesecake is the perfect balance between sweet and tart, with a light (but not overpowering) lemon zing.
- Prep: 20 mins
- Servings: 12
INGREDIENTS
For the crust:
- 2 cups graham crumbs
- 1/2 cup butter, melted
- 2 tablespoons sugar
For the cheesecake layer:
- 24 oz cream cheese, softened (750g or 3 packages)
- 3 cups cool whip
- 1 1/4 cups icing sugar (i.e. confectioners sugar or powdered sugar)
- 1 teaspoon vanilla extract
- 1/4 cup lemon juice (1 1/2- 2 lemons will give you enough juice)
- zest of 2 lemons
Optional toppings:
- whipped cream
- lemon slices (fresh or Candied Lemon Slices)
- mint leaves
INSTRUCTIONS
- Line the bottom of a 9 inch spring-form pan with parchment paper.
- In a large bowl, add the graham crumbs, melted butter and sugar and mix together. Press the graham crust mixture evenly onto the bottom of the pan and place in the fridge to chill.
- In a large bowl using a hand mixer (or in the bowl of a stand mixer), mix the softened cream cheese until fluffy. Add the cool whip, sugar, vanilla and lemon juice and zest and then mix until smooth.
- Spread the cheesecake layer evenly over the graham crust. [I like to use an offset spatula to smooth the top of the cream cheese layer.] Chill for 3-4 hours.
- Before serving, top with whipped cream, lemon slices, or candied lemons, if desired.
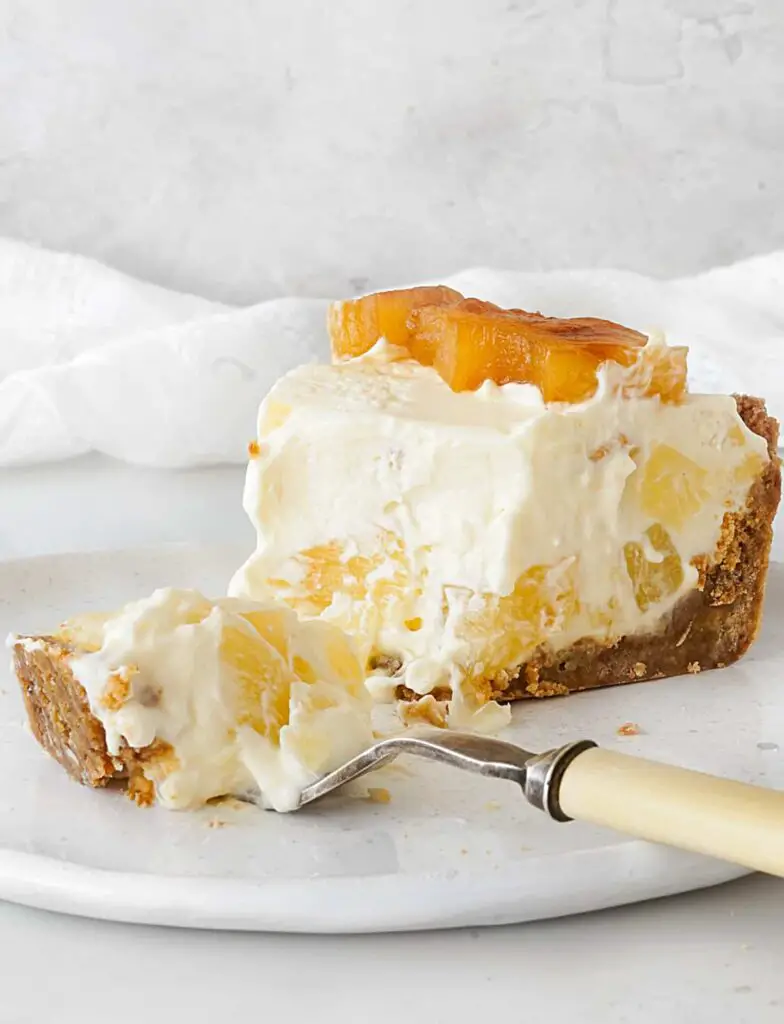
Grill Peaches
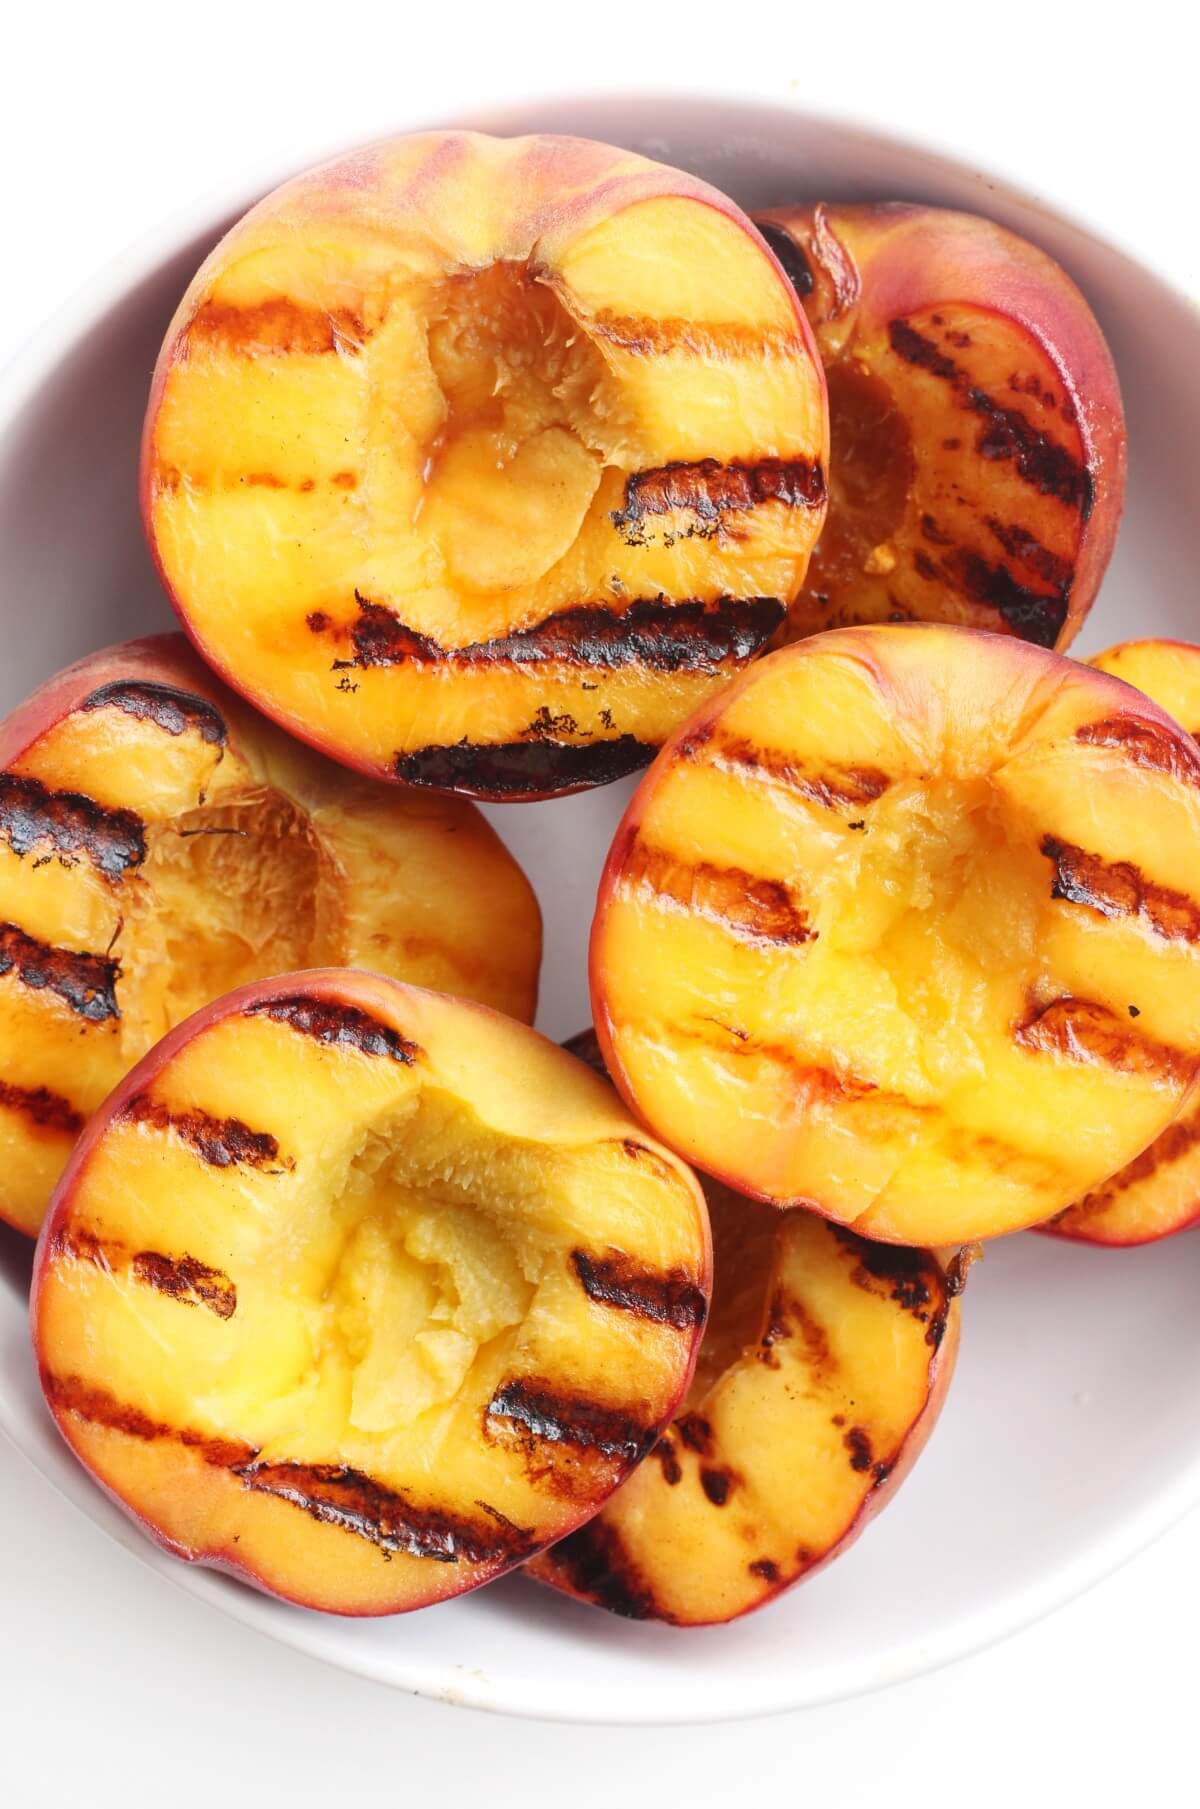
Learn step-by-step how to grill peaches! Grilled Peaches are a healthy summer dessert that’s so quick and easy to make! Naturally gluten-free and vegan, add cinnamon and brown sugar, and serve them with your favorite dairy-free ice cream or whipped cream!
- Total: 13 mins
- Servings: 4
Ingredients
- 4 Slightly Ripe Peaches
- 1 TB Vegan Butter (melted)
- 1 TB Brown Sugar Sweetener (or preferred light brown sugar)
- ½ Tsp Cinnamon
Instructions
Prepping the peaches:
- Rinse and dry off the fresh peaches before taking a sharp paring knife and slicing each peach through to the pit and then guiding the knife around the seam to cut the peach in half
- Hold both sides of the sliced peach and lightly twist in opposite directions to separate the halves. Now take the knife and carefully remove the pit from the half that it’s still attached to.
For an indoor grill:
- Preheat the pan over medium-high heat. Lightly brush the cut side of the peaches with melted butter or oil and place them cut side down on the grill. Do not move them around.
- Grill the cut side for 3-5 minutes, before using tongs to flip them over, and grill the rounded side for another 3-5 minutes until soft and tender.
- Now sprinkle the grilled cut side of the peaches with any sweeteners, or spices, and sprinkle on the herbs you are using.
For an outdoor gas grill:
- Preheat the grill to medium-low heat before adding the peaches cut side down. Do not close the cover of the grill. Grill for 3-5 minutes before flipping them with tongs and following the same process as above to grill the other side and brush the peaches with flavorings.
For a charcoal grill:
- Heat the charcoal on one side of the grill. Place the peaches cut side down over direct heat (charcoal side) and grill for 4-6 minutes. Use tongs to flip and move the peaches to indirect heat (non-charcoal side) and finish grilling the other side for 4-6 more minutes, brushing the grilled side with flavorings.
Frozen Greek Yogurt Granola Bars
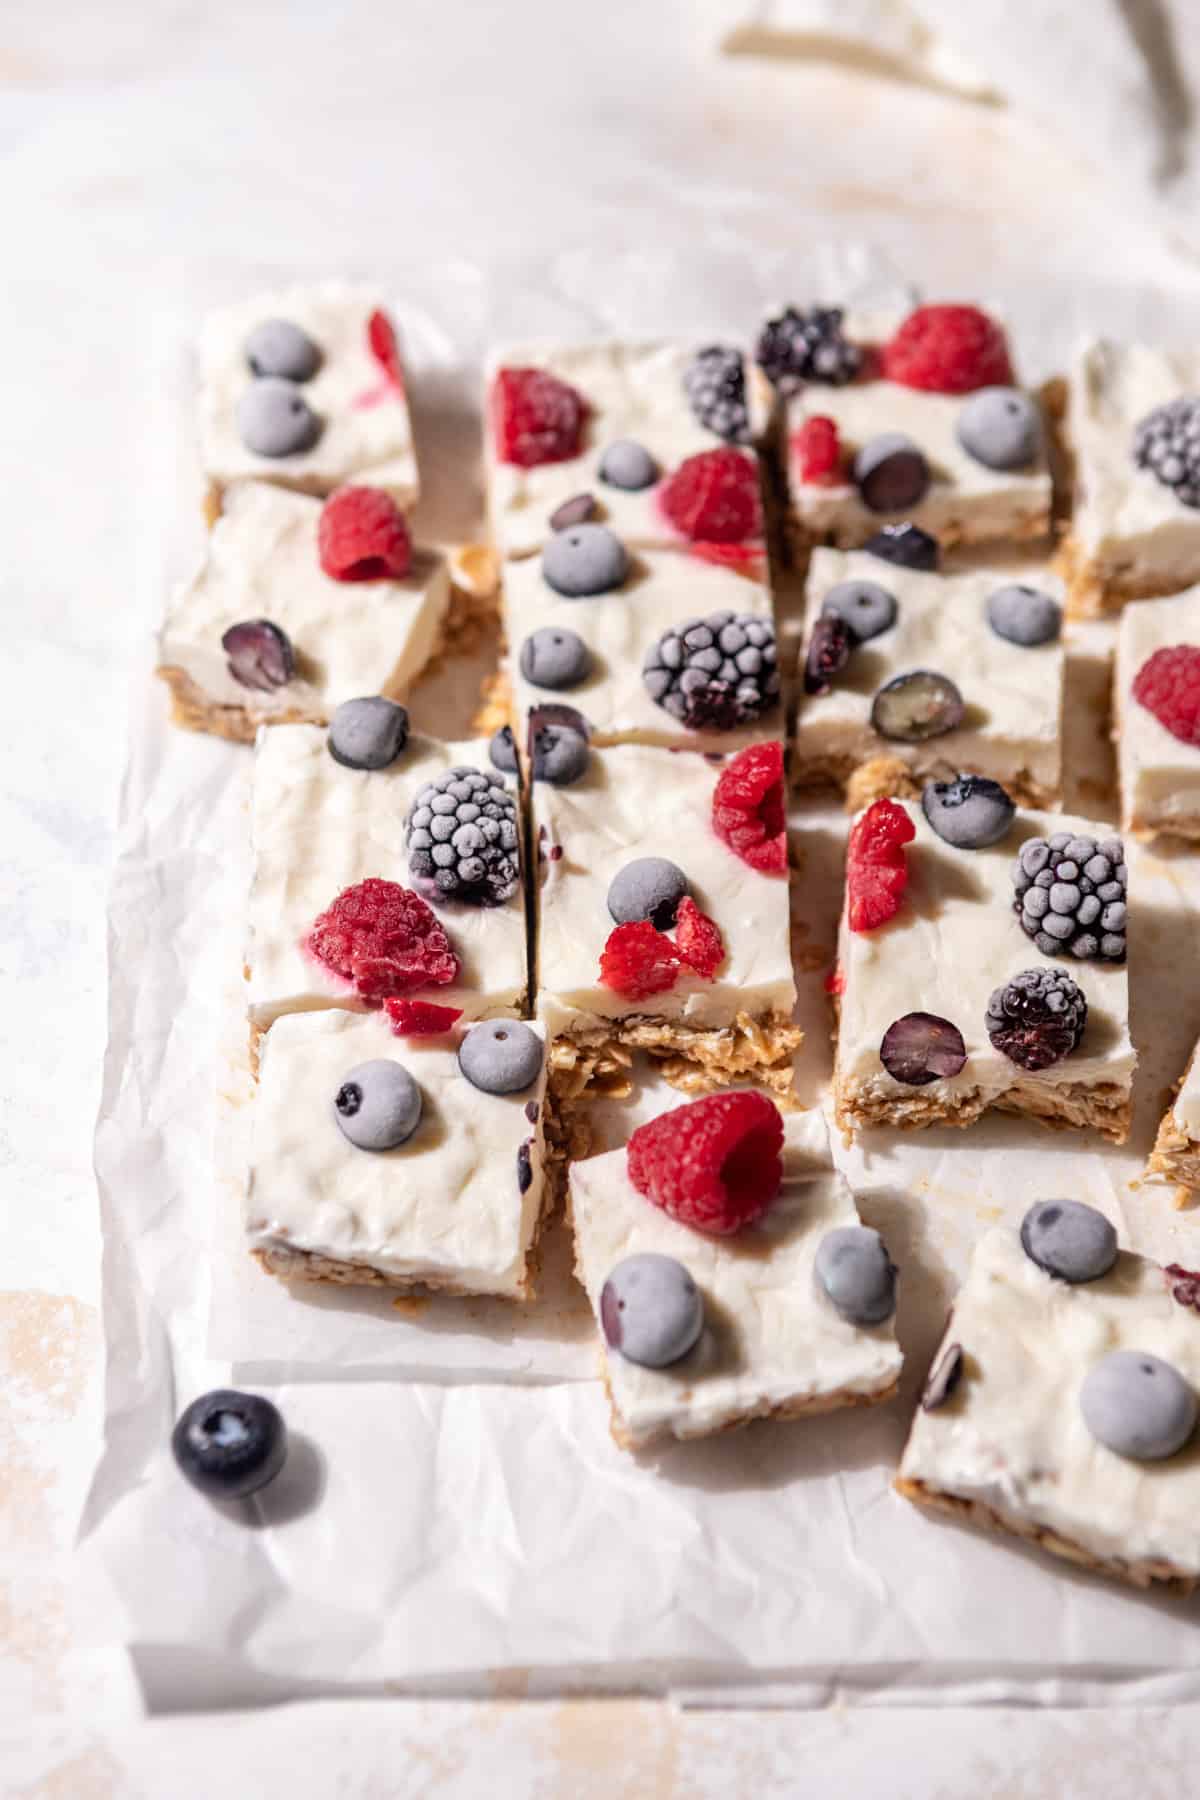
Cool off on hot summer days with these no-bake frozen Greek yogurt granola bars! They’re made with creamy frozen Greek yogurt layered on top of a chewy oat granola base. They can be easily customized by adding your favorite fruit toppings and make the perfect healthy snack, breakfast, or dessert.
- Prep: 15 mins
- Servings: 16 bars
INGREDIENTS
- 2 cups whole rolled oats
- 1 cup creamy almond butter
- ⅓ cup honey
- ½ cup chopped almonds
- ¼ teaspoon salt
- 2 cups plain Greek yogurt full-fat
- 3 tablespoon honey
- 1 teaspoon vanilla extract
- ¼ cup raspberries
- ¼ cup blueberries
- ¼ cup blackberries
INSTRUCTIONS
- Mix the oats, almond butter, honey, almonds, and sea salt together in a large bowl with a rubber spatula or large spoon. The oats should be completely coated with almond butter.
- Line your square pan with parchment paper (see recipe notes for tips). Then, press the oat mixture into the pan, using your hands or a spoon to press it down evenly and tightly in the edges and corners.
- In a clean large mixing bowl, mix the Greek yogurt, honey, and vanilla extract together until well combined.
- Pour the yogurt over the oat layer. Then, spread the yogurt evenly across the pan with a rubber spatula, butter knife, or back of a large spoon. Sprinkle the fresh mixed berries on top of the yogurt.
- Place the pan in the freezer (covered or uncovered) for 4 hours or until the yogurt is completely frozen.
- Cut the granola bars into 16 pieces with a sharp knife and serve cold.
Pineapple Cream Cheese Pie
Meet the mouthwatering pineapple cheesecake pie – a dessert that’s as easy to make as it is to devour. It’s incredibly delicious. The cookie crust encases a 5-ingredient, no-bake filling that comes together in minutes. It can be made ahead and kept refrigerated or frozen.
- Prep: 20 mins
- Servings: 8
INGREDIENTS
For the crumb crust:
- 1 ¾ cups fine graham cracker crumbs
- 2 tablespoons brown sugar
- ½ cup butter, melted
For the filling:
- 8 oz cream cheese, at room temperature
- 1 cup heavy or heavy whipping cream, cold
- ½ cup sugar
- 20 oz can of pineapple, drained
- 1 teaspoon vanilla extract
For the topping:
- 3-4 pineapple rings (use extra or from the total amount above)
- 2-3 tablespoon sugar (if you wish to caramelize them)
- Drizzle of oil or dab of butter (if you wish to caramelize them)
INSTRUCTIONS
For the crumb crust:
- Preheat the oven to 350°F/180°C if you’re baking the crust. You can opt for simply chilling it until firm.
- Have ready a 9-inch pie plate or pie pan with a removable bottom and high sides.
- For the cookie crumbs, the easiest way is to use a food processor and process until you have fine crumbs. Make sure there are no large pieces or that it’s a very coarse crumb mixture as it will prevent the mixture from compressing well. You can also make the crumbs by hand, but it takes a while and some patience. Crush the cookies with a rolling pin. It’s easier if you put them in a large plastic bag, like a Ziploc bag, leaving it a bit open to let the air out as you roll.
- By hand: mix crumbs with the sugar in a medium bowl. Add the melted butter and combine everything until it resembles wet sand and no dry spots remain.
- Food processor: you can make the mixture directly in the bowl of the processor. Simply process the graham crackers with the sugar and add the melted butter to the bowl of the processor, pulse a few times, and you have your graham mixture ready.
- Press the mixture onto the pan, starting at the edges and the angles where the base and sides join together and make sure it’s compacted. This will help when removing the pie from the pan.
- Bake for 10 minutes, until lightly golden and dry. Let cool completely on a wire rack before filling.
- For a no-bake pie or dessert: simply put the crust in the refrigerator for at least 1 hour to allow the butter to firm up. This will make it less sturdy and might crumble here and there when you cut it but worth it if you don’t want to turn on the oven.
For the pineapple filling:
- Beat cold cream in a large bowl until it forms medium-firm peaks. Reserve.
- In another large mixing bowl, beat the softened cream cheese with the sugar until smooth, lump-free and the sugar has dissolved a little. You can use an electric mixer for this part.
- Add the vanilla and pineapple chunks and mix to incorporate well.
- Add the pineapple mixture to the beaten cream in 2 parts, mixing lightly the first time and making sure it’s fully incorporated the second time. Don’t overmix but make sure no streaks remain. Use a spatula to integrate well.
- Fill the prepared crust, smooth the top and refrigerate the pie for several hours until firm.
- Add the topping at the last moment. You can have the caramelized pineapple made in advance or use fresh or canned pineapple slices, chopped. The pie should be served cold.
For the caramelized topping:
- If you’re short on time or don’t want to caramelize the pineapple, simply chop it, drain it well and top the cold pie.
- If you want caramelized fruit: heat butter or oil in a non-stick skillet and add the pineapple.
- Sprinkle with half the sugar and cook for a few minutes.
- Flip and sprinkle the rest of the sugar on top.
- When the bottoms are caramelized, flip over and let the other side get golden brown. Move them a little during baking to avoid burning.
- Let cool, cut into pieces and distribute on top of the pie.
Strawberry Cream Cheese Icebox Cake
This creamy, no-bake Strawberry Cream Cheese Icebox Cake is a welcome dessert for hot and humid days when it’s best to leave the oven off.
- Prep: 45 mins
- Servings: 8
INGREDIENTS
Whipped cream:
- 2 cups whipping cream
- ½ cup confectioner’s sugar
- ¼ teaspoon cream of tartar
Fillings:
- 1 pound fresh strawberries, plus a few extra for garnish, washed & allowed to dry
- 12 ounces cream cheese, room temperature and very soft
- 1 cup confectioner’s sugar
- 1 tablespoon vanilla extract
- 12 sheets graham crackers (typical boxes of graham crackers have pre-wrapped packages with 9 crackers in each.)
INSTRUCTIONS
Get stuff ready:
- Line a 9-inch by 5-inch loaf pan with plastic wrap, parchment paper, or wax paper to cover the bottom and sides.
- Place the bowl and whisk attachment from a stand mixer into the fridge or freezer to chill for at least 10 minutes.
Whip the cream:
- Assemble the chilled bowl and whisk on the mixer. Turn the mixer on low and slowly pour in the whipping cream. Increase the speed to medium-high and whip the cream until it begins to thicken.
- Pause the mixer and add in the ½ cup of confectioner’s sugar and the cream of tartar. Turn the mixer back on and whip the cream until it’s thick and stiff.
- Set aside two cups of the whipped cream. Put the rest in a covered bowl in the fridge to use on the finished cake.
Prepare the strawberries:
- Set aside a few strawberries to use on the finished cake.
- Hull the rest of the strawberries, and then slice them vertically into thin slices. Set them aside.
Make the cream cheese mixture:
- Beat the room-temperature, softened cream cheese on medium-high speed until it’s very smooth. Beat in the 1 cup of confectioner’s sugar and the vanilla extract.
- Fold in the two cups of whipped cream using a rubber spatula, until it’s fully incorporated.
Assemble the icebox cake:
- Take a third of the sliced strawberries and arrange them in an even layer in the bottom of the prepared loaf pan.
- Spread a third of the cream cheese mixture in an even layer over the strawberries.
- Break graham crackers along the perforations and lay them in a single layer over the cream. Fit the pieces together as closely as you can.
- Repeat these layers of strawberries, filing, and graham crackers two more times which should fill the loaf pan.
- Cover the top of the pan with plastic wrap, and lightly press down on the layers in the pan. Chill it in the fridge for at least 8 hours or overnight.
Finish the cake:
- Remove the cake from the fridge and carefully invert it onto a serving platter or cutting board. Peel off the parchment or plastic wrap.
- Retrieve the rest of the whipped cream from the fridge and use it to “frost” the top and sides of the cake.
- Slice the strawberries you set aside and use them to decorate the top of the cake.
- Slice the icebox cake and serve immediately.