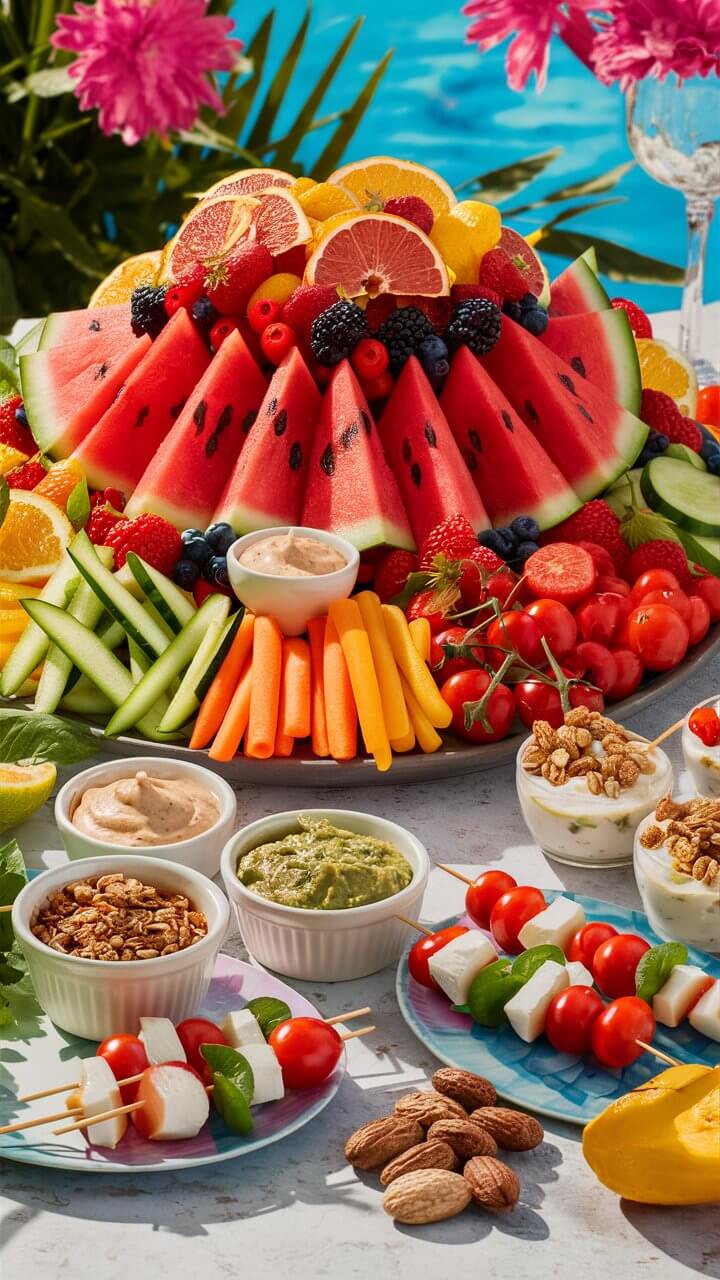
This is the ultimate summer snack list: my top 37 healthy summer snacks for the pool, park, beach, lake, or backyard. Easy to make and put together, nutrient-rich, and kid and adult approved.
The easy snack ideas on this list are perfect for hot weather summer months: refreshing and simple!
Table Of Contents
- Frozen Yogurt Bark
- 4th of July Fruit Kabobs
- Mango Yogurt Popsicles
- Strawberry-Chocolate Greek Yogurt Bark
- Oven-Fried Pickles
- Raspberry-Lemon Greek Frozen Yogurt Bark
- Homemade Oven-Dried Strawberries
- Vegan Frozen Pineapple & Coconut Yogurt Bark
- Mini Frozen Yogurt Parfaits
- Tomato-Basil Skewers
- Mini Bell Pepper Pebre
- Strawberry Swirl Cheesecake Ice Pops
- Carrot Smoothie
- Frozen Chocolate Bananas
- Frozen Yogurt Bark with Berries
- Fruit Pizza
- Cottage Cheese Ice Cream
- Peanut Butter Swirled Chocolate Fudge Popsicles
- Sicilian Granita Recipe
- Rainbow Fruit Skewers
- Watermelon Lemon Mint Popsicles
- Easy Mango Popsicles
- Cookie Ice Cream Sandwiches
- Banana Mocha Nice Cream
- Pretty in Pink Peach Smoothie
- Strawberry Cream Pie Popsicles
- No Bake Cookies
- 2-Ingredient Piña Colada Smoothie
- Vanilla Chia Pudding
- Healthy Apple Nachos
- Key Lime Pie Energy Balls
- No-Bake Trail Mix Granola Bars
- Healthy Yogurt Bowl
- Banana-Oat Breakfast and Snack Cookies
- 10-Minute No-Bake Snack Bites
- Sweet and Salty Do-It-Yourself Trail Mix
- Homemade Ranch Dip
Frozen Yogurt Bark

Cool down this summer with this healthy frozen yogurt bark. Topped with blueberries, strawberries and granola, it’s perfect for snacks, dessert or even breakfast. With its red, white and blue colors, it’s perfect to enjoy on the 4th of July too!
- Prep: 15 mins
- Freeze: 3 hrs
- Servings: 12 pieces
INGREDIENTS
- 2 cups whole milk vanilla yogurt
- ½ cup diced strawberries
- ¼ cup blueberries
- ¼ cup granola
INSTRUCTIONS
- Line a rimmed baking quarter sheet with wax or parchment paper.
- Pour the yogurt into the baking dish and spread evenly on the prepared baking sheet so that it fills the shape.
- Top with the strawberries, blueberries and granola.
- Place in the freezer until the yogurt is firm, about 3 hours.
- Cut into 12-15 pieces, and enjoy cold.
- Store leftovers in the freezer.
4th of July Fruit Kabobs

4th of July fruit kabobs are an easy, fun and festive snack for celebrating the holiday. With different options for your fruit and extras choices and the ability to make ahead and have a few or a lot, these kabobs will be the hit of the party!
- Prep: 15 mins
- Servings: 10 kabobs
INGREDIENTS
- 12 medium length wooden kabob sticks (approximately 6-8 inches long)
- 12 strawberries, halved lengthwise OR 24 raspberries
- 48 blueberries OR 24 blackberries
- 24 banana slices (about ½ inch thick) OR 24 regular marshmallows OR 24 1-inch chunks of angel food cake OR 24 1-inch chunks of pound cake
INSTRUCTIONS
- Thread a strawberry half or a raspberry onto the bottom of each kabob. Follow with your choice of white fruit or extra (banana, marshmallow or cake). Next thread on two blueberries or one blackberry. Repeat to the end of the kabob.
- Serve immediately or cover in plastic wrap and store in the fridge until ready to serve (up to 12 hours for best freshness and flavor).
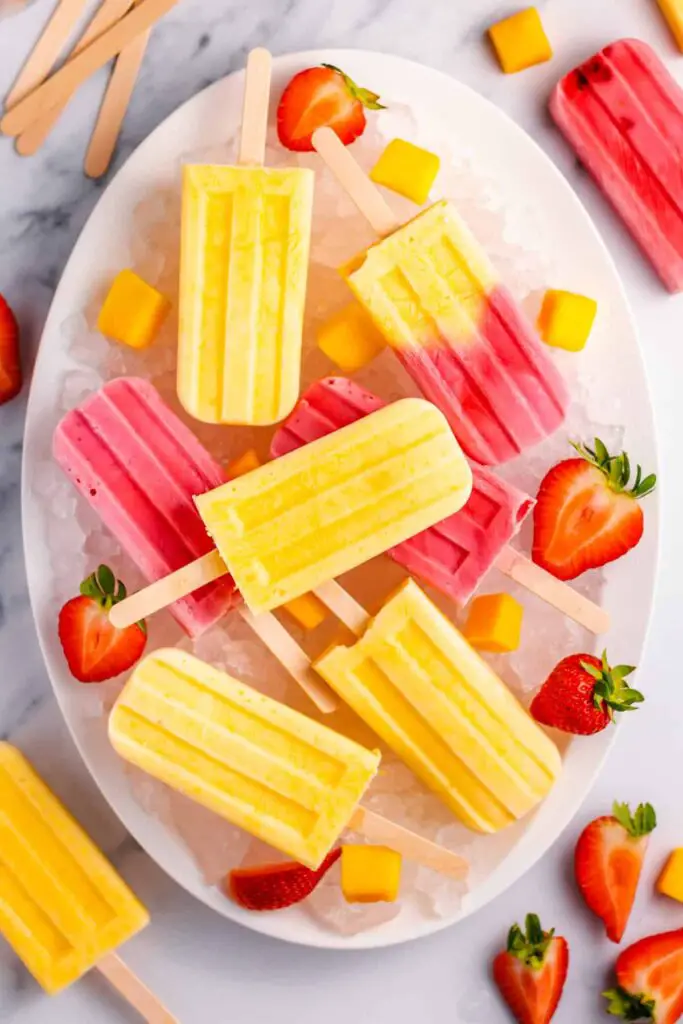
Mango Yogurt Popsicles

Easy homemade mango yogurt popsicles with fresh mangos and Greek yogurt are a great summertime treat! Naturally sweetened and just 5 healthy ingredients!
- Prep: 10 mins
- Freeze: 4 hrs
- Servings: 5 popsicles
INGREDIENTS
- 2 large ripe mangoes (about 1 ½ cups diced)
- 1 cup plain Greek yogurt (I use non-fat)
- 1 ½-2 tablespoons honey
- ½ teaspoon pure vanilla extract
- Juice of ½ lemon
INSTRUCTIONS
- Peel and dice mangoes and add a few small pieces to the bottom of each popsicle mold. You can also add a few small blueberries if you have them on hand.
- Add remaining mango to a blender with remaining ingredients. Blend until smooth.
- Divide mango mixture between popsicle molds and place in freezer. After 45 minutes to an hour, place popsicle sticks in molds and continue to freeze.
- Mango popsicles will be ready after another 3-4 hours. Run under warm water to loosen the popsicles from your molds and remove and enjoy!
Strawberry-Chocolate Greek Yogurt Bark
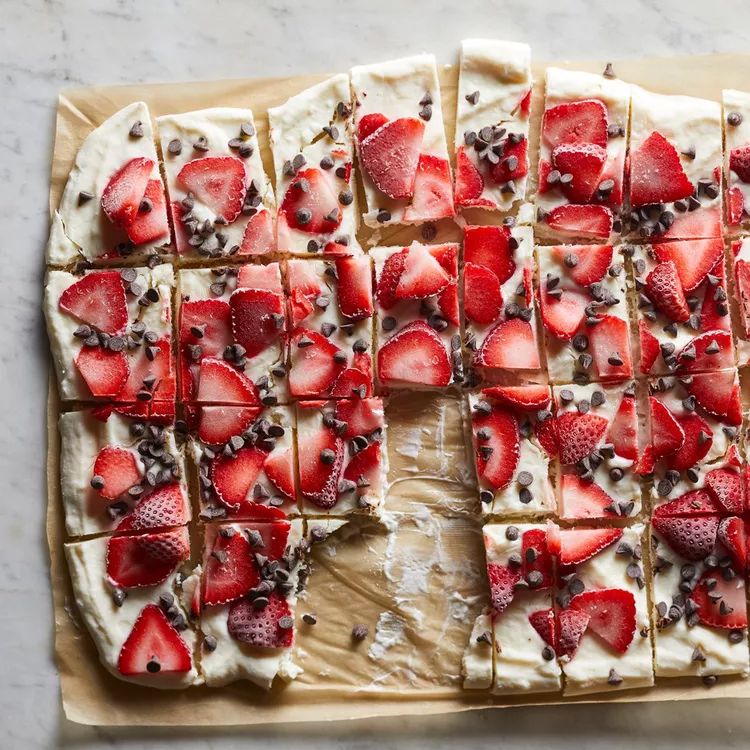
Lightly sweetened Greek yogurt gets studded with fresh strawberries and chocolate chips then frozen so you can break it into chunks just like chocolate bark (but healthier!). This colorful snack or healthy dessert is perfect for kids and adults alike. Use full-fat yogurt to ensure the creamiest bark possible.
- Active Time: 10 mins
- Additional Time: 3 hrs
- Yield: 32 pieces
Ingredients
- 3 cups whole-milk plain Greek yogurt
- ¼ cup pure maple syrup or honey
- 1 teaspoon vanilla extract
- 1 ½ cups sliced strawberries
- ¼ cup mini chocolate chips
Directions
- Line a large rimmed baking sheet with parchment paper.
- Stir yogurt, maple syrup (or honey) and vanilla in a medium bowl. Spread on the prepared baking sheet into a 10-by-15-inch rectangle. Scatter the strawberries on top and sprinkle with chocolate chips.
- Freeze until very firm, at least 3 hours. To serve, cut or break into 32 pieces.
Oven-Fried Pickles
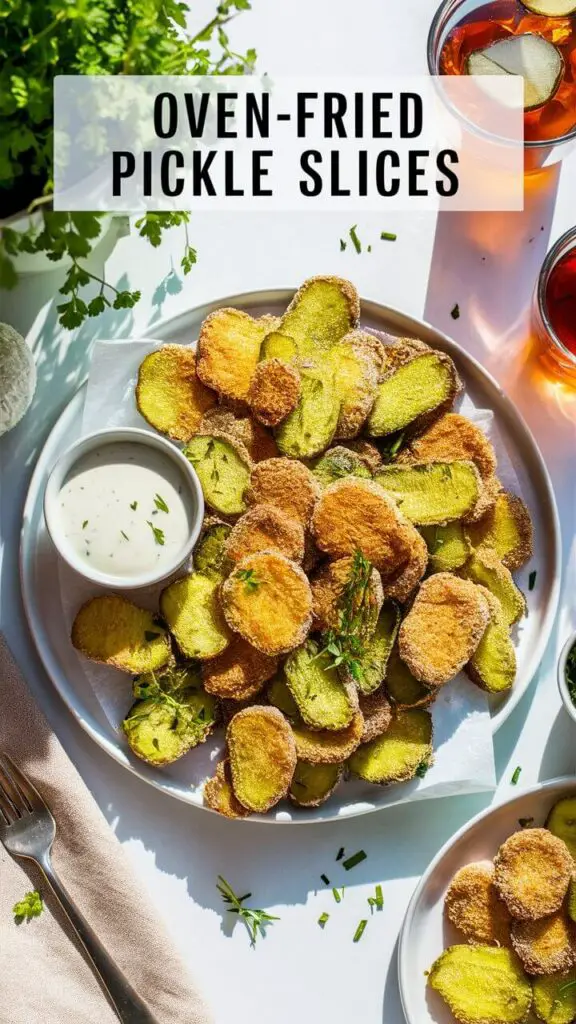
These oven-fried pickles get their crispy exterior from a dredge in flour, egg and whole-wheat breadcrumbs. Serve with a creamy herbed sour cream to take this easy app to the next level.
- Prep Time: 20 mins
- Additional Time: 10 mins
- Yield: 8 servings
Ingredients
- 8 ounces sliced dill pickles (about 1 1/3 cups)
- 1 cup whole-wheat panko breadcrumbs
- ⅓ cup all-purpose flour
- 2 eggs, lightly beaten
- Cooking spray
- ½ cup sour cream
- 1 tablespoon chopped fresh dill
- 1 teaspoon dried minced garlic
- 1 teaspoon lemon juice
- ¼ teaspoon salt, divided
Directions
- Preheat oven to 425 degrees F. Set a wire rack on a rimmed baking sheet and coat with cooking spray.
- Pat pickle slices dry. Place panko, flour and eggs in three separate shallow dishes. Working in batches, dredge the pickles in the flour, coat with the egg and then the panko, patting the crumbs to adhere. Place on the prepared rack. Coat liberally with cooking spray. Bake until crisp and beginning to brown, about 10 minutes.
- Meanwhile, combine sour cream, dill, dried garlic, lemon juice and 1/8 teaspoon salt in a small bowl.
- To serve, transfer the pickles to a platter and sprinkle with the remaining 1/8 teaspoon salt. Serve with the sauce.
Raspberry-Lemon Greek Frozen Yogurt Bark

A thin layer of honey-sweetened Greek yogurt is topped with fresh raspberries and lemon zest and then frozen and broken into chunks for a colorful snack or healthy dessert that kids and adults will love.
- Active Time: 15 mins
- Total Time: 3 hrs 15 mins
- Servings: 16
Ingredients
- 3 cups whole-milk plain Greek yogurt
- ¼ cup honey
- Zest of 1 lemon
- 2 tablespoons lemon juice
- 1 teaspoon vanilla extract
- 6 ounces raspberries, halved lengthwise
Directions
- Line a large rimmed baking sheet with parchment paper.
- Stir yogurt, honey, lemon juice and vanilla together in a medium bowl. Spread on the prepared baking sheet into a 10-by-15-inch rectangle. Scatter raspberries on top and sprinkle with lemon zest.
- Freeze until very firm, at least 3 hours. To serve, cut or break into 32 pieces.
To make ahead
Freeze airtight between sheets of parchment for up to 1 month; let stand at room temperature for 15 minutes before serving.
Homemade Oven-Dried Strawberries
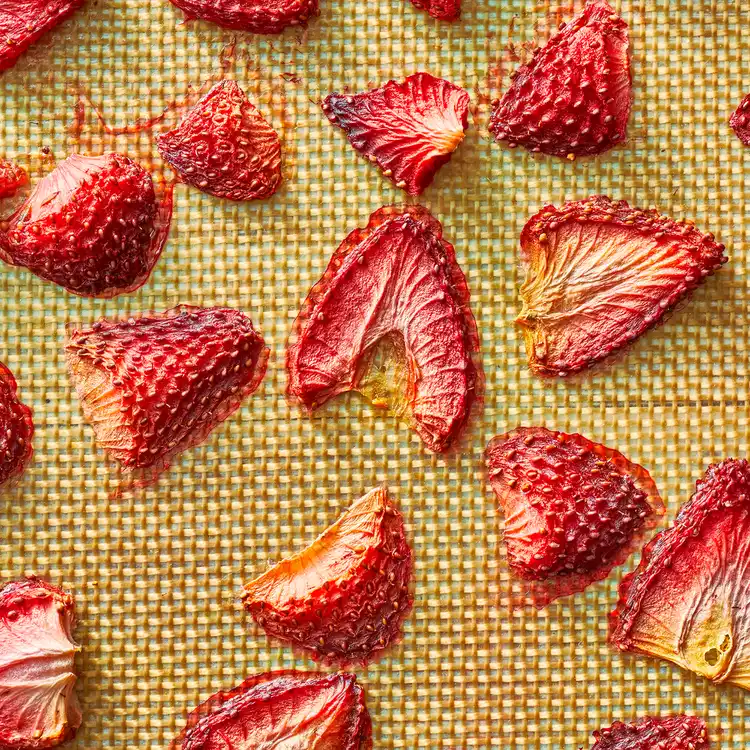
These homemade oven-dried strawberries have a deeply fruity, sweet-tart flavor you can savor just by turning on your oven. Enjoy them on their own, add them to trail mix or use them as a topping to yogurt or ice cream.
- Active Time: 5 mins
- Total Time: 4 hrs 25 mins
- Servings: 3
Ingredients
- 1 pound fresh strawberries, hulled and sliced lengthwise (1/4 to 3/8 inch)
Directions
- Preheat oven to 200°F. Line a rimmed baking sheet with a silicone baking mat. Arrange strawberries, cut-side down, on the prepared baking sheet; bake until completely dry, about 4 hours, flipping once halfway through bake time.
- Remove from oven and let cool completely on the baking sheet, about 20 minutes.
Vegan Frozen Pineapple & Coconut Yogurt Bark

Coconut-milk yogurt is sweetened with maple syrup, spread into a thin layer and studded with fresh pineapple and coconut flakes. After freezing, break it into pieces to enjoy as a healthy vegan snack or dessert!
- Active Time: 10 mins
- Total Time: 4 hrs 10 mins
- Servings: 16
Ingredients
- 1 (24 ounce) container unsweetened coconut-milk yogurt
- ¼ cup pure maple syrup
- 1 teaspoon vanilla extract
- 1 ½ cups diced fresh pineapple
- ⅓ cup unsweetened coconut flakes, toasted
Directions
- Line a 9-by-13-inch baking pan with parchment paper or plastic wrap.
- Combine coconut yogurt, maple syrup and vanilla in a medium bowl. Pour into the prepared pan. Scatter pineapple on top and sprinkle with coconut flakes.
- Freeze until very firm, at least 4 hours. To serve, cut or break into 32 pieces.
To make ahead
Freeze airtight between sheets of parchment for up to 1 month; let stand at room temperature for 15 minutes before serving.
Mini Frozen Yogurt Parfaits
These mini yogurt parfaits are the perfect sweet treat. You can use raspberries, blueberries or strawberries in these bite-size parfaits.
- Active Time: 15 mins
- Total Time: 4 hrs 15 mins
- Servings: 14
Ingredients
- 1 tablespoon pure maple syrup
- 1 cup low-fat plain Greek yogurt
- ½ cup granola
- 14 berries, such as raspberries or blackberries
Directions
- Stir maple syrup into yogurt. Divide the yogurt among slots of a 14-well ice cube tray. Sprinkle with granola, then press a berry onto each one. Freeze until frozen, at least 4 hours.
Tomato-Basil Skewers
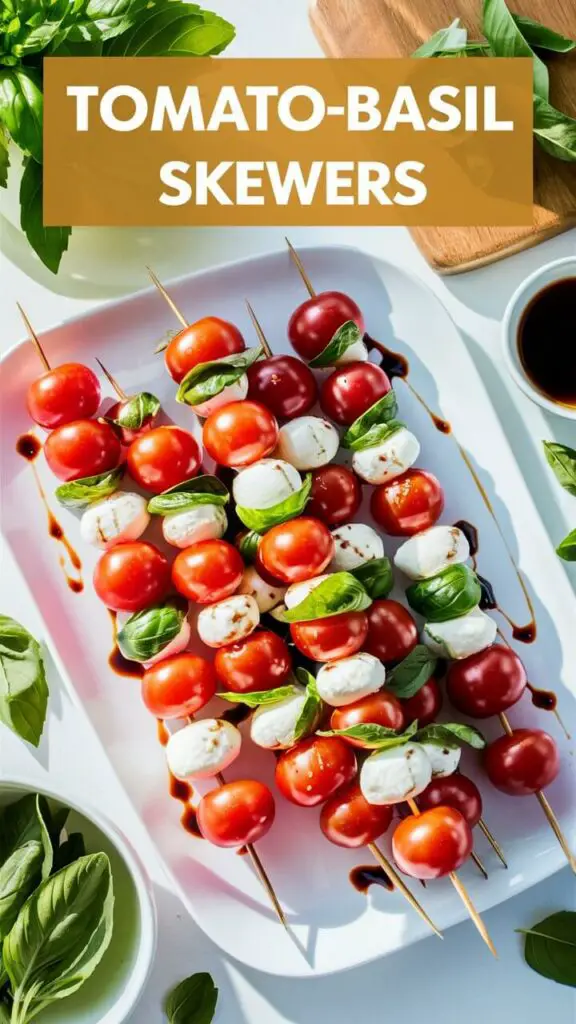
We take all the ingredients of a classic caprese salad and layer them onto skewers for a quick appetizer. These tomato-mozzarella-basil skewers are easy to assemble and perfect for a party.
- Active Time: 10 mins
- Servings: 16
Ingredients
- 16 small fresh mozzarella balls
- 16 fresh basil leaves
- 16 cherry tomatoes
- Extra-virgin olive oil, to drizzle
- Coarse salt & freshly ground pepper, to taste
Directions
- Thread mozzarella, basil and tomatoes on small skewers. Drizzle with oil and sprinkle with salt and pepper.
Mini Bell Pepper Pebre

This version of pebre, a Chilean condiment, combines bell peppers, tomatoes, parsley and cilantro for a fresh bite.
- Active Time: 10 mins
- Servings: 24
Ingredients
- 1 pound mini bell peppers, seeded and diced
- 2 large tomatoes, diced
- 1 cup chopped fresh cilantro
- 1 cup chopped fresh parsley
- ½ large onion, diced
- 4 cloves garlic, minced
- ¼ cup extra-virgin olive oil
- 2 tablespoons red-wine vinegar
- ¾ teaspoon salt
- ¼ teaspoon ground pepper
- Tortilla chips for serving
Directions
- Combine peppers, tomatoes, cilantro, parsley, onion, garlic, oil, vinegar, salt and pepper in a medium bowl. Serve with chips, if desired.
Strawberry Swirl Cheesecake Ice Pops
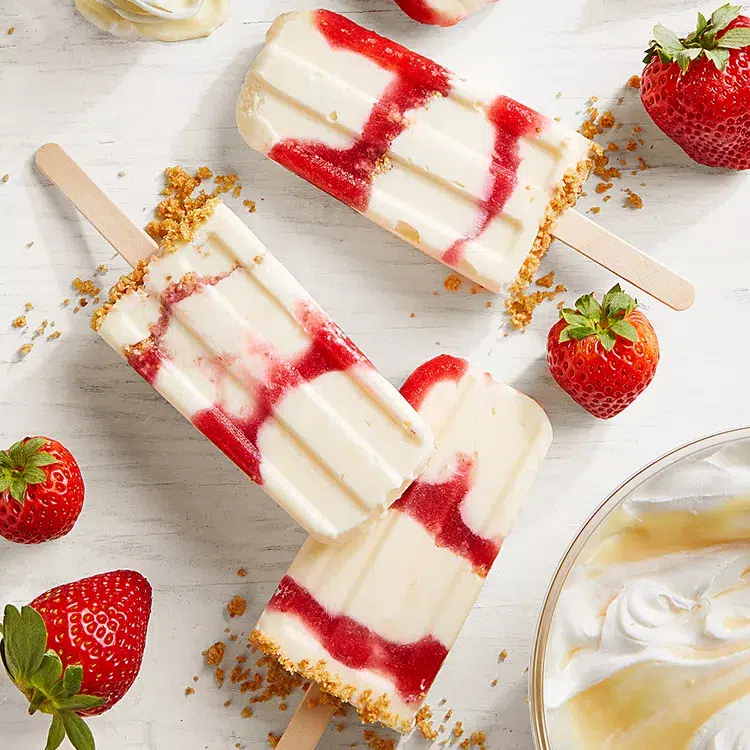
Cheesecake mix, graham crackers, and strawberries make this truly a cheesecake popsicle.
- Prep Time: 30 mins
- Additional Time: 8 hrs
- Servings: 8
Ingredients
- 1 cup chopped fresh or frozen strawberries, thawed
- 2 tablespoons sugar
- 1 (4-serving size) package fat-free, sugar-free, reduced-calorie cheesecake instant pudding mix
- 2 cups fat-free milk
- 1 cup frozen light whipped topping, thawed
- ⅓ cup crushed graham crackers
- 1 tablespoon butter, melted
Directions
- In a food processor or blender combine strawberries and sugar. Cover and process or blend until smooth. In a medium bowl whisk together pudding mix and milk 2 to 3 minutes or until thick. Fold in whipped topping.
- Spoon pudding mixture into eight 5-oz. paper cups or ice-pop molds. Top with pureed strawberries; swirl slightly to marble. In a small bowl combine graham crackers and melted butter. Top strawberry layer with crumb mixture.
- Cover each cup with foil. Cut a small slit in foil and insert a wooden stick into each pop. If using, insert sticks into molds. Freeze overnight or until firm.
Carrot Smoothie

This type of drink tends to be pricey in the big city juice bars. Now you can make the recipe at home.
- Prep Time: 10 mins
- Additional Time: 25 mins
- Servings: 3
Ingredients
- 1 cup sliced carrots
- ½ teaspoon finely shredded orange peel
- 1 cup orange juice
- 1 ½ cups ice cubes
- 3 (1 inch) pieces Orange peel curls
Directions
- In a covered small saucepan, cook carrots in a small amount of boiling water about 15 minutes or until very tender. Drain well. Cool.
- Place drained carrots in a blender. Add finely shredded orange peel and orange juice. Cover and blend until smooth. Add ice cubes; cover and blend until smooth. Pour into glasses. If desired, garnish with orange peel curls.
Frozen Chocolate Bananas

Frozen chocolate bananas are an incredibly fun treat that will impress both kids and adults. They are easy to make, naturally sweet, and delicious. Plus, it’s the perfect way to use up extra bananas in the summer! These chocolate bananas are naturally vegan, gluten-free, and dairy-free!
- Prep Time: 10 mins
- Additional Time: 2 hrs
- Servings: 6
Ingredients
- 3 bananas
- 6 oz dark chocolate
Toppings
- Chopped nuts
- Shredded coconut
- Dried fruit
- Cacao nibs
Instructions
- Cut the bananas in half and add a popsicle stick into the cut end.
- Peel each halved banana.
- Place the bananas on a baking sheet covered with parchment paper or wax paper and freeze them for at least 2 hours.
- Put the chocolate in a small heatproof bowl and place it in the microwave, mixing and checking every 20 seconds. Or melt the chocolate in a double boiler.
- Dip the frozen bananas one at a time in the bowl of melted chocolate, twirl to remove the excess chocolate, and place them to dry on a cooling rack or parchment paper. Quickly sprinkle with your favorite topping before the chocolate solidifies (you really have only a few seconds here).
- Freeze the bananas for another 30 minutes and enjoy!
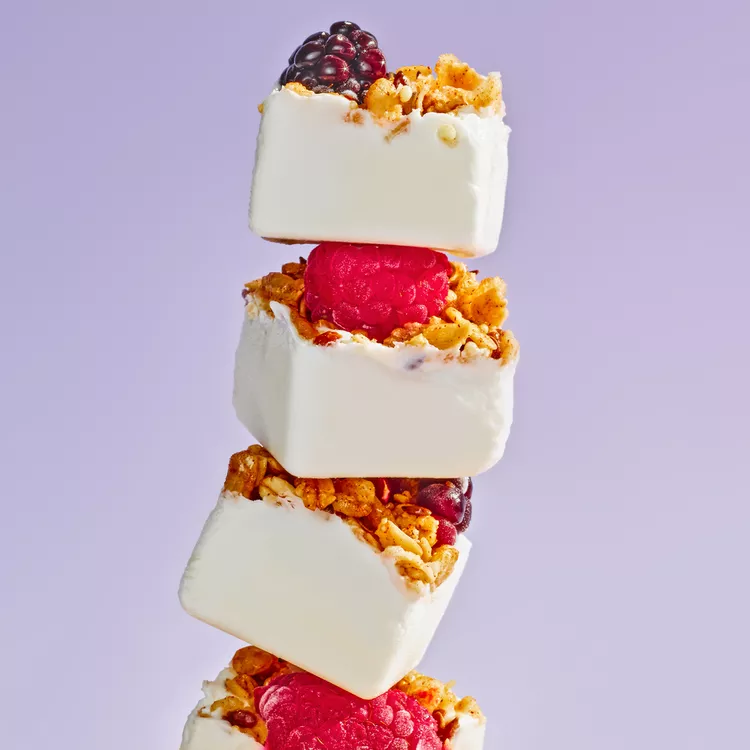
Frozen Yogurt Bark with Berries

This healthy frozen yogurt bark with fresh fruit, crunchy granola, and nuts is the perfect snack for warmer days. It’s made with simple ingredients and is loaded with plenty of protein to tide you over until your next meal!
- Prep Time: 15 mins
- Freezing Time: 2 hrs
- Servings: 6
Ingredients
- 2 cups Greek yogurt – use full fat
- ½ cup diced strawberries
- ¼ cup blueberries
- ¼ cup raspberries
- 2 tablespoons maple syrup – optional
- ½ teaspoon vanilla powder – or 1 teaspoon vanilla extract
- ¼ cup chopped nuts or granola
Instructions
- Line a baking sheet with parchment paper or a silicone baking mat.
- In a mixing bowl, whisk together the Greek yogurt, maple syrup (if using), and vanilla extract until smooth.
- Spread the yogurt mixture onto the prepared baking sheet in an even layer, about 1/4 inch thick.
- Sprinkle the diced strawberries, blueberries, raspberries, and chopped nuts or granola over the top of the yogurt layer.
- Place the baking sheet in the freezer for at least 2 hours or until the yogurt is completely frozen.
- Once frozen, use a knife or your hands to break the bark into smaller pieces.
- Serve immediately or store in an airtight container in the freezer.
Fruit Pizza

This simple fruit pizza is beautiful and delicious! A soft sugar cookie crust with a cream cheese frosting and topped with sliced fruit. So simple and oh-so good!
- TOTAL TIME: 1 hour 30 minutes
- YIELD: 8 big slices
INGREDIENTS
Sugar Cookie Crust (although store bought sugar cookie dough also works great):
- 3/4 cup sugar
- 1 1/4 cups flour
- 1/4 teaspoon baking powder
- 1/4 teaspoon salt
- 1/2 cup butter, softened
- 1 teaspoon vanilla extract
- 1 large egg
Cream Cheese Frosting:
- 12 ounces cream cheese, softened
- 1/4 cup butter, softened
- 1 teaspoon vanilla
- 1 1/4 cup powdered sugar
Fruit Toppings:
- 7–10 strawberries, sliced
- 5–6 kiwis, sliced
- 1 mango, sliced
- 1/2 cup blueberries
- 1 small bunch of grapes, halved
INSTRUCTIONS
- Make the Crust: Mix the butter, sugar, egg, and vanilla until well combined. (You can use an electric mixer or just mix with a spoon if your butter is melted.) Add flour, baking powder, and salt. Mix until combined. Chill the dough for 30 minutes.
- Bake the Crust: Preheat the oven to 350 degrees. Line a baking stone with parchment. Roll the chilled dough out onto it into a 1/4 to 1/2-inch thick layer, leaving some space around the edge. Bake for 20-25 minutes. Allow it to cool.
- Make the Cream Cheese Frosting: Using an electric mixer, combine the cream cheese, butter, powdered sugar and vanilla until smooth and creamy. Spread over the cooled cookie crust and chill again to firm up the frosting.
- Make It Fancy: Top with fruit! See post for designs.
Cottage Cheese Ice Cream

This tasty ice cream is made with frozen fruit and cottage cheese for a healthy treat that is creamy and delicious! It only takes a few minutes to make this simple recipe!
- Prep: 10 minutes
- Yield: 1 1/2 cups
Ingredients
- 1 cup cottage cheese (do not use fat-free cottage cheese)
- 1 1/2 cups frozen berries
- 1 frozen banana
- 1 tablespoon honey
Instructions
- Add the cottage cheese, berries, banana, and honey to a blender or food processor.
- Blend until smooth.
- Enjoy it immediately as soft serve ice cream or transfer the ice cream to a loaf pan and freeze for 1-2 hours for a firmer texture.
- If freezing for longer or overnight, place the pan in the fridge for 30 minutes to an hour to allow to thaw slightly. This will make it easier to scoop.
Peanut Butter Swirled Chocolate Fudge Popsicles

- Prep Time: 15 minutes
- Chill time: 4 hours
- Servings: 12 popsicles
Ingredients
- 1 (14 ounce) can full fat canned coconut milk
- 1/4 + 1/3 cup creamy peanut butter
- 2 ripe bananas
- 6-8 dates + 1/3 cup pitted medjool dates
- 1/2 cup cacao or cocoa powder
- 3 tablespoons hemp seeds
- 2 teaspoons vanilla extract
- 1/2 cup rolled oats
- 1/2 cup roasted peanuts
- 8 ounces dark chocolate, melted
Instructions
- 1. In a high powder blender or food processor, combine the coconut milk, 1/4 cup peanut butter, bananas, 6-8 dates, cacao powder, hemp seeds, and vanilla and blend until completely smooth and the consistency of a thick smoothie.
- 2. To assemble, layer the chocolate mix and the remaining 1/3 cup peanut butter evenly among 10-12 popsicles molds. It’s OK if the layers are not perfect.
To make the granola:
- In a food processor, combine the remaining 1/3 cup dates, oats, and peanuts and pulse until the mix is finely ground and resembles granola.
- Sprinkle the “granola” over the tops of the pops, gently pressing into the pops (you will not use all the “granola”). Insert popsicle sticks, cover the tops of the mold and freeze until firm, about 4 hours.
- To remove the popsicles run the mold under hot water for 10 seconds and then pull the popsicles out of the molds.
If desired, dip each popsicle in chocolate and then quickly sprinkle with the remaining “granola”. Store in the freezer.
Sicilian Granita Recipe

Try the authentic Sicilian granita recipe at home, one of the best Italian frozen desserts – Only 3 ingredients required!
- Prep Time: 5 mins
- Freezing time: 1 hr 30 mins
- Servings: 10
Ingredients
- 6 organic lemons, juice only
- 220 g white sugar
- 1 litre water
Instructions
- In a large bowl, stir together lemon juice, sugar and water, until the sugar has dissolved.
- Transfer the granita mixture into a large metal container (a loaf tin works great), cover with cling film, and place in the freezer for half an hour.
- Use a wooden spoon to stir vigorously the mixture and break any ice crystals, then transfer the tin back in the freezer.
- Repeat every 30 minutes for 2-3 times, or until your granita has reached a velvety icy texture. Alternatively, you can also use an immersion blender to break the ice crystals. Once it reaches the desired consistency, serve straight away.
Rainbow Fruit Skewers

Easy & delicious fruit skewers made with 5 different types of fresh fruit and a drizzle of dark chocolate for an extra treat. These fun rainbow fruit skewers are the perfect healthy snack or dessert and are great for kids!
- Prep Time: 20 mins
- Servings: 6
Ingredients
- 6 strawberries, hulled
- 1 orange, peeled, segmented and cut in half
- ½ of a ripe pineapple, peeled, cored and cut into 1-inch chunks (about 1 ½ cups pineapple chunks)
- 1 banana, cut into 1-inch sliced
- 2 kiwi fruit, peeled and cut into 1-inch chunks
- 1 bar of semi-sweet or dark chocolate, vegan or dairy free if desired
- Optional: flaky sea salt
Instructions
- Arrange fruit on wooden skewers. I like adding them in rainbow order: strawberry, orange, pineapple, banana, kiwi. Place the skewers on a large plate or baking pan lined with parchment paper or wax paper.
- Break up the dark chocolate bar into pieces and add it to a microwave safe bowl. Microwave in 30-second intervals, stirring in between, until the chocolate is melted.
- Drizzle the melted chocolate over the fruit kabobs and sprinkle with flaky sea salt, if using.
- Place the plate of kabobs in the freezer for 5 minutes or until the chocolate hardens. Enjoy!
Watermelon Lemon Mint Popsicles
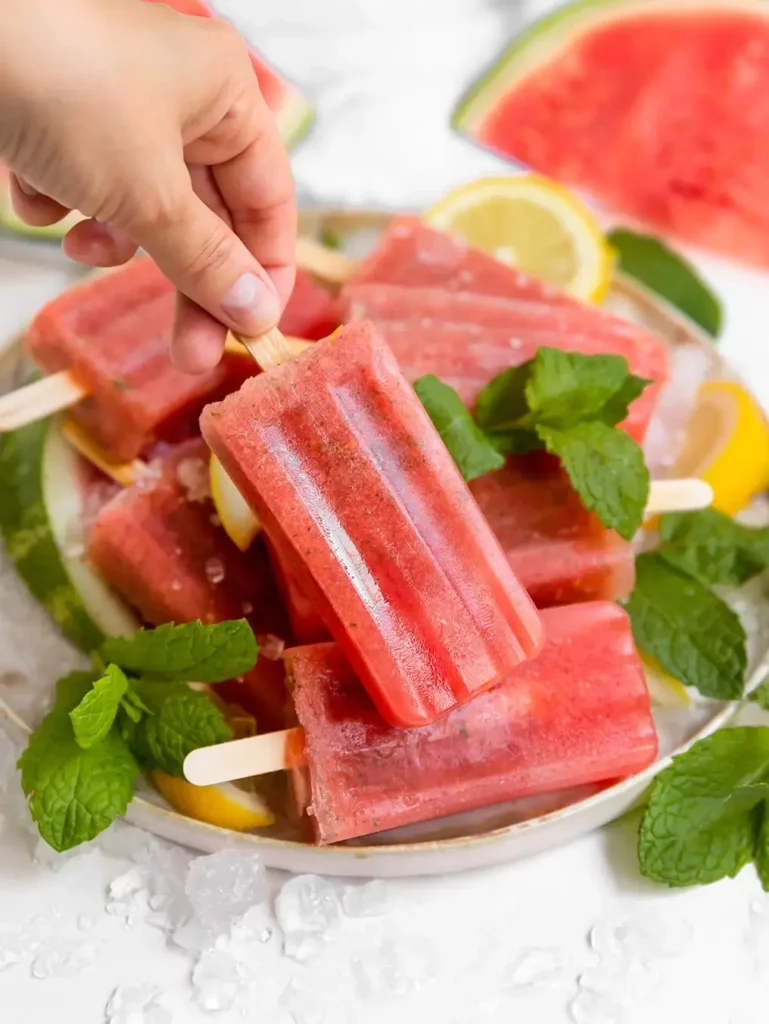
These healthy & naturally sweetened watermelon popsicles only require 4 ingredients for a refreshing frozen treat!
- Prep Time: 15 minutes
- Additional Time: 6 hours
- Servings: 10 popsicles
Ingredients
- 5 ½ cups watermelon, chop into squares before measuring
- ⅓ cup freshly squeezed lemon juice, about 2 large lemons or 3 small lemons juiced
- 1 tablespoon lemon zest, zest of 1 large lemon or 2 small
- 18 fresh mint leaves, stems removed, about 4 sprigs
Instructions
- Cut the watermelon and zest and juice the lemons. Then, add the watermelon, lemon juice, lemon zest, and mint leaves to a blender and blend together until smooth.
- Pour the watermelon popsicle mixture into a popsicle mold filling each mold until there is 1-inch of space left on the top of the mold. Then, add in the popsicle sticks. Add the mold to the freezer for 6-12 hours until frozen through.
- Remove the mold from the freezer and gently run a butter knife along the edges of the mold to loosen the popsicles. Once the popsicles have been removed enjoy immediately as they will melt fast. Enjoy!
Easy Mango Popsicles
These easy mango popsicles are made with just 3 healthy ingredients and are gluten-free, delicious and refreshing on a hot summer’s day. This mango popsicle recipe can be customized with your favorite fruits, too!
- Prep Time: 5 minutes
- Chilling Time: 6 hours
- Servings: 6
Ingredients
- 2 cups frozen mango chunks or fresh cut mango
- 2 cups plain yogurt
- 2 tablespoon honey
Instructions
- Put the mango chunks, yogurt, and honey into the blender.
- Blend on high speed until smooth, about 60-90 seconds depending on the strength of your blender. The blended mixture will look thick and creamy but will be pourable.
- Pour the fruit and yogurt mixture into the popsicle molds and insert the popsicle sticks.
- Freeze for at least 6 hours, preferably overnight.
Cookie Ice Cream Sandwiches

This recipe produces a soft chocolate chip cookie which is perfect for making cookie ice cream sandwiches. You do not have to chill this cookie dough! For best results, I recommend using mini chocolate chips and freezing the assembled sandwiches for at least 3 hours.
- Prep Time: 30 minutes
- Cook Time: 13 minutes
- Total Time: 3 hours, 30 minutes (includes freezing)
- Yield: 12 3-inch sandwiches
Ingredients
- 2 and 1/4 cups (281g) all-purpose flour (spooned & leveled)
- 1 and 1/2 teaspoons cornstarch
- 1 teaspoon baking soda
- 1/2 teaspoon salt
- 3/4 cup (12 Tablespoons or 170g) unsalted butter, softened to room temperature
- 3/4 cup (150g) packed light or dark brown sugar
- 1/2 cup (100g) granulated sugar
- 1 large egg + 1 egg yolk, at room temperature
- 2 teaspoons pure vanilla extract
- 1 and 1/4 cups (225g) mini semi-sweet chocolate chips
Sandwiching
- 3 cups (about 540g) vanilla ice cream (or your desired flavor)
- 1 cup mini chocolate chips (180g), sprinkles (150g), or finely chopped nuts (100g)
Instructions
- Preheat oven to 350°F (177°C). Line 3 large baking sheets with parchment paper or silicone baking mats. (If you don’t have 3 baking sheets, bake the cookies in batches.)
- Whisk the flour, cornstarch, baking soda, and salt together in a medium bowl.
- Using a handheld or stand mixer fitted with a paddle attachment, beat the butter, brown sugar, and granulated sugar together in a large bowl on medium-high speed until combined and creamy, about 2 minutes. Add egg, egg yolk, and vanilla extract, then beat on medium-high speed until combined. Scrape down the sides and up the bottom of the bowl as needed. Beat in the dry ingredients on low speed, then beat in the chocolate chips until combined. The dough will be soft and sticky.
- Since the dough is so sticky, I recommend using a cookie scoop and this medium size is perfect. Scoop cookie dough into balls, about 1.5 Tablespoons of dough per cookie, and arrange 3 inches apart on the baking sheets. Bake for 12–13 minutes or until lightly browned on the sides. The centers will look soft.
- Remove from the oven and allow cookies to cool on the baking sheet for 5 minutes. If desired, while the cookies are still warm, press extra mini chocolate chips into the tops of the cookies. This is optional and just for looks. Transfer to a wire rack to cool completely before assembling your ice cream sandwiches.
- Assemble the sandwiches: Flip a cooled cookie over and place 1 generous ice cream scoop, about 1/4 cup or 45g, on top. Use your scoop to gently spread the ice cream to the edges. Sandwich a cookie on top, then pick up the assembled sandwich and gently press it all together in the very center to make a compact sandwich. Roll sides into mini chocolate chips, sprinkles, or nuts. If not enjoying right away (they’re messy if you don’t freeze them first), immediately wrap assembled sandwich in plastic wrap or parchment paper and place in the freezer. Repeat with remaining cookies and ice cream.
- Freeze for at least 3 hours and up to 3 months.
Banana Mocha Nice Cream
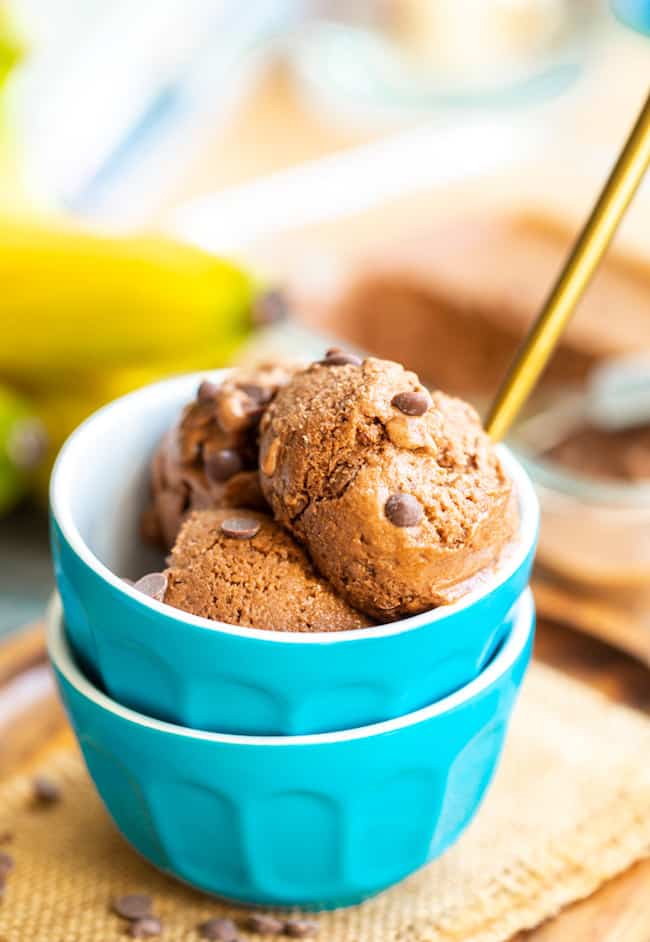
Easier to make than you might think – this chocolate and coffee infused banana ‘nice cream’ comes together with in little times with only a handful of ingredients! It’s naturally vegan, gluten free and refined sugar free. You can enjoy this frozen treat ASAP like a soft serve or thick shake or freeze it until firm for a scoopable ice cream treat!
- Yield: 2-3 servings
- Prep Time: 5 minutes
- Additional Time: 4 hours
Ingredients
- 3 frozen bananas, diced
- 1/4 cup dairy free milk
- 2 tbsp cocoa powder
- 1 tsp instant coffee powder
- 1/2 tsp vanilla extract
- 3 tbsp mini chocolate chips, optional (ensure dairy free in needed)
Instructions
- Add all of the ingredients to a blender or food processor and blend until thick and smooth. If you’re tough time getting everything to blend add a little more milk to get things moving.
- Your nice cream should resemble soft serve at this point. You can top with chocolate chips and enjoy right away or transfer to a freezer safe container, stir in the chips and freeze for 2-4 hours to solidify into scoop-able constancy.
Pretty in Pink Peach Smoothie
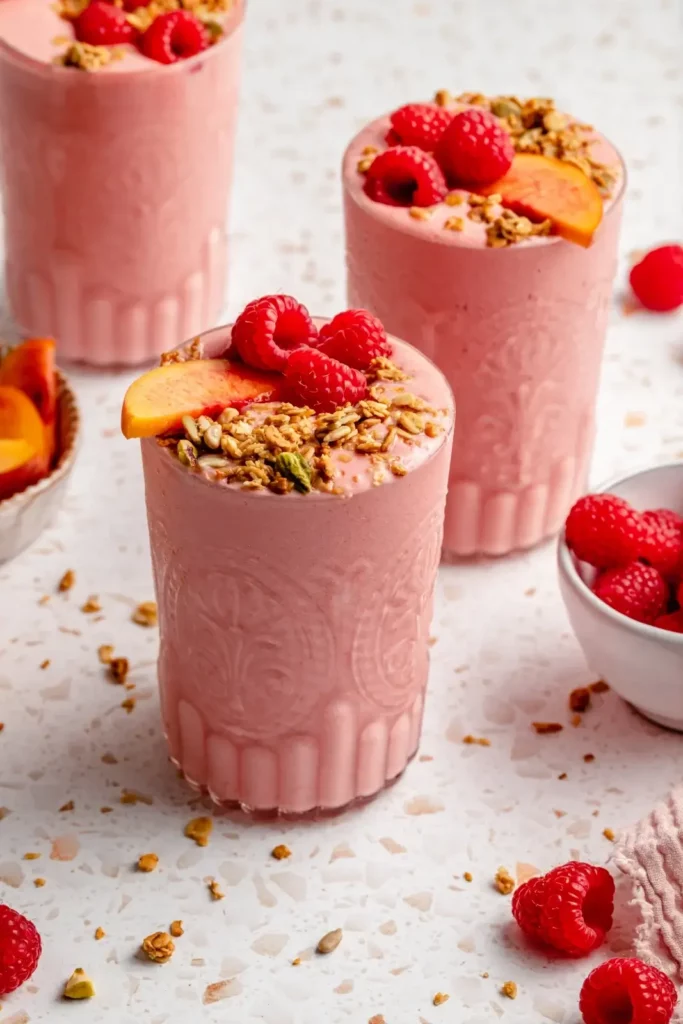
Creamy and delicious peach smoothie made with 5 simple ingredients for a refreshing, filling breakfast or snack! This easy peach smoothie recipe gets a boost of protein from greek yogurt and has the perfect amount of sweetness from ripe peaches and berries. Enjoy as is or add your fav nutritional boosters!
- PREP: 5 mins
- Serves: 1
Ingredients
For the smoothie:
- 1 heaping cup frozen peach slices
- 1 cup frozen raspberries or strawberries
- ½ cup vanilla greek yogurt (or sub dairy free yogurt of choice)
- 1 cup unsweetened dairy free milk of choice (i use almond milk but coconut milk would be YUM)
- 1 teaspoon pure vanilla extract
To garnish:
- Granola and fresh raspberries/peach slices
Instructions
- Add all ingredients to a high powered blender: frozen peaches, frozen raspberries, yogurt, milk and vanilla extract. Feel free to add any optional add-ins to your smoothie if you’d like.
- Blend until smooth, adding more milk to thin, if necessary.
- Taste and add honey to sweeten as necessary then blend again; this is totally optional but some might prefer a sweeter smoothie.
- Pour into a glass and enjoy! Serves 1. Feel free to double the recipe to serve 2.
Strawberry Cream Pie Popsicles

These vegan Strawberry Cream Pie Popsicles take a creamy strawberry filling made with real strawberries, topped with a three-nut, gluten-free cinnamon “crust” for the perfect summer pie-inspired treat.
- Prep Time: 10 minutes
- Cook Time: 15 minutes
- Yield: 6 popsicles
INGREDIENTS
Strawberry Cream Filling
- 16 ounces (1 lb) strawberries, tops trimmed off, cut in half
- 1 can (13.66 oz) unsweetened coconut cream
- 1 teaspoon pure almond extract
- 3 tablespoons agave/maple syrup
- 1 tablespoon arrowroot powder
- pinch salt
Crust
- 1/3 cup almonds (I used Diamond of California)
- 1/3 cup shelled pecans (I used Diamond of California)
- 1/3 cup shelled walnuts (I used Diamond of California)
- 1 teaspoon ground cinnamon
- pinch salt
- 1/4 teaspoon pure vanilla extract
- 1 tablespoon coconut oil, melted
INSTRUCTIONS
- In a medium saucepan, saute the washed and cut strawberries over medium heat until they start to reduce and get soft, about 10-15 minutes.
- Stir in the rest of the filling ingredients and bring to a boil, then reduce and simmer for a few minutes.
- Remove from heat to cool slightly while you prepare the popsicle molds (I like to add mine to a baking sheet to make getting into the freezer easier).
- Pour the filling into the popsicle molds leaving about an inch of space at the top to add the crust. Place in the freezer for about an hour.
- Make the crust by blending/processing the nuts, cinnamon, and salt together until you have a fine texture. Add in the vanilla and coconut oil and pulse until it’s sticky.
- Remove the popsicles from the freezer and add the crust on top of each filling, gently packing it down tight.
- Insert the popsicle sticks into each well and freeze at least 4 hours, preferably overnight.
No Bake Cookies
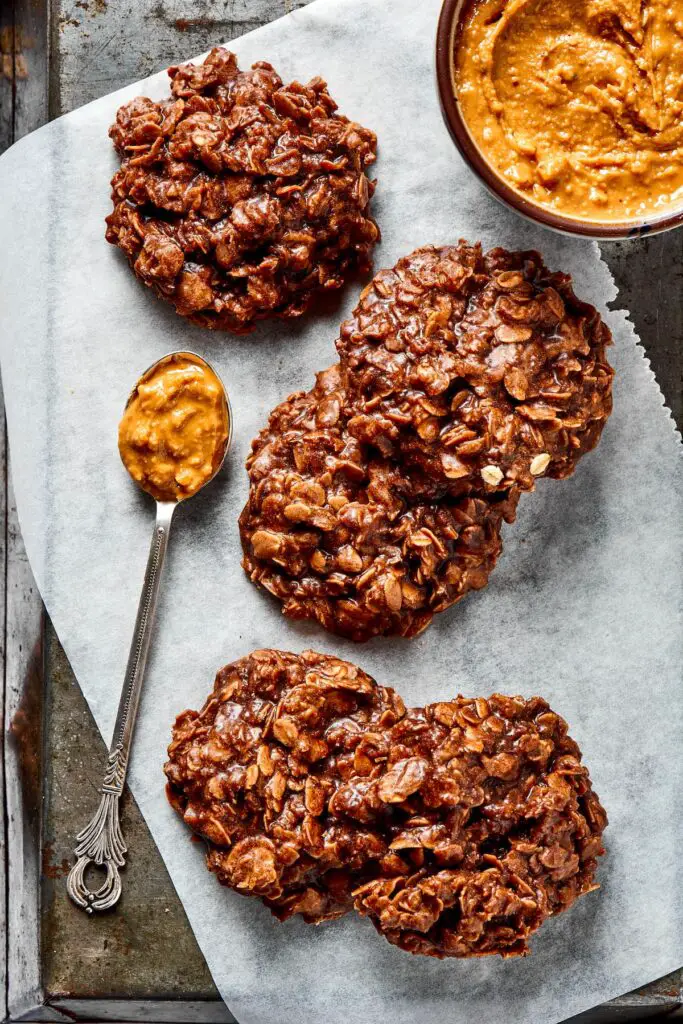
These classic No Bake Cookies are jam-packed with chocolate, peanut butter, and oatmeal, and are surprisingly easy to make. You don’t even have to turn on the oven! They are a family favorite!
- Prep Time: 5 minutes
- Cook Time: 10 minutes
- Yield: 24 cookies
Ingredients
- 1/2 cup unsalted butter, cut into tablespoon pieces
- 2 cups granulated sugar
- 1/2 cup milk
- 1/4 cup unsweetened cocoa powder
- 1/2 cup creamy peanut butter
- 2 teaspoons pure vanilla extract
- 1/2 teaspoon kosher salt
- 3 cups quick oats
Instructions
- Line two large baking sheets with parchment paper or silicone baking mats. Set aside.
- Place the butter, granulated sugar, milk, and cocoa powder in a medium saucepan. Over medium heat, bring to a boil, stirring occasionally. Once the mixture is at a rolling boil, boiling around the edges and in the middle, boil for one minute.
- Remove the pan from the heat and stir in the peanut butter, vanilla, and salt. Stir until peanut butter is melted and smooth. Stir in the oats.
- Drop spoonfuls of the mixture (about 2 tablespoons per cookie) onto the prepared baking sheets, and let sit at room temperature until cooled and hardened, about 20 to 30 minutes.
2-Ingredient Piña Colada Smoothie
The flavors of your favorite beach cocktail simplified into a 2-ingredient smoothie. This refreshing smoothie requires just 5 minutes to make.
- Prep Time: 5 minutes
- Yield: 2 servings
Ingredients
SMOOTHIE
- 3 cups chopped frozen pineapple (ripe for best flavor)
- 3/4 cup light coconut milk (or canned or boxed)
- 1-2 tsp honey or maple syrup (optional // only if pineapple isn’t sweet enough)
- 1 scoop plain or vanilla protein powder (or add whole food source such as hemp seeds // optional)
- 1-2 oz white rum to make it boozy (optional)
FOR SERVING optional
- Coconut whipped cream
- Cherries
- Fresh pineapple
- Fresh mint
Instructions
- To a high-speed blender add frozen pineapple and coconut milk (we prefer light canned). Then blend on high until creamy and smooth, using the tamper (if available) to push down and blend more easily. Add more coconut milk as needed to facilitate blending and ensure creaminess.
- Taste and adjust flavors as needed, adding more coconut milk for creaminess, pineapple to thicken // add sweet-tart flavor, or a bit of honey or maple syrup (optional) for additional sweetness.
- If enjoying as a smoothie, you have the option of adding a bit of protein powder of choice, such as plain or vanilla. If enjoying as a cocktail, add 1-2 oz of your favorite rum (white is preferred) and blend again to combine.
- Enjoy fresh as is, or top with coconut whipped cream, a cherry, a slice of pineapple, and mint (all optional).
- If you have leftovers, freeze into popsicles or ice cube molds (if you’ve already added booze, they likely won’t firm up all the way). When ready to use, simply blend the piña colada ice cubes in your blender with rum or additional coconut milk.
Vanilla Chia Pudding

Vanilla Chia Pudding is a healthy make-ahead breakfast that doubles as dessert! A mixture of chia seeds, milk, natural sweetener, and vanilla creates a pudding-like treat, perfect for topping with granola, coconut yogurt, and your favorite fresh fruit.
- Prep Time: 10 mins
- Chill Time: 2 hrs
- Yield: 1 serving
Ingredients
- 2 tablespoons chia seeds
- 1/2 cup almond milk – or any other milk
- 1 teaspoon maple syrup – or any other sweetener
- ¼ teaspoon vanilla powder – or seeds of 1 vanilla bean
Toppings
- Coconut yogurt – or any other yogurt of your choice
- Berries or other fresh fruit
- Granola
Instructions
- In a glass or mason jar bowl, stir together the chia seeds, almond milk, maple syrup, and vanilla. Stir well.
- Let the chia seeds mixture sit for 5 minutes. Give it another good stir to avoid clumps (this is super important!).
- Cover and let it set in the fridge for at least 1-2 hours or overnight.
- Remove from the fridge and add your favorite toppings: coconut yogurt, fresh berries, and/or granola.
Healthy Apple Nachos

These healthy apple nachos with creamy peanut butter and crunchy chocolate nibs are the perfect 5-minute snack if you crave something sweet! Vegan, Gluten-Free, Grain-Free
- Prep Time: 5 mins
- Yield: 2 servings
Ingredients
- 2 apples – (pink ladies, granny smith, honey crisp, fuji, or any other type)
- 1/4 cup peanut butter – (or any other nut butter)
- 1 tbsp chocolate nibs – (or chocolate chips)
- 1 tbs chopped hazelnuts – (or walnuts, peanuts, almonds, etc.)
- The juice of half a lemon – optional
- A sprinkle of cinnamon – optional
Instructions
- Wash the apples. Cut them into quarters and remove the core. Then slice them into thin slices. Squeeze half a lemon on a plate and coat the apple slices. This will keep them from browning. Skip this step if you will eat the apple nachos straight away.
- Layer the apples in a nice circle on a plate.
- Warm the peanut butter in the microwave for 10-15 seconds. This will make it more spreadable and easy to drizzle on the apples. If you don’t have a microwave, simply place the peanut butter in a heatproof bowl and set the bowl over a pan of simmering water (bain-marie), stirring occasionally, until warm.
- Drizzle the peanut butter on top of the apples, sprinkle with cinnamon, chocolate nibs, and chopped nuts. Enjoy!
Key Lime Pie Energy Balls

Want a healthy snack ready in just 15 minutes? These Key Lime Pie Energy Balls are easy to make, bursting with zesty lime flavour and perfect for a tasty snack or dessert!
- Prep Time: 15 mins
- Yield: 16 servings
Ingredients
- 1 cup pitted Medjool dates
- 3/4 cup blanched almonds
- 1/4 cup unsweetened shredded coconut
- zest of 1 lime
- 2 tsp lime juice
- 1/2 tsp vanilla extract
- Shredded coconut and lime zest for rolling (optional)
Instructions
- Add all the ingredients to a food processor and blend the mixture until well combined, about 1-2 minutes. You should be able to easily press the mixture between your fingers and it should feel sticky. (if your mixture is too dry, add some more dates continue to blend.)
- Scoop out 1 tablespoon of the mixture at a time and use your hands to roll into balls, then dip each ball into a plate of shredded coconut and some lime zest.
- Place the energy balls in the fridge to set for at least 2 hours then enjoy.
No-Bake Trail Mix Granola Bars
This recipe simplifies the entire granola-bar-making process with a no-bake freezer preparation method.
- Prep: 20 mins
- Freeze: 30 mins
- Servings: 16 square bars
INGREDIENTS
- 1 cup old-fashioned rolled oats
- 1 cup puffed brown rice cereal, I prefer Arrowhead Mills brand which you can find at most health food stores for about $3/bag
- 1/2 cup unsalted chopped almonds
- 1/2 cup roasted and unsalted pumpkin seeds
- pinch salt
- 1 cup medjool dates, packed, pitted
- 1/3 cup honey
- 1/3 cup peanut butter
- 1 TB pure vanilla extract
INSTRUCTIONS
- In a large bowl, combine the dry ingredients: rolled oats, puffed brown rice, chopped almonds, pumpkin seeds, and a pinch of salt.
- Place the pitted dates in a food processor bowl, or you can do this step with a knife but it will require more time. Slowly pulse the dates, pausing between pulses, until the dates are chopped into pieces. Ideally the dates shouldn’t form a ball, but if this happens you can separate the dates into smaller pieces with your hands. Add the dates to the dry ingredients, and then combine the ingredients with your hands (it helps to wet your hands first!). The mixture should feel sticky once the dates are incorporated in the dry mixture.
- In a small saucepan, over medium heat, combine the honey and peanut butter. Stir the honey and peanut butter until smooth and creamy. You may need to use a whisk to combine the ingredients. Turn off the heat, and stir in the vanilla extract (yes, 1 tablespoon).
- Pour the sticky honey and peanut butter over the dry ingredients. Stir to combine the ingredients, making sure the honey and peanut butter covers all the dry ingredients.
- Line an 8×8 baking dish with parchment paper. Press the granola down into the pan. I like to use the back of a measuring cup (you’ll want to wet the back of the measuring cup first) to level the top of the granola and make sure it’s packed tight in the baking dish.
- Freeze the granola bars for 30 minutes. Remove the granola bars from the freezer and cut into even bars. Place the bars in a freezer-safe container or bag. Freeze the granola bars until you’re ready to enjoy. I like to pull a granola bar from the freezer, and let it warm up at room temperature for about 1 minute before enjoying.
Healthy Yogurt Bowl

Looking for a convenient breakfast that’s also healthy? Healthy yogurt bowls are an easy, quick, and nutrient-dense breakfast, lunch, or mid-day snack. Use this recipe guide to mix and match toppings, sweeteners, and create your own yogurt bowls.
- Prep: 5 mins
- Total: 5 mins
- Servings: 1
INGREDIENTS
Yogurt Bowl Base:
- 3/4 cup plain yogurt whole milk, Greek, or plant-based of choice
- 1-2 scoops protein powder I love this brand
- 1-2 scoops collagen powder I love this brand
- 1/4-1/2 teaspoon pure vanilla extract
- 1/4 teaspoon ground cinnamon
Sweetener:
- 1/2 Tablespoon maple syrup or honey
Fruit Toppings:
- 1/2 cup berries fresh or frozen: strawberries, blueberries, blackberries, or raspberries
- 1/2 cup mango chunks fresh or frozen
- 1/2 cup pineapple chunks fresh or frozen
- 1/2 cup pitted cherries fresh or frozen
- 1/2 cup peach slices fresh or frozen
- 1/2 cup citrus slices orange or grapefruit
- 1 kiwi sliced
- 1/2-1 banana sliced
Crunch and Extras:
- 1/4 cup granola
- 1/4 cup nuts cashews, almonds, or macadamia (chopped or whole)
- 1/8-1/4 cup seeds sunflower or pumpkin seeds
- 1-2 Tablespoons nut or seed butter such as: almond butter, peanut butter, cashew butter, or sunflower butter
- 1-2 Tablespoons coconut flakes or shredded coconut
- 1-2 Tablespoons cacao nibs
- 1 teaspoon chia seeds
INSTRUCTIONS
- Add 3/4 cup of plain yogurt to a bowl (or mason jar if prepping in advance for an easy grab-and-go breakfast).
- Stir in any sweetener (honey or maple syrup), protein powder or collagen powder, or flavoring (cinnamon, vanilla extract) into the yogurt. Alternatively, you can drizzle any sweetener or flavoring (except vanilla, which is best stirred into yogurt) over the yogurt and toppings.
- Top the yogurt with desired toppings: fruit (one fruit or a mix of different fruits totaling 1/2 cup), nut butter, granola, cacao nibs, etc. If you’re making the yogurt bowls in advance (to enjoy later), add the toppings to a separate container, then add before enjoying the yogurt bowl.
- Enjoy the yogurt bowl immediately, or place a lid on the mason jar and store the make-ahead yogurt bowl in the fridge and enjoy within 2 days.
Banana-Oat Breakfast and Snack Cookies

Oat-based breakfast and snack cookies that taste like homemade banana bread with chocolate and nuts. Use certified gluten-free oats for gluten-free cookies.
- Prep: 15 mins
- Total: 17 mins
- Servings: 10 cookies
INGREDIENTS
- 2 TB ground flax *
- 5 TB warm water
- 2 medium ripe bananas 230g; scant 1 cup
- 1/2 cup nut butter ** 140g
- 2 TB pure maple syrup
- 1 tsp pure vanilla extract
- 1 tsp cinnamon
- 1/2 tsp salt
- 1/2 tsp baking powder
- 2 cups old-fashioned rolled oats 195g
- 1/2 cup mini chocolate chips such as: Enjoy Life brand***
- 2 TB chopped nuts such as: walnuts, almonds, or pecans (optional)
INSTRUCTIONS
- Preheat the oven to 350F and line a sheet pan with parchment paper.
- Optional: I like to spread the rolled oats on the parchment-lined sheet pan, and then toast the oats while the flax egg (next step) sets. This step helps to enhance the flavor of the oats. Toast the oats for 8-10 minutes, until fragrant. Then remove the oats from the oven and proceed on with the following steps.
- Combine the ground flax and warm water in a medium mixing bowl. Set aside for 5 minutes to gel.
- Mash the banana in the bowl with the flax. Stir in the remaining wet ingredients: nut butter, maple syrup, and vanilla extract.
- Add the dry ingredients and mix.
- Stir in the chocolate chips and nuts, if using.
- Scoop out the batter using a ¼ cup measure cup (I used an ice cream scooper). The cookies do not spread, so they can be close together on the sheet. Press the cookies down with your fingers or the back of the measuring cup, once on the pan, so they resemble a thick cookie.
- Bake the cookies for 17-20 minutes. The cookies should feel “set” in the middle when gently pressed, and lightly brown around the edges.
- Cool the cookies on the sheet pan for 5 minutes. Then remove the cookies to a rack to cool the rest of the way.
- The cookies are best eaten within 3 days, or store them in the fridge in an air-tight container for up to a week. They also freeze well, and should keep for a couple of months.
10-Minute No-Bake Snack Bites
These great snack bites blend up and roll up in less than 10 minutes! No cooking, No baking! Better yet – get the kids in on making these easy snack bites.
- Prep: 10 mins
- Total: 10 mins
- Servings: 12 bites
INGREDIENTS
- 1 cup nuts or seeds (Whatever you have in your pantry! These were made with crispy walnuts. Pecans, almonds, or, if you are nut free, sunflower seeds all work! I like to soak/dehydrate my nuts and seeds using this method to reduce the phytates and make the nutrients more available for digestion.)
- 1 cup medjool dates pitted
- 1/2 cup dried cranberries or another 1/2dates
- 1-2 TB shredded unsweetened coconut optional
INSTRUCTIONS
- Put everything into your food processor and blend to combine. You can grind the nuts completely before adding the remaining ingredients if you don’t want pieces of nuts showing in the bites – some kids might not like those bits!
- Press the mixture together and roll the bites into the desired size. If you want coconut on the outside, roll the bites in the coconut shreds.
- Store the bites in the fridge to stay fresh – or you can freeze them to last longer. They make a great pull-out lunchbox addition!
Sweet and Salty Do-It-Yourself Trail Mix

If your pantry is always stocked with a fair amount of raw nuts and seeds, then my homemade trail mix is relatively inexpensive to make and doesn’t require any extra shopping trips to gather ingredients.
- Prep: 10 mins
- Cook: 15 mins
- Servings: 3 cups
INGREDIENTS
- 1/2 cup raw and unsalted almonds
- 1/2 cup raw and unsalted cashews
- 1/2 cup raw and unsalted pumpkin seeds shelled
- 1/2 cup coconut flakes not shredded coconut
- 2 tsp ghee melted
- 2 TB pure maple syrup
- 1/4 tsp salt or to taste
- 1/2 cup raisins
- 1/2 cup chocolate chips or SunDrops (naturally-dyed chocolate candies)
INSTRUCTIONS
- Preheat the oven to 350F.
- Line a rimmed baking sheet with parchment paper. Add the nuts, seeds, and coconut to the parchment-lined baking sheet. Pour the melted ghee (you may also be able to use an oil, like avocado oil) and maple syrup over the nuts, pumpkin, and coconut. Mix the ingredients together. Sprinkle with the salt, and mix again. If you’d like to add more salt, you can do this after the trail mix roasts.
- Roast the trail mix in the oven for about 15-17 minutes, stirring half-way through to prevent the ingredients from burning. Make sure you keep an eye on your trail mix since baking times may vary, depending on your oven and the baking sheet. Once the nuts, pumpkin seeds, and coconut are golden, they’re done! Remove the baking sheet from the oven, and allow the trail mix to cool on the sheet. Once fully cool, add the raisins and chocolate. Store the trail mix in an air-tight container at room temperature.
- The trail mix only lasts a few weeks in our home, but I’m sure it could last longer than that. If you’re concerned about the trail mix going bad (all the ingredients are shelf-stable, but it can go stale), then I recommend freezing it without the chocolate candies, until you’re ready to enjoy!
Homemade Ranch Dip
The dressing, or dip, is made with the simplest of ingredients: sour cream, kefir (a cultured, probiotic dairy food-good for the gut), fresh lemon juice, seasonings. It takes only five minutes to whisk the ingredients together and make what we think is the best ranch dressing.
- Prep: 15 mins
- Servings: 1 cup
INGREDIENTS
- 3/4 cup sour cream
- 1/4 cup plain kefir or filmjolk, similar to kefir (Siggi’s brand), or whole milk
- 1/2 lemon juiced, or 1 lemon juiced (based on taste preference)
- 1 tsp dried parsley
- 1/2 tsp garlic powder
- 1/4 tsp onion powder
- 1/2 tsp salt to taste
- 1/4 tsp black pepper
INSTRUCTIONS
- Add the ingredients to a medium-size bowl. Whisk to combine.
- Serve immediately, or pour the dressing into a storage container with a lid and store in the fridge for up to a week. Use as a dressing or dip.